The input of our verifier consists of three parts:
-
Model file: which can be a Pytorch model or an ONNX model. If a Pytorch model is used, you also need to provide the verifier with the Pytorch definition of the model since Pytorch checkpoints does not contain model structure information. If an ONNX model is used, you only need to provide the ONNX file as the input. In general, using Pytorch models as inputs is recommended.
-
Data loader: our verifier has a few commonly used built-in datasets like MNIST/CIFAR, and you can also provide a fully customized dataloader. In addition, data can also be loaded from a VNNLIB file (as part of the specification).
-
Specifications: α,β-CROWN supports Lp norm input specifications (e.g., L2 and Linf norm perturbations), element-wise input perturbations (similar to Linf norm but each element can have a different range), as well input specifications defined in a VNNLIB file. For output specifications, we support classic robustness specifications as well as any general linear specifications (specified in a VNNLIB file).
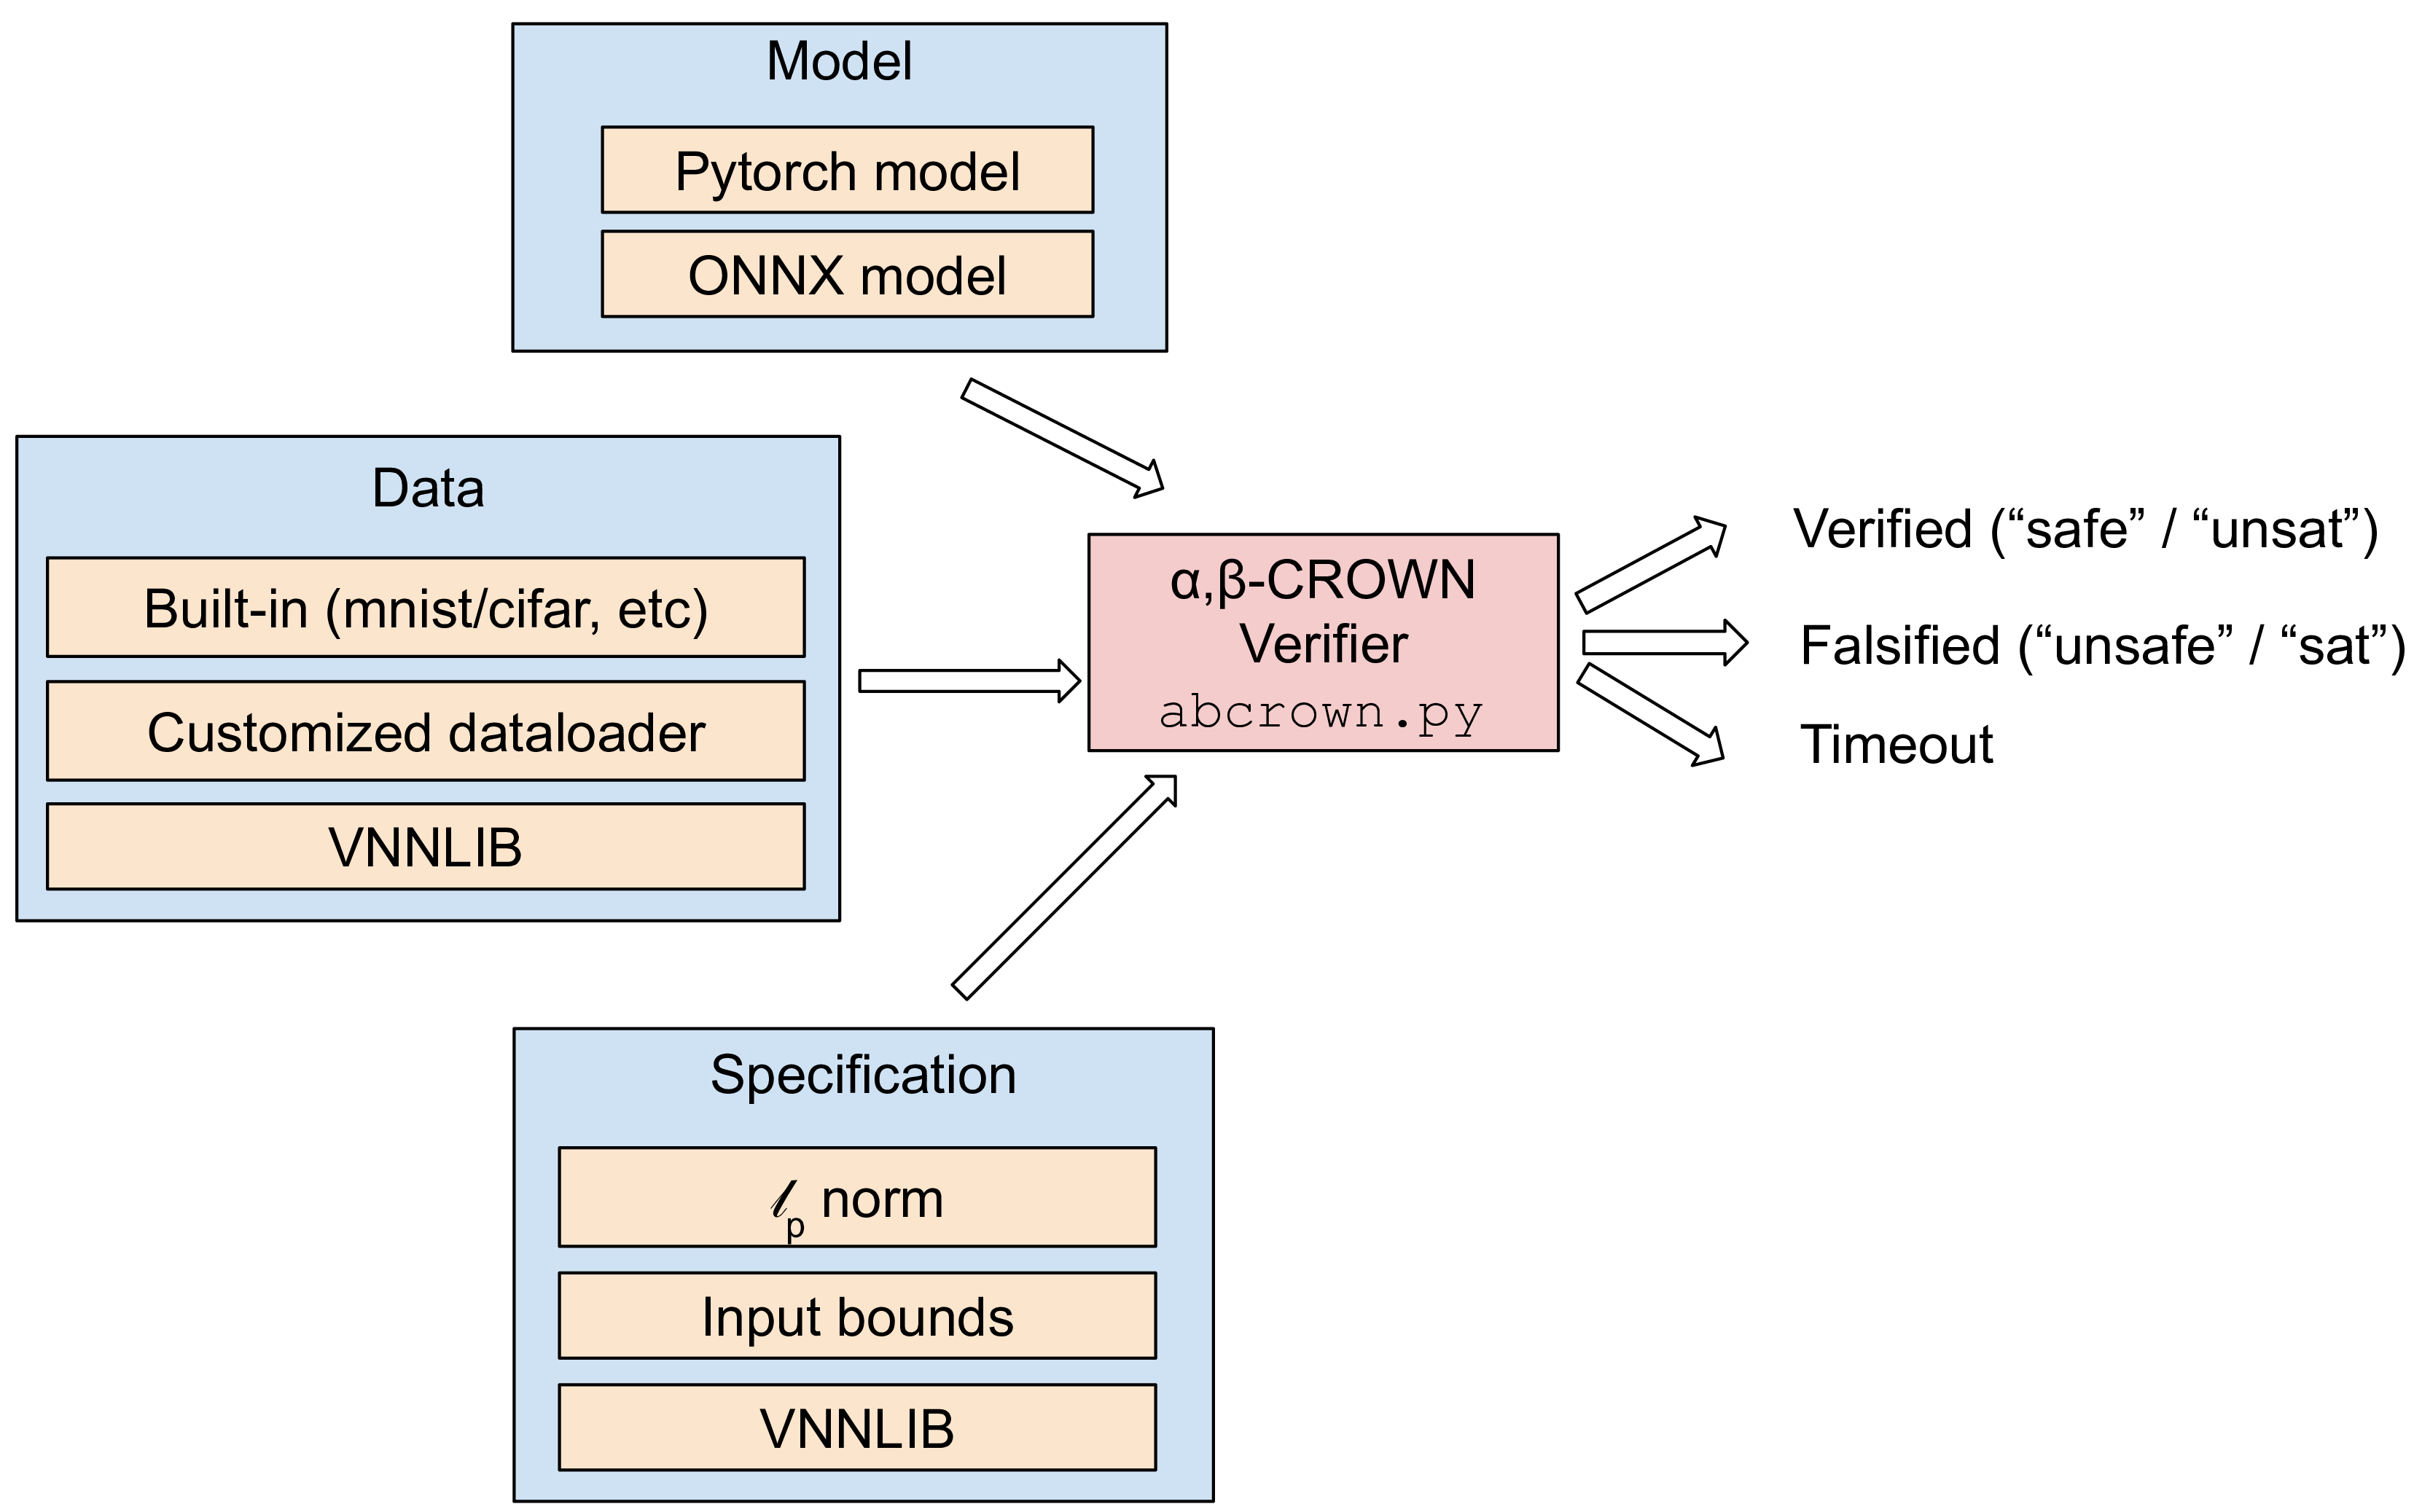
The output of the verifier can be "verified" (the specification is guaranteed to hold, sometimes referred to as "safe" or "unsat"), "falsified" (a counterexample is found, sometimes referred as "unsafe" or "sat" or "attack success"), or timeout. Using a longer timeout can usually verify or falsify more problem instances, however since NN verification is a NP-complete problem in general, there are always hard instances that may not be verified nor falsified given a limited timeout threshold.
The inputs of α,β-CROWN and all parameters are set in a .yaml configuration file. The basic syntax to run the verifier is:
python abcrown.py --config XXX.yamlWe document all configuration options in this file
and we provide a wide range of examples of configurations in the exp_configs
folder. We provide more detailed instructions in the next sections.
α,β-CROWN verifier includes a wide range of algorithms, especially bound-propagation-based algorithms. We prefer ReLU branching in most cases, but input space branching works better when the input dimension is very low (e.g., < 20).
If your model is a CNN/ResNet and task is image classification, using beta-CROWN with ReLU branching is the best option. Relatively large models such as a 20-layer ResNet can be supported. Example configuration files include:
- CIFAR100 ResNet (VNN-COMP 2022): 11-layer, 19-layer, 19-layer (wide), 21-layer
- TinyImageNet (VNN-COMP 2022): 19-layer
- CIFAR10 ResNets (VNN-COMP 2021): 4-block, 2-block
If your model has low input dimension on the perturbed variables (e.g., tasks in control, RL), branching the input space is often the best solution. Example configuration files include:
- ACASXu (open-loop controller):
acasxuin VNN-COMP 2021 - Reinforcement learning:
cartpolein VNN-COMP 2022,dubins-rejoin,lunarlander - NN in computer systems: learned database index, query cardinality prediction
- Low dimensional bias-field perturbation on CIFAR-10: CIFAR-10 biasfield
If your model is relatively small (a few layers of CNN/MLP) and ReLU branching is used, you can use GCP-CROWN to get potentially better results than beta-CROWN:
- CIFAR10 CNN models (from SDP-FO): CNN-B-Adv, CNN-A-Mix
- MNIST CNN models: MNIST-A-Adv
oval21benchmarks (VNN-COMP 2021): oval21oval20benchmarks (VNN-COMP 2020): base, wide, deep
For very small models (e.g., < 1000 neurons), a MIP solver may be useful especially when combined with strong intermediate layer bounds from alpha-CROWN. A MIP solver can be used to tighten intermediate layer bounds or compute the final bounds directly. Examples of using MIP solver including:
- Tiny MNIST fully connected networks:
mnistfcbenchmark (2-layer) in VNN-COMP 2022 - Small MNIST fully connected networks (MIP solver used for solving intermediate layer bounds only, beta-CROWN for final result):
mnistfcbenchmark in VNN-COMP 2022,eranbenchmark in VNN-COMP 2021
If you aim to find adversarial/counter examples on data points that cannot be verified by any verifier nor attacked by existing attacks (e.g., PGD), you can consider using the BaB-Attack with instructions listed here.
Note that most configuration files were tested on a GPU with 24 GB memory. If you encountered OOM errors, you can reduce batch size in the config files.
We provide a wide range of examples for many combinations of model file/data loader/specifications. To use the verifier for your application, you can find the closest setting and start from there.
python abcrown.py --config exp_configs/tutorial_examples/basic.yamlThe model name (resnet2b) is specified under model: name in this config file.
It is a built-in model defined in model_defs.py. You can simply
add your model also to model_defs.py or using the Customized primitive to load
a model structure from an arbitrary file (see the next example).
The norm (.inf) and the magnitude of perturbation are specified in the
specification section in the config file. In addition, please pay attention
to dataset normalization coefficients under the data section. The built-in
image dataset loaders will also clip unnormalized image pixel values to the
range of 0 to 1.
Pytorch model (using a customized model loader), Linf norm robustness specification, built-in dataset
This is a simple example of defining your own model in your own python source file and load it by the verifier.
python abcrown.py --config exp_configs/tutorial_examples/custom_model.yamlThe config file is the same as the previous example, except that the model: name section is different with a Customized primitive. The setting of
name: Customized("custom_model_data", "simple_conv_model", in_channel=3, out_dim=10) means that the model is defined as simple_conv_model() in
custom/custom_model_data.py. The function simple_conv_model() will be called with
arguments in_channel=3, out_dim=10 to obtain the model definition.
For L2 norm, you can simply modify the specification: norm section in the
config file. In this example we verify the L2 norm robustness for a recently
proposed L2 norm certified defense (Huang et al.).
wget https://download.huan-zhang.com/models/alpha-beta-crown/cifar_l2_4c3f.pth
python abcrown.py --config exp_configs/tutorial_examples/cifar_l2_norm.yamlWe provide an example on customized dataloader, so you can also easily load your own datasets. In this example we just load the CIFAR10 dataset using Pytorch, and you can slightly modify this example to load any dataset supported by Pytorch.
python abcrown.py --config exp_configs/tutorial_examples/custom_cifar_data_example.yamlIn this example, the customized dataloader is a function cifar10() defined in
custom_model_data.py.
It is also fine if your dataloader is completely customized
(non-Pytorch) as long as you return the same type of values. An additional example
is provided to generate synthetic data for a toy ReLU model:
python abcrown.py --config exp_configs/tutorial_examples/custom_box_data_example.yamlElement-wise bounds are similar to Linf norm input perturbations, but you can
specify different ranges for each input dimension. To use this, you need
to change specification: type to bound in configurations as well as returning
the per-element lower and upper bounds in dataloader.
python abcrown.py --config exp_configs/tutorial_examples/custom_cifar_data_element_bound.yamlA VNNLIB file contains both the data and the specification. Data is specified
as per-element ranges and any general linear specifications on the output can
be used (to handle non-linear specifications, you can add them as part of the
network). The format of VNNLIB file is detailed in this
document and many examples can
be found at VNN-COMP 2021
and
2022
repositories.
Four arguments are necessary in this case: model: path is the path to the pytorch model,
model: name is the name of the pytorch model definition which should be found in
complete_verifier/model_defs.py, '--vnnlib_path' is the path to VNNLIB file and
model: input_shape should be provided by user since VNNLIB does not have this information.
The example shows how to verify resnet2b given one VNNLIB:
# To get the ONNX model and VNNLIB config file, first clone the vnncomp2021 repository, put it at the same folder as the alpha-beta-CROWN repo folder.
# git clone https://github.com/stanleybak/vnncomp2021 ../../vnncomp2021
python abcrown.py --config exp_configs/tutorial_examples/pytorch_model_with_one_vnnlib.yamlThe above command only checks the specification in a single VNNLIB file. In many cases, you may have a large number of specifications (e.g., each example in a dataset has a specification) to verify for a single model. To facilitate the verification of this case, you can list all the VNNLIB files in a csv file, one filename per-line, to avoid reloading the model and rerun the verifier each time. The example shows how to verify resnet2b given multiple VNNLIB in a csv file:
# To get the ONNX model and VNNLIB config file, first clone the vnncomp2021 repository, put it at the same folder as the alpha-beta-CROWN repo folder.
# git clone https://github.com/stanleybak/vnncomp2021 ../../vnncomp2021
python abcrown.py --config exp_configs/tutorial_examples/pytorch_model_with_batch_vnnlib.yamlThe following commands show how to verify an ONNX model. For built-in dataset
like CIFAR-10, MNIST etc. with Linf norm perturbation, please provide the path
to ONNX model by model: onnx_path. Other things are exactly same as pytorch
model examples. We provide an example to show how to verify
cifar_deep_kw.onnx model on whole CIFAR-10 dataset with given Linf-norm of
epsilon=2/255:
# To get the ONNX model and VNNLIB config file, first clone the vnncomp2021 repository, put it at the same folder as the alpha-beta-CROWN repo folder.
# git clone https://github.com/stanleybak/vnncomp2021 ../../vnncomp2021
python abcrown.py --config exp_configs/tutorial_examples/onnx_with_built-in_dataset_linf_bound.yamlCompare to Pytorch model with element-wise bounds perturbation and customized
dataloader, the only difference is the model entry in config file. User
should provide the path to ONNX model by model: onnx_path instead of the name
and path of the pytorch model. Here is an example:
# To get the ONNX model and VNNLIB config file, first clone the vnncomp2021 repository, put it at the same folder as the alpha-beta-CROWN repo folder.
# git clone https://github.com/stanleybak/vnncomp2021 ../../vnncomp2021
python abcrown.py --config exp_configs/tutorial_examples/onnx_with_custom_cifar_data_element_bound.yamlThe VNNLIB specification file is given by the specification: vnnlib_path
entry in the config file. The VNNLIB file is from the vnncomp2021
benchmark repository and you should first clone that repository.
The example shows that how to verify one ONNX model with one VNNLIB:
# To get the ONNX model and VNNLIB config file, first clone the vnncomp2021 repository, put it at the same folder as the alpha-beta-CROWN repo folder.
# git clone https://github.com/stanleybak/vnncomp2021 ../../vnncomp2021
python abcrown.py --config exp_configs/tutorial_examples/onnx_with_one_vnnlib.yamlFor ONNX model, we also support multiple VNNLIB specifications to facilitate the verification of multiple specifications. You can list all the VNNLIB files in a csv file, one filename per-line, to avoid reloading the model and rerun the verifier each time. Here is an example:
# To get the ONNX model and VNNLIB config file, first clone the vnncomp2021 repository, put it at the same folder as the alpha-beta-CROWN repo folder.
# git clone https://github.com/stanleybak/vnncomp2021 ../../vnncomp2021
python abcrown.py --config exp_configs/tutorial_examples/onnx_with_batch_vnnlib.yamlThis format is used for evaluating VNN-COMP benchmarks, where a csv file is specified for each benchmark. Each line of the csv file contains three elements: path to a ONNX file, path to a VNNLIB file and a timeout threshold. See this file for an example. The following command will run all instances in a benchmark in batch mode:
# To get the ONNX model and VNNLIB config file, first clone the vnncomp2022_benchmarks repository, put it at the same folder as the alpha-beta-CROWN repo folder.
# git clone https://github.com/ChristopherBrix/vnncomp2022_benchmarks.git ../../vnncomp2022_benchmarks
# pushd ../../vnncomp2022_benchmarks; ./setup.sh; popd
python abcrown.py --config exp_configs/vnncomp22/tinyimagenet_2022.yaml
The general: root_path entry in config file should point to the corresponding
benchmark in a cloned
vnncomp2022_benchmarks
repository, where all models and VNNLIB files are located. After cloning the
benchmark repository, please run ./setup.sh to extract all files and download
large models. For more details on running VNN-COMP 2021 or VNN-COMP 2022 benchmarks,
please refer to our documentation.