If you are unfamiliar with Git, CMake, or VSCode, please read through this guide thoroughly.
This repository is for students that are part of the SAE club at Illinois Tech.
If you are here then that probably means you have joined the club and are interested in programming the microcontrollers that our car uses.
This side of the software sub-team works closely with different electrical sub systems of the car. This includes things like the Motor controllers, Accumulator Management System (AMS), and sensors such as the steering wheel, pedals, and brake pressure.
Another major part of this project communicates with an Android phone app, which is currently being used as a dashboard for the car. If you would like to take a look at the Android app instead, look for the appropriate repository on the Illinois Tech Motorsports organization page on github. The project should be named Dashboard followed by the most recent year.
The main part of this project is written in C++17 and is currently setup to only compile on Windows. Various scripts used by the compilation process are written in python 3.10.
This project is meant to be used with VSCode as all the tasks and formatting is taken care of through local settings. The rest of this document assumes you are using VSCode.
Before continuing, be sure to follow the Software and Setup section of the README.
If you are having trouble with anything here, first double check you read it correctly, and if that doesn't work, try looking it up, and if that don't work, ask someone that you think might know, to help you.
Here are some things that you should do which should help you familiarize yourself with scripts, extensions, and tasks that are often used and to ensure that everything is working.
Although you already should have from the README setup section, make sure you have also cloned the TeensyToolchain repo using git clone, and put it next to this project folder.
To thoroughly follow this guide, ensure you have 1-2 Teensies connected to your pc. They must be the same model, either 3.6, 4.0, or 4.1.
-
When you first open this project in VSCode, it might recommend you to install some extensions, install them. If it does not recommend them look into the
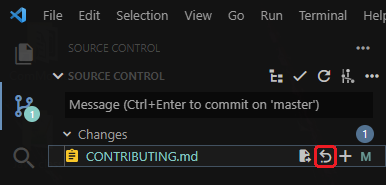
.vscode/extensions.jsonfile and search for each item under therecommendationssection using the extensions tab which is on the left side bar in VSCode.By default, The top left icon in VSCode shows the open editors and files in your workspace. The one below that is source control.
We will not get into how git works, you should learn about that elsewhere. In any case, know that this is where you can commit changes to the repository without using a terminal, meaning, you can upload changes to the online repository or just see what changes you have made in general.
If something like this shows up instead...
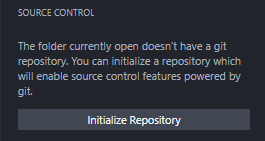
This means you either did not use
git cloneto download this repository or you don't actually have the folder open in VSCode. Just in case, to open a folder, look at the top bar and doFile > Open Folderand open the root folder of this project.On the bottom taskbar in VSCode, towards the far left, there is a similar smaller icon that which should look like
 , this is your current branch.
If you understand git, it may be best that you work on a separate fork and create pull requests as you work on the repository.
If nothing about branches, commits, forks, or whatever does not make sense, that is okay. Just know that, for now, you cannot upload any changes and everything you do will only be saved locally.
One caveat to this, however, is if there is an update to the online repository you need to undo all changes and then run
git pullin the repository folder. Alternatively, click on which is at the bottom left corner.
One additional note, you can click on
to switch to a testing branch, that is, you can switch to the testing version of this repository which should be used for testing. It is most likely the case that you should do this. Click on the icon and then click on testingwhen the popup shows up. -
Run these tasks* in VSCode
VS setup: Setup VSCode configuration files- There is a similar task that should run on startup called
ZZZZ, VSCode might prompt you to allow running tasks on startup, allow it if that happens. If your terminal did not open up and begin prompting you when you initally opened this repository folder, run this task. - When the prompt is asking for the
CORE_MODELchoose what model teensy you have. - When the prompt is asking for a
COMport, if you have your Teensies connected, it should show which ones are available**. Choose which teensy to be the front one and which teensy to be the back one***. - When the prompt is asking for the
LOGGING_OPTIONsimply pressEnterto choose the default option - When the prompt is asking for
GRAPH_ARGset toyesornodepending if you want a plotter to show up when connecting to the teensy.
- There is a similar task that should run on startup called
Build: Compile project- A Terminal should open up running various commands and ending with the statement
Task Succeeded ✔
- A Terminal should open up running various commands and ending with the statement
Clean: Clean up build files- Same result as the
Buildtask
- Same result as the
Shebang Both****: Run all tasks required to program both connected Teensies ( for the prompts when the monitor task is run, selectFRONT_TEENSY_PORT, andMapped)- You should see the terminal printing log information from the front Teensy
-
Open the documentation website
- This will be useful later
* By default, pressing the combo Ctrl + lShift + P then typing and selecting Tasks: Run Task should give you a list of all the tasks listed in the tasks.json file. Alternatively, installing the Tasks extension shows commonly used tasks on the bottom task bar in VSCode, as so.

These tasks are used to help automate development.
** If COM ports are not showing up as available, find what COM port to use by doing the following.
In windows, these COM ports show up in the Device Manager. There should only be one port per Teensy. These ports should look like COMx where x is a number.

If there are no extra ports showing up, i.e. connecting or disconnecting a teensy doesn't change the number of ports, attempt to first program the teensy using teensy.exe or with the Arduino suite. Or ask someone for help.
*** If you only have one teensy, make it the front one and put whatever for the second.
**** If you only have one Teensy, only setup the front one and instead run Shebang Front.
Now that you have taken a look at what you will be using to program, lets look at how you should program.
As stated before, this project mainly uses C++ and Python.
Both languages can be auto formatted by running the default combo of lShift + lAlt + F, otherwise pressing the combo Ctrl + lShift + P then typing and selecting Format Document should do the same. Note, however, that the style for python is less strict than for C++, the following only concerns when programming in C++.
-
No new lines after an open bracket, this reduces the need for vertical screen space. Also, try reducing used vertical space wherever else you can.
  If (true) { // Wrong ✖

      return;
  }

  If (true) { // Correct ✔
      return;
  }
-
Favor readability. Limit the use of one liners. This also helps when debugging problems.
  // Wrong ✖
  return object.command(otherObj.eval(input / 126f) * 255);

  // Correct ✔
  float fnlEval = otherObj.eval(input / 126f);
  return object.command(fnlEval * 255);
-
X Macros should be defined in a
.deffile within the same library folder. -
Header guards should follow the format
__ECU_X_Y__whereXis the file name andYis the file extension ( as this can be used with.h,.hpp, and.deffiles), the entire string should also be capitalized.
e.g.__ECU_LOGGING_H__
Before committing changes, be sure you have at least auto formatted your file. You should, however, follow these guidelines as you are working on files.
A big idea behind this project is modularity. This means that if we want to program some new functionality it should be in the form of a library/module.
Each library should only focus on doing one thing and doing it well. They should not be hardcoded to fit our specific case, and should be as general as they can be. These libraries/modules are stored in the libraries folder.
This library folder also stores third party libraries, those that we have taken from other repositories. Regardless, they work in the same way.
One caveat, however, is that some of the libraries do break this rule somewhat. For example, some libraries have it hardcoded to behave one way if they are on the front teensy and different otherwise. The file ECUGlobalConfig.h denotes these hardcoded values, in the sense that the libraries are directly dependent on our situation. That situation being that we are currently using two Teensies which behave differently. Solving this issue is possible but has not been done.
The python portion of this project is somewhat neglected. As long as it seemed to work we just left it alone. This is especially true for the Pre_Build.py script. Not much is to be said beyond this, feel free to look into the scripts and improve upon them as you see fit.
If you want to know more about what the scripts do, look at the documentation website or open their file and read the top portion of comments.
Doxygen is a program that is used to help generate documentation for this project. All of it's settings are in the Doxyfile, refer to the Doxygen website for more info.
In regards to the libraries that we have written, all of their headers have been documented using Doxygen. The extension Doxygen Extensions exist for VSCode. Use this extension to help easily create comments.
In short, the way Doxygen works is by reading specifically formatted comments. You can look at examples throughout the project, but we will look at the file State.h.
Note that towards the top there is a multiline comment, this gives Doxygen info about the file itself.
/**
 * @file State.h
 * @author IR
 * @brief State library
 * @version 0.1
 * @date 2020-11-11
 *
 * @copyright Copyright (c) 2022
 * ...
 */
The @ symbol is used to denote what information you are giving, this is more important for functions.
Looking at the notify and getLastState function...
    /**
     * @brief Send a code to the next state
     *
     * @param notify code to send
     */
    void notify(int notify);

    /**
     * @brief Get a pointer of the last state
     * @note If the state machine has just started, this will return a nullptr
     * @return State_t* pointer of last state
     */
    State_t *getLastState();
@brief gives a brief description of the function
@note gives us the option is give an optional extra note
@param Tells us what the first parameter of the function should be
@return Tells us what this function should return
The extension should help with auto generating these symbols, just begin creating a multiline comment above a function and it should generate it for you.
If you wish to remove a part of code from documentation surround the code with the following comments. This is mostly used to omit the actual source files from documentation, as currently only header files are documented with Doxygen.
    // @cond
    int dontDocumentMe[4];

    void dontDocumentThis(void);

    void orThis(void);
    // @endcond
You do not have to do anything beyond this. If you wish, however, you can install Doxygen and compile the website locally. However, this is automatically done on GitHub to generate the website online.
You will need to look through the documentation to get a more detailed description of what all the libraries do, as you should not work on something that you do not understand. This documentation attempts to explain a lot of how these underlying libraries work. Of course, as this project is, hopefully, expanded on, feel free to improve this documentation.
I strongly recommend at least learning how logging works, as logging is used basically throughout this entire project, this is under Classes > Class List > Log_t > Detailed Description. Also, take a look at the Pre_Build.py file under the See also part, this is also a major part of how logging works.
Other commonly used libraries are the Canbus and Pins libs. These deal with communicating over Canbus and interacting the the GPIO pins respectively. Regardless, as you work on this project, hopefully you find this documentation to be helpful.
At this point ( especially if you have access to an Teensy ), attempt to first make some basic changes with the libraries. like use the logging library in the Front::run function and make it print something out, or use the pin library to turn the in-built led on and off. Of course, don't actually commit these changes to the repository.
Actually, you can completely undo changes to a file in the source tab in VSCode before you commit. This is in the source control tab, in case you needed to know that.
You can also look at all of the source files for examples on everything. But just as a quick example for logging.
The statements
    LOG_TAG BruhID = "Bruh";
    Log.w(BruhID, "Moment", 2);
Should print in the terminal ( while monitoring the teensy over serial )
[Bruh] [WARN] Moment 2
One final note is to take a look at the infographics page, here are listed various files that help visualize and document various designs used throughout this repository.
This repository was initially created with the intent that it would be used for multiple years after it's initial creation. Regardless, feel free to not use this repository and start something new. Use a new platform, use a new board, framework, whatever. Creating this repository from scratch taught us a lot as we are, after all, just students. In any case, this repository should work for the following years and its design should make it easy to add new functionality, so long as the teensy allows it.