So you just installed CouchDB, but you're not sure how to set up the right user permissions? Look no further.
When you first install CouchDB, it will be in the "Admin Party" mode, which means everyone is an admin. You'll want to disable this and create at least one admin user, so that random people can't mess with your CouchDB settings:

Below is a list of recipes for common authentication use cases.
- Everybody can read and write everything
- Everybody can read, only some can write (everything)
- Everybody can read, only some can write (some things)
- Some people can read and write everything
- Some people can read (some docs), some people can write (those same docs)
- Everybody has to be logged in to do anything
- Example: a public wiki
Just create a new database; this is the default. It's very dangerous, though, since users can even overwite the history of a document. So you probably don't want it.
- Example: a blog
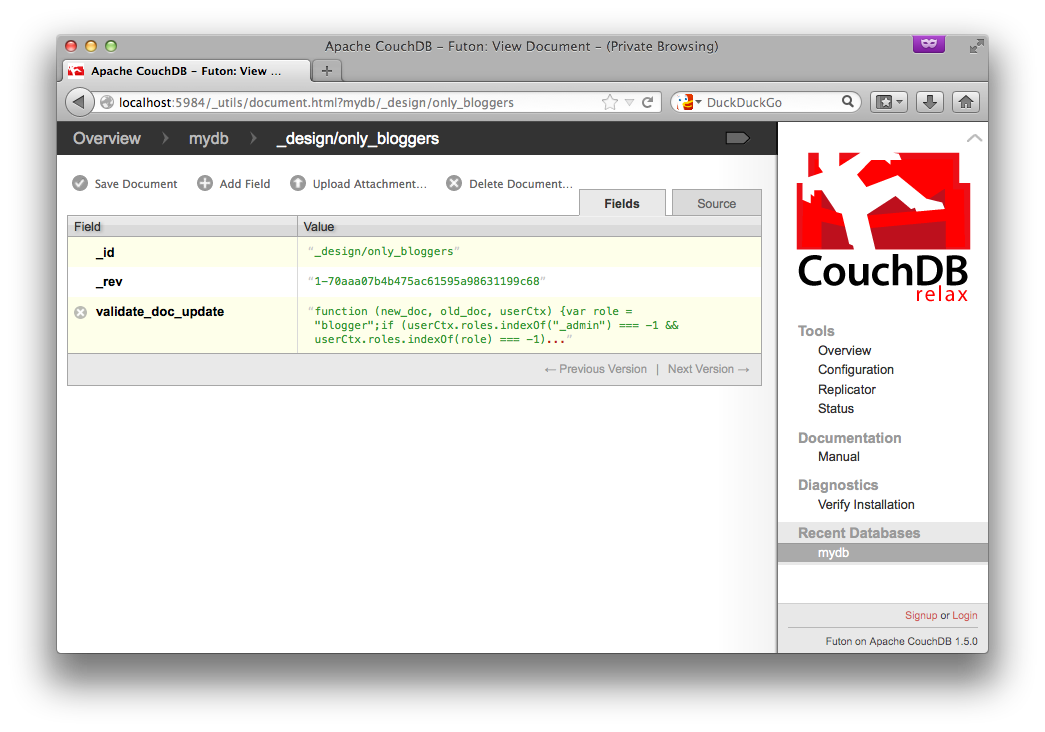
Create a new database, then add a design doc with a validate_doc_update function (see the CouchDB docs for details). This function will be called whenever a document is created, modified, or deleted. In it, we'll check that the user is either an admin or has the 'blogger' role.
The function looks like this:
function(newDoc, oldDoc, userCtx) {
  var role = "blogger";
  if (userCtx.roles.indexOf("_admin") === -1 && userCtx.roles.indexOf(role) === -1) {
    throw({forbidden : "Only users with role " + role + " or an admin can modify this database."});
  }
}
You can create the document like this:
curl -X POST http://admin:password@localhost:5984/mydb \
-H 'content-type:application/json' \
-d $'{"_id":"_design/only_bloggers","validate_doc_update":"function (newDoc, oldDoc, userCtx) {\\nvar role = \\"blogger\\";\\nif (userCtx.roles.indexOf(\\"_admin\\") === -1 && userCtx.roles.indexOf(role) === -1) {\\nthrow({forbidden : \\"Only users with role \\" + role + \\" or an admin can modify this database.\\"});\\n}\\n}"}'
In the above command, you will need to change admin/password (admin and password), localhost:5984 (your Couch URL), mydb (your database), only_bloggers (name of the design doc, can be whatever you want), and blogger (name of the new role).
You can also create the document in the Futon interface itself:

From now on, you can give users the role "blogger", so they can add/modify/remove documents. (Only admins can change someone's roles.)
Admins can also modify documents, but they are the only ones who can change the security settings.
Everyone else will get an error if they try to write (but not if they try to read).
$ curl -X POST http://blogger1:blogger1@localhost:5984/mydb -H 'content-type:application/json' -d '{"some" : "doc"}'
{"ok":true,"id":"ef24bec394e1a45f32ea917121002282","rev":"1-65c2325c1ab76e8279e6c2e3abc1da69"}
$ curl -X POST http://foobar:foobar@localhost:5984/mydb -H 'content-type:application/json' -d '{"some" : "doc"}'
{"error":"forbidden","reason":"Only users with role blogger or an admin can modify this database."}
- Example: Twitter
In this example, all tweets are public, but everybody can only create/edit/delete their own tweets.
Very similar to the above, we'll create a design doc with a validate_doc_update function, but this time we'll also ensure that every document contains a user field, and that the user field matches the name of the user who's modifying it:
function(newDoc, oldDoc, userCtx) {
  if (userCtx.roles.indexOf('_admin') === -1 && newDoc.user !== userCtx.name) {
    throw({forbidden : "doc.user must be the same as your username."});
  }
}
Here's a curl command you can use:
curl -X POST http://admin:password@localhost:5984/mydb \
-H 'content-type:application/json' \
-d $'{"_id":"_design/only_correct_user","validate_doc_update":"function (newDoc, oldDoc, userCtx) {\\nif (userCtx.roles.indexOf(\'_admin\') === -1 && newDoc.user !== userCtx.name) {\\nthrow({forbidden : \\"doc.user must be the same as your username.\\"});\\n}\\n}"}'
In the above command, you will need to change admin/password (admin and password), localhost:5984 (your Couch URL), mydb (your database), and only_correct_user (name of the design doc, can be whatever you want).
You can also use the Futon UI to do this. See the "blogger" example above for details.
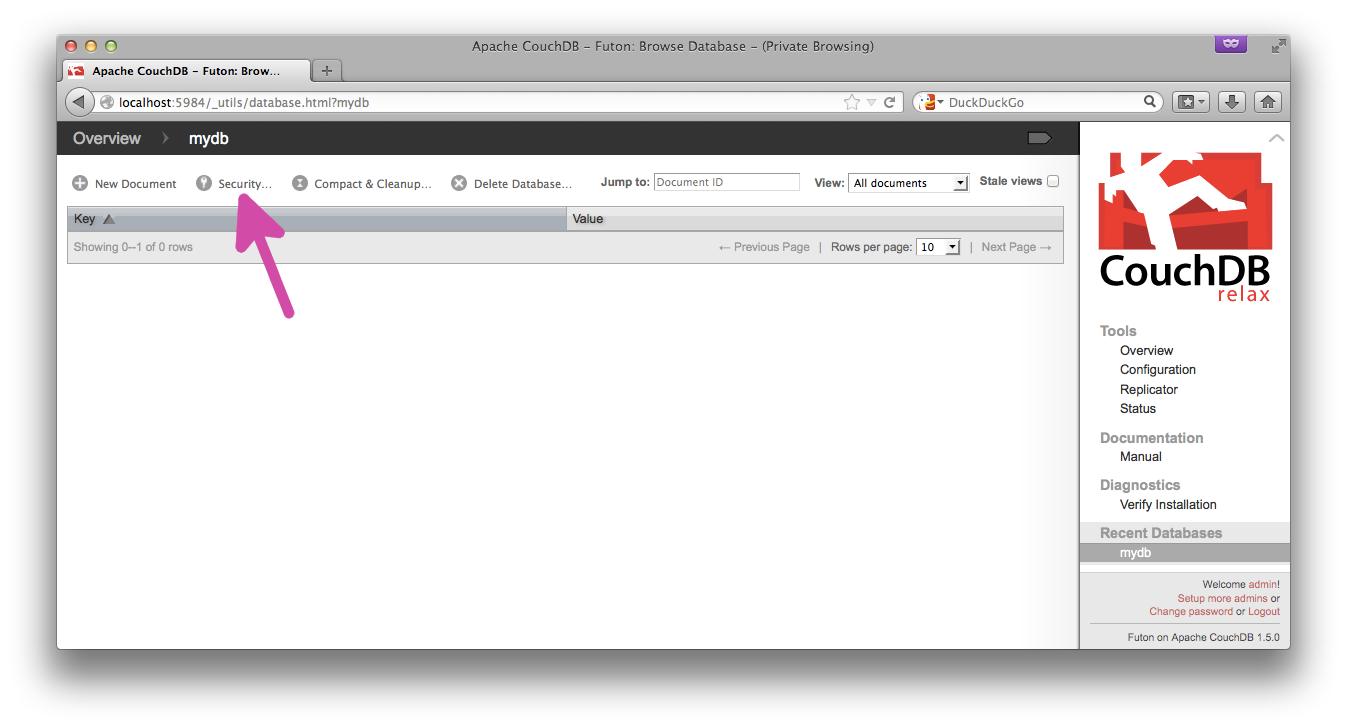
- Example: a shared company wiki
Create a new database, then click the "Security" button:
Set a new role as the read/write role. We'll call this one "employee":
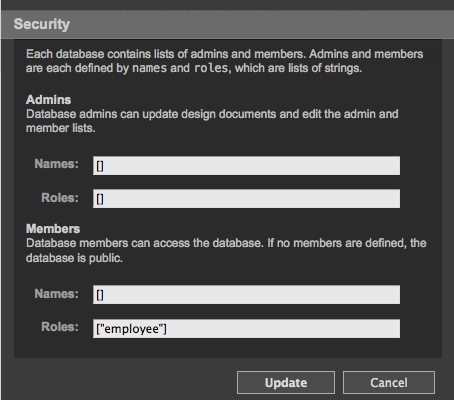
In this scheme, only admins can change the security settings, but any user with the role "employee" can view or add/modify/delete documents. The database is not public; only valid users with the role "employee" can read from it.
See the "blogger" example above for how to set roles.
- Example: A private file locker
The standard practice for this is to set up one database per user. Don't be scared: databases are cheap, and Cloudant says 100k databases per account is not uncommon.
Alternatively, if you have users who belong to multiple groups, and each group has a set of documents, then you should use a one database per role setup, with CouchDB's roles system.
Then, you just need to set the database to be read-only/write-only for people with the correct user name (or correct role), using the db/_security API. (See screenshots above for manual steps.)
There are a few different ways to accomplish this, and unfortunately you can't do it with CouchDB alone (as of this writing). But here are a few different third-party options you can try:
As of CouchDB 2.1, CouchDB supports couch_peruser configuration options.
Native CouchDB Erlang plugin that automatically creates one database per user. The database name is just a hex-encoded hash of the user name, and it completely predictable.
Update! This is now much easier to use, because there are prebuilt Docker images containing the CouchPerUser plugin.
Node.js daemon to do the same as above.
Python process that gives you a URL to use when registering users, and creates a database for that user on registration.
PHP library that provides some sugar over the CouchDB API, e.g. for admin stuff.
Batteries-included no-backend framework. Currently (as of January 2016) being ported to use PouchDB.
PouchBase (deprecated) (formerly pouch.host)
(Work in progress as of January 2015.) Hosted PouchDB Server with per-user read-write access.
- Example: Medical healthcare records
The highest level of security offered by CouchDB. No requests whatsoever are allowed from unauthenticated users.
First, ensure that at least one CouchDB user has been created (if you've disabled admin party, you'll already have at least one admin user). Next, if you're using CORS, ensure the cors.headers array contains authorization (this should already be set if you've followed CouchDB setup). Finally, set httpd.require_valid_user to true.
To prevent browser HTTP basic authentication modal dialogs of ye olde times, we have to be subtle in the way we use PouchDB. To prevent a rogue unauthenticated request to CouchDB (used to check whether the remote DB exists), pass skip_setup: true in Pouch's constructor options. Secondly, to authenticate the request against _session, add the HTTP basic authorization header to db.login()'s AJAX options.
Example usage:
var user = {
  name: 'admin',
  password: 'admin'
};

var pouchOpts = {
  skip_setup: true
};

var ajaxOpts = {
  ajax: {
    headers: {
      Authorization: 'Basic ' + window.btoa(user.name + ':' + user.password)
    }
  }
};

var db = new PouchDB('http://localhost:5984/test', pouchOpts);

db.login(user.name, user.password, ajaxOpts).then(function() {
  return db.allDocs();
}).then(function(docs) {
  console.log(docs);
}).catch(function(error) {
  console.error(error);
});