- NgRx is a framework for building reactive applications in Angular. NgRx provides libraries for:
- Managing global and local state.
- Isolation of side effects to promote a cleaner component architecture.
- Entity collection management.
- Integration with the Angular Router.
- Developer tooling that enhances developer experience when building many different types of applications.
- Store - RxJS powered global state management for Angular apps, inspired by Redux.
- Effects - Side effect model for @ngrx/store.
- Router Store - Bindings to connect the Angular Router to @ngrx/store.
- Entity - Entity State adapter for managing record collections.
- ComponentStore - Standalone library for managing local/component state.
- Data - Extension for simplified entity data management.
- Component - Extension for building reactive Angular templates.
- Store Devtools - Instrumentation for @ngrx/store that enables visual tracking of state and time-travel debugging.
- Schematics - Scaffolding library for Angular applications using NgRx libraries.
- ESLint Plugin - ESLint rules to warn against bad practices. It also contains a few automatic fixes to enforce a consistent style, and to promote best practice.
- NgRx Store provides state management for creating maintainable, explicit applications through the use of single state and actions in order to express state changes. In cases where you don't need a global, application-wide solution to manage state, consider using NgRx ComponentStore which provides a solution for local state management.
-
In particular, you might use NgRx when you build an application with a lot of user interactions and multiple data sources, or when managing state in services are no longer sufficient.
-
A good guideline that might help answer the question, "Do I need NgRx Store?" is the SHARI principle:
-
Shared: state that is accessed by many components and services.
-
Hydrated: state that is persisted and rehydrated from external storage.
-
Available: state that needs to be available when re-entering routes.
-
Retrieved: state that must be retrieved with a side-effect.
-
Impacted: state that is impacted by actions from other sources.
-
-
However, realizing that using NgRx Store comes with some tradeoffs is also crucial. It is not meant to be the shortest or quickest way to write code. It also encourages the usage of many files.
-
It's also important to consider the patterns implemented with NgRx Store. A solid understanding of RxJS and Redux will be very beneficial before learning to use NgRx Store and the other state management libraries.
- Type safety is promoted throughout the architecture with reliance on the TypeScript compiler for program correctness. In addition to this, NgRx's strictness of type safety and the use of patterns lends itself well to the creation of higher quality code.
- Store is built on a single, immutable data structure which makes change detection a relatively straightforward task using the OnPush strategy. NgRx Store also provides APIs for creating memoized selector functions that optimize retrieving data from your state.
- Using NgRx Effects and Store, any interaction with external resources side effects such as network requests or web sockets, as well as any business logic, can be isolated from the UI. This isolation allows for more pure and simple components and upholds the single responsibility principle.
-
By normalizing state changes and passing them through observables, NgRx provides serializability and ensures the state is predictably stored. This allows the state to be saved to external storage such as localStorage.
-
This also allows the inspection, download, upload, and the dispatch of actions all from the Store Devtools.
- Because Store uses pure functions for changing and selecting data from state, as well as the ability to isolate side effects from the UI, testing becomes very straightforward. NgRx also provides test resources such as provideMockStore and provideMockActions for isolated tests and an overall better test experience.
- Store is RxJS powered global state management for Angular applications, inspired by Redux. Store is a controlled state container designed to help write performant, consistent applications on top of Angular.
- Actions describe unique events that are dispatched from components and services.
- State changes are handled by pure functions called reducers that take the current state and the latest action to compute a new state.
- Selectors are pure functions used to select, derive and compose pieces of state.
- State is accessed with the Store, an observable of state and an observer of actions.
- NgRx Store is mainly for managing global state across an entire application. In cases where you need to manage temporary or local component state, consider using
NgRx ComponentStore.
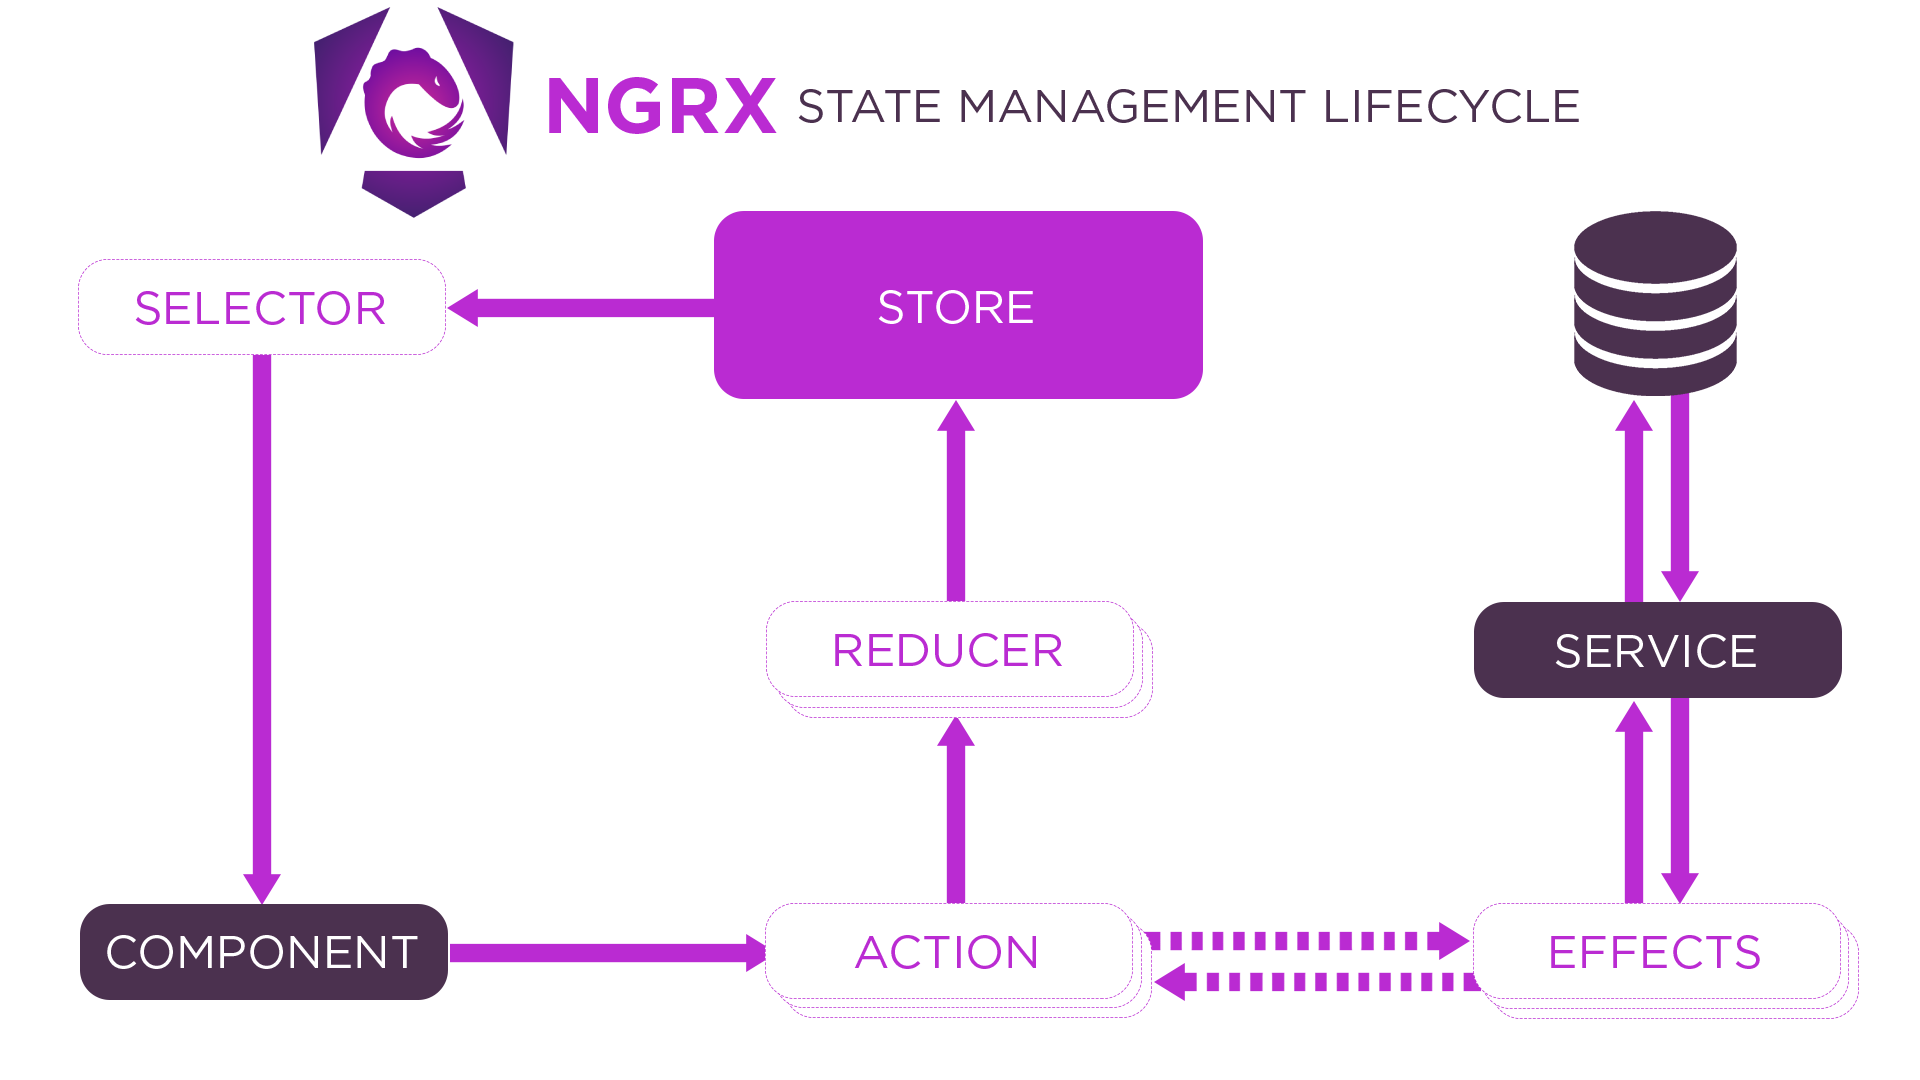
- Note: All
Actionsthat are dispatched within an application state are always first processed by theReducersbefore being handled by theEffectsof the application state.
-
The following tutorial shows you how to manage the state of a counter, and how to select and display it within an Angular component.
- The
StoreModule.forRoot()method registers the global providers needed to access the Store throughout your application.
- The
-
Let's cover what you did:
- Defined actions to express events.
- Defined a reducer function to manage the state of the counter.
- Registered the global state container that is available throughout your application.
- Injected the Store service to dispatch actions and select the current state of the counter.
-
The example more extensively utilizes the key concepts of store to manage the state of book list, and how the user can add a book to and remove it from their collection within an Angular component.
- As you can see, the
selectBookCollectionselector combines two other selectors in order to build its return value. - Note:
- In
BooksComponentclass, we subscribe to the Google Books API in order to update the state. (This should probably be handled by NgRx Effects. For the sake of this demo, NgRx Effects is not being included).
- In
- As you can see, the
-
Let's cover what you did:
- Defined actions to express events.
- Defined two reducer functions to manage different parts of the state.
- Registered the global state container that is available throughout your application.
- Defined the state, as well as selectors that retrieve specific parts of the state.
- Created two distinct components, as well as a service that fetches from the Google Books API.
- Injected the
Storeand Google Books API services to dispatch actions and select the current state.
-
Installing with ng add
ng add @ngrx/store@latest-
This command will automate the following steps:
- Update
package.json> dependencies with@ngrx/store. - Run
npm installto install those dependencies. - Update your
src/app/app.module.ts> imports array withStoreModule.forRoot({}).
- Update
-
Optional ng add flags
- --path
- --project
- --module
- --minimal
- --statePath
- --stateInterface
ng add @ngrx/store@latest --no-minimal-
This command will automate the following steps:
- Update package.json > dependencies with @ngrx/store.
- Run npm install to install those dependencies.
- Create a src/app/reducers folder, unless the
statePathflag is provided, in which case this would be created based on the flag. - Create a src/app/reducers/index.ts file with an empty
Stateinterface, an emptyreducersmap, and an emptymetaReducersarray. This may be created under a different directory if thestatePathflag is provided. - Update your src/app/app.module.ts > imports array with
StoreModule.forRoot(reducers, { metaReducers }). If you provided flags then the command will attempt to locate and update module found by the flags.
-
-
Installing with npm
npm install @ngrx/store --save -
Installing with yarn
yarn add @ngrx/store
-
Actions are one of the main building blocks in NgRx. Actions express unique events that happen throughout your application. From user interaction with the page, external interaction through network requests, and direct interaction with device APIs, these and more events are described with actions.
-
Introduction
- Actions are used in many areas of NgRx. Actions are the inputs and outputs of many systems in NgRx. Actions help you to understand how events are handled in your application.
-
The Action interface
interface Action { type: string; }-
The interface has a single property, the type, represented as a string. The type property is for describing the action that will be dispatched in your application. The value of the type comes in the form of
[Source] Eventand is used to provide a context of what category of action it is, and where an action was dispatched from. You add properties to an action to provide additional context or metadata for an action. -
Listed below are examples of actions written as plain old JavaScript objects (POJOs):
{ type: '[Auth API] Login Success' }- This action describes an event triggered by a successful authentication after interacting with a backend API.
{ type: '[Login Page] Login', username: string; password: string; }- This action describes an event triggered by a user clicking a login button from the login page to attempt to authenticate a user. The username and password are defined as additional metadata provided from the login page.
-
-
Writing actions
-
There are a few rules to writing good actions within your application.
- Upfront - write actions before developing features to understand and gain a shared knowledge of the feature being implemented.
- Divide - categorize actions based on the event source.
- Many - actions are inexpensive to write, so the more actions you write, the better you express flows in your application.
- Event-Driven - capture events not commands as you are separating the description of an event and the handling of that event.
- Descriptive - provide context that are targeted to a unique event with more detailed information you can use to aid in debugging with the developer tools.
-
Let's look at an example action of initiating a login request.
-
login-page.actions.ts
import { createAction, props } from '@ngrx/store'; export const login = createAction( '[Login Page] Login', props<{ username: string; password: string }>() );- The
createActionfunction returns a function, that when called returns an object in the shape of theActioninterface. Thepropsmethod is used to define any additional metadata needed for the handling of the action. Action creators provide a consistent, type-safe way to construct an action that is being dispatched.
- The
-
-
Use the action creator to return the
Actionwhen dispatching.-
login-page.component.ts
onSubmit(username: string, password: string) { store.dispatch(login({ username: username, password: password })); }- The login action creator receives an object of username and password and returns a plain JavaScript object with a type property of [Login Page] Login, with username and password as additional properties.
-
-
The returned action has very specific context about where the action came from and what event happened.
- The category of the action is captured within the square brackets [].
- The category is used to group actions for a particular area, whether it be a component page, backend API, or browser API.
- The
Logintext after the category is a description about what event occurred from this action. In this case, the user clicked a login button from the login page to attempt to authenticate with a username and password.
-
-
Reducers in NgRx are responsible for handling transitions from one state to the next state in your application. Reducer functions handle these transitions by determining which actions to handle based on the action's type.
-
Introduction
- Reducers are pure functions in that they produce the same output for a given input. They are without side effects and handle each state transition synchronously. Each reducer function takes the latest Action dispatched, the current state, and determines whether to return a newly modified state or the original state.
-
The reducer function
-
There are a few consistent parts of every piece of state managed by a reducer.
- An interface or type that defines the shape of the state.
- The arguments including the initial state or current state and the current action.
- The functions that handle state changes for their associated action(s).
-
scoreboard-page.actions.ts
import { createAction, props } from '@ngrx/store'; export const homeScore = createAction('[Scoreboard Page] Home Score'); export const awayScore = createAction('[Scoreboard Page] Away Score'); export const resetScore = createAction('[Scoreboard Page] Score Reset'); export const setScores = createAction('[Scoreboard Page] Set Scores', props<{game: Game}>()); -
Defining the state shape
-
Each reducer function is a listener of actions.
-
scoreboard.reducer.ts
import { Action, createReducer, on } from '@ngrx/store'; import * as ScoreboardPageActions from '../actions/scoreboard-page.actions'; export interface State { home: number; away: number; }- You define the shape of the state according to what you are capturing, whether it be a single type such as a number, or a more complex object with multiple properties.
-
-
Setting the initial state
-
The initial state gives the state an initial value, or provides a value if the current state is undefined. You set the initial state with defaults for your required state properties.
-
scoreboard.reducer.ts
export const initialState: State = {
  home: 0,
  away: 0,
};
-
-
Creating the reducer function
-
The reducer function's responsibility is to handle the state transitions in an immutable way.
-
scoreboard.reducer.ts
export const scoreboardReducer = createReducer( initialState, on(ScoreboardPageActions.homeScore, state => ({ ...state, home: state.home + 1 })), on(ScoreboardPageActions.awayScore, state => ({ ...state, away: state.away + 1 })), on(ScoreboardPageActions.resetScore, state => ({ home: 0, away: 0 })), on(ScoreboardPageActions.setScores, (state, { game }) => ({ home: game.home, away: game.away })) ); -
Each action handles the state transition immutably. This means that the state transitions are not modifying the original state, but are returning a new state object using the spread operator. The spread syntax copies the properties from the current state into the object, creating a new reference. This ensures that a new state is produced with each change, preserving the purity of the change. This also promotes referential integrity, guaranteeing that the old reference was discarded when a state change occurred.
-
Note: The spread operator only does shallow copying and does not handle deeply nested objects. You need to copy each level in the object to ensure immutability. There are libraries that handle deep copying including lodash and immer.
-
When an action is dispatched, all registered reducers receive the action. Whether they handle the action is determined by the on functions that associate one or more actions with a given state change.
-
-
-
Registering root state
-
The state of your application is defined as one large object. Registering reducer functions to manage parts of your state only defines keys with associated values in the object. To register the global Store within your application, use the
StoreModule.forRoot()method with a map of key/value pairs that define your state. TheStoreModule.forRoot()registers the global providers for your application, including the Store service you inject into your components and services to dispatch actions and select pieces of state. -
app.module.ts
import { NgModule } from '@angular/core'; import { StoreModule } from '@ngrx/store'; import { scoreboardReducer } from './reducers/scoreboard.reducer'; @NgModule({ imports: [ StoreModule.forRoot({ game: scoreboardReducer }) ], }) export class AppModule {} -
Registering states with
StoreModule.forRoot()ensures that the states are defined upon application startup. In general, you register root states that always need to be available to all areas of your application immediately.
-
-
Register feature state
-
Feature states behave in the same way root states do, but allow you to define them with specific feature areas in your application. Your state is one large object, and feature states register additional keys and values in that object.
-
Looking at an example state object, you see how a feature state allows your state to be built up incrementally. Let's start with an empty state object.
-
app.module.ts
import { NgModule } from '@angular/core'; import { StoreModule } from '@ngrx/store'; @NgModule({ imports: [ StoreModule.forRoot({}) ], }) export class AppModule {}- This registers your application with an empty object for the root state.
{
}
- This registers your application with an empty object for the root state.
-
Now use the scoreboard reducer with a feature NgModule named
ScoreboardModuleto register additional state.-
scoreboard.reducer.ts
export const scoreboardFeatureKey = 'game'; -
scoreboard.module.ts
import { NgModule } from '@angular/core'; import { StoreModule } from '@ngrx/store'; import { scoreboardFeatureKey, scoreboardReducer } from './reducers/scoreboard.reducer'; @NgModule({ imports: [ StoreModule.forFeature(scoreboardFeatureKey, scoreboardReducer) ], }) export class ScoreboardModule {} -
Note: It is recommended to abstract a feature key string to prevent hardcoding strings when registering feature state and calling
createFeatureSelector. Alternatively, you can use a Feature Creator which automatically generates selectors for your feature state.
-
-
Add the
ScoreboardModuleto theAppModuleto load the state eagerly.-
app.module.ts
import { NgModule } from '@angular/core';
import { StoreModule } from '@ngrx/store';
import { ScoreboardModule } from './scoreboard/scoreboard.module';

@NgModule({
  imports: [
    StoreModule.forRoot({}),
    ScoreboardModule
  ],
})
export class AppModule {}
-
-
Once the
ScoreboardModuleis loaded, thegamekey becomes a property in the object and is now managed in the state.{ game: { home: 0, away: 0 } }
-
-
Whether your feature states are loaded eagerly or lazily depends on the needs of your application. You use feature states to build up your state object over time and through different feature areas.
-
-
Next Steps
-
Reducers are only responsible for deciding which state transitions need to occur for a given action.
-
In an application there is also a need to handle impure actions, e.g. AJAX requests, in NgRx we call them
Effects.
-
-
Selectors are pure functions used for obtaining slices of store state. @ngrx/store provides a few helper functions for optimizing this selection. Selectors provide many features when selecting slices of state:
- Portability
- Memoization
- Composition
- Testability
- Type Safety
-
When using the
createSelectorandcreateFeatureSelectorfunctions @ngrx/store keeps track of the latest arguments in which your selector function was invoked. Because selectors are pure functions, the last result can be returned when the arguments match without reinvoking your selector function. This can provide performance benefits, particularly with selectors that perform expensive computation. This practice is known as memoization. -
Using a selector for one piece of state
-
index.ts
import { createSelector } from '@ngrx/store';

export interface FeatureState {
  counter: number;
}

export interface AppState {
  feature: FeatureState;
}

export const selectFeature = (state: AppState) => state.feature;

export const selectFeatureCount = createSelector(
  selectFeature,
  (state: FeatureState) => state.counter
);
-
-
Using selectors for multiple pieces of state
-
The
createSelectorcan be used to select some data from the state based on several slices of the same state. -
The
createSelectorfunction can take up to 8 selector functions for more complete state selections.-
For example, imagine you have a
selectedUserobject in the state. You also have anallBooksarray of book objects. -
And you want to show all books for the current user.
-
The result will be just some of your state filtered by another section of the state. And it will be always up to date.
-
index.ts
import { createSelector } from '@ngrx/store';

export interface User {
  id: number;
  name: string;
}

export interface Book {
  id: number;
  userId: number;
  name: string;
}

export interface AppState {
  selectedUser: User;
  allBooks: Book[];
}

export const selectUser = (state: AppState) => state.selectedUser;
export const selectAllBooks = (state: AppState) => state.allBooks;

export const selectVisibleBooks = createSelector(
  selectUser,
  selectAllBooks,
  (selectedUser: User, allBooks: Book[]) => {
    if (selectedUser && allBooks) {
      return allBooks.filter((book: Book) => book.userId === selectedUser.id);
    } else {
      return allBooks;
    }
  }
);
-
-
-
-
Using selectors with props
-
Selectors with props are deprecated.
-
To select a piece of state based on data that isn't available in the store you can pass props to the selector function. These props gets passed through every selector and the projector function. To do so we must specify these props when we use the selector inside our component.
-
For example if we have a counter and we want to multiply its value, we can add the multiply factor as a prop:
-
The last argument of a selector or a projector is the props argument, for our example it looks as follows:
- index.ts
export const getCount = createSelector(
  getCounterValue,
  (counter, props) => counter * props.multiply
);
- index.ts
-
Inside the component we can define the props:
- app.component.ts
ngOnInit() {
  this.counter = this.store.select(fromRoot.getCount, { multiply: 2 })
}
- app.component.ts
-
Keep in mind that a selector only keeps the previous input arguments in its cache. If you reuse this selector with another multiply factor, the selector would always have to re-evaluate its value. This is because it's receiving both of the multiply factors (e.g. one time 2, the other time 4). In order to correctly memoize the selector, wrap the selector inside a factory function to create different instances of the selector.
- The following is an example of using multiple counters differentiated by id.
- index.ts
export const getCount = () =>
  createSelector(
    (state, props) => state.counter[props.id],
    (counter, props) => counter * props.multiply
  );
- index.ts
- The component's selectors are now calling the factory function to create different selector instances:
- app.component.ts
ngOnInit() {
  this.counter2 = this.store.select(fromRoot.getCount(), { id: 'counter2', multiply: 2 });
  this.counter4 = this.store.select(fromRoot.getCount(), { id: 'counter4', multiply: 4 });
  this.counter6 = this.store.select(fromRoot.getCount(), { id: 'counter6', multiply: 6 });
}
- app.component.ts
- The following is an example of using multiple counters differentiated by id.
-
-
Selecting Feature States
-
The
createFeatureSelectoris a convenience method for returning a top level feature state. It returns a typed selector function for a feature slice of state. -
index.ts
import { createSelector, createFeatureSelector } from '@ngrx/store'; export const featureKey = 'feature'; export interface FeatureState { counter: number; } export interface AppState { feature: FeatureState; } export const selectFeature = createFeatureSelector<AppState, FeatureState>(featureKey); export const selectFeatureCount = createSelector( selectFeature, (state: FeatureState) => state.counter ); -
The following selector below would not compile because
fooFeatureKey ('foo')is not a feature slice ofAppState.- index.ts
export const selectFeature = createFeatureSelector<AppState, FeatureState>(fooFeatureKey);
- index.ts
-
Using a
Feature Creatorgenerates the top-level selector and child selectors for each feature state property.
-
-
Resetting Memoized Selectors
-
The selector function returned by calling
createSelectororcreateFeatureSelectorinitially has a memoized value ofnull. After a selector is invoked the first time its memoized value is stored in memory. If the selector is subsequently invoked with the same arguments it will return the memoized value. If the selector is then invoked with different arguments it will recompute and update its memoized value. Consider the following: -
example.ts
import { createSelector } from '@ngrx/store'; export interface State { counter1: number; counter2: number; } export const selectCounter1 = (state: State) => state.counter1; export const selectCounter2 = (state: State) => state.counter2; export const selectTotal = createSelector( selectCounter1, selectCounter2, (counter1, counter2) => counter1 + counter2 ); // selectTotal has a memoized value of null, because it has not yet been invoked. let state = { counter1: 3, counter2: 4 }; selectTotal(state); // computes the sum of 3 & 4, returning 7. selectTotal now has a memoized value of 7 selectTotal(state); // does not compute the sum of 3 & 4. selectTotal instead returns the memoized value of 7 state = { ...state, counter2: 5 }; selectTotal(state); // computes the sum of 3 & 5, returning 8. selectTotal now has a memoized value of 8 -
A selector's memoized value stays in memory indefinitely. If the memoized value is, for example, a large dataset that is no longer needed it's possible to reset the memoized value to null so that the large dataset can be removed from memory. This can be accomplished by invoking the
releasemethod on the selector.-
example.ts
selectTotal(state); // returns the memoized value of 8 selectTotal.release(); // memoized value of selectTotal is now null -
Releasing a selector also recursively releases any ancestor selectors. Consider the following:
-
index.ts
export interface State {
  evenNums: number[];
  oddNums: number[];
}

export const selectSumEvenNums = createSelector(
  (state: State) => state.evenNums,
  evenNums => evenNums.reduce((prev, curr) => prev + curr)
);
export const selectSumOddNums = createSelector(
  (state: State) => state.oddNums,
  oddNums => oddNums.reduce((prev, curr) => prev + curr)
);
export const selectTotal = createSelector(
  selectSumEvenNums,
  selectSumOddNums,
  (evenSum, oddSum) => evenSum + oddSum
);

selectTotal({
  evenNums: [2, 4],
  oddNums: [1, 3],
});

/**
* Memoized Values before calling selectTotal.release()
*   selectSumEvenNums  6
*   selectSumOddNums   4
*   selectTotal        10
*/

selectTotal.release();

/**
* Memoized Values after calling selectTotal.release()
*   selectSumEvenNums  null
*   selectSumOddNums   null
*   selectTotal        null
*/
-
-
-
-
Using Store Without Type Generic
-
The most common way to select information from the store is to use a selector function defined with createSelector. TypeScript is able to automatically infer types from createSelector, which reduces the need to provide the shape of the state to Store via a generic argument.
-
So, when injecting Store into components and other injectables, the generic type can be omitted. If injected without the generic, the default generic applied is Store<T = object>.
-
It is important to continue to provide a Store type generic if you are using the string version of selectors as types cannot be inferred automatically in those instances.
-
The follow example demonstrates the use of Store without providing a generic:
-
app.component.ts
export class AppComponent { counter$ = this.store.select(fromCounter.selectCounter); constructor(private readonly store: Store) {} } -
When using strict mode, the select method will expect to be passed a selector whose base selects from an object.
-
-
This is the default behavior of
createFeatureSelectorwhen providing only one generic argument:-
index.ts
import { createSelector, createFeatureSelector } from '@ngrx/store';

export const featureKey = 'feature';

export interface FeatureState {
  counter: number;
}

// selectFeature will have the type MemoizedSelector<object, FeatureState>
export const selectFeature = createFeatureSelector<FeatureState>(featureKey);

// selectFeatureCount will have the type MemoizedSelector<object, number>
export const selectFeatureCount = createSelector(
  selectFeature,
  state => state.counter
);
-
-
-
Advanced Usage
-
Selectors empower you to compose a read model for your application state. In terms of the CQRS architectural pattern, NgRx separates the read model (selectors) from the write model (reducers). An advanced technique is to combine selectors with RxJS pipeable operators.
-
This section covers some basics of how selectors compare to pipeable operators and demonstrates how c
reateSelectorandscanare utilized to display a history of state transitions. -
Breaking Down the Basics
-
Select a non-empty state using pipeable operators
-
Let's pretend we have a selector called selectValues and the component for displaying the data is only interested in defined values, i.e., it should not display empty states.
-
We can achieve this behaviour by using only RxJS pipeable operators:
-
app.component.ts
import { map, filter } from 'rxjs/operators';

store
  .pipe(
    map(state => selectValues(state)),
    filter(val => val !== undefined)
  )
  .subscribe(/* .. */);
-
-
The above can be further rewritten to use the
select()utility function from NgRx:-
app.component.ts
import { select } from '@ngrx/store';
import { map, filter } from 'rxjs/operators';

store
  .pipe(
    select(selectValues),
    filter(val => val !== undefined)
  )
  .subscribe(/* .. */);
-
-
-
Solution: Extracting a pipeable operator
-
To make the
select()andfilter()behaviour a reusable piece of code, we extract a pipeable operator using the RxJSpipe()utility function:-
app.component.ts
import { select } from '@ngrx/store';
import { pipe } from 'rxjs';
import { filter } from 'rxjs/operators';

export const selectFilteredValues = pipe(
  select(selectValues),
  filter(val => val !== undefined)
);

store.pipe(selectFilteredValues).subscribe(/* .. */);
-
-
-
-
Advanced Example: Select the last {n} state transitions
-
In this example, we will write a selector function that projects values from two different slices of the application state. The projected state will emit a value when both slices of state have a value. Otherwise, the selector will emit an
undefinedvalue.-
index.ts
export const selectProjectedValues = createSelector(
  selectFoo,
  selectBar,
  (foo, bar) => {
    if (foo && bar) {
      return { foo, bar };
    }

    return undefined;
  }
);
-
-
Then, the component should visualize the history of state transitions. We are not only interested in the current state but rather like to display the last n pieces of state. Meaning that we will map a stream of state values (1, 2, 3) to an array of state values ([1, 2, 3]).
-
select-last-state-transition.ts
// The number of state transitions is given by the user (subscriber)
export const selectLastStateTransitions = (count: number) => {

  return pipe(
   // Thanks to `createSelector` the operator will have memoization "for free"
   select(selectProjectedValues),
   // Combines the last `count` state values in array
   scan((acc, curr) => {
      return [ curr, ...acc ].filter((val, index) => index < count && val !== undefined)
    }, [] as {foo: number; bar: string}[]) // XX: Explicit type hint for the array.
                                          // Equivalent to what is emitted by the selector
  );
}
-
-
Finally, the component will subscribe to the store, telling the number of state transitions it wishes to display:
- app.component.ts
// Subscribe to the store using the custom pipeable operator
store.pipe(selectLastStateTransitions(3)).subscribe(/* .. */);
- app.component.ts
-
-
-
@ngrx/store composes your map of reducers into a single reducer.
-
Developers can think of meta-reducers as hooks into the action->reducer pipeline. Meta-reducers allow developers to pre-process actions before normal reducers are invoked.
-
Use the
metaReducersconfiguration option to provide an array of meta-reducers that are composed from right to left. -
Note: Meta-reducers in NgRx are similar to middleware used in Redux.
-
Using a meta-reducer to log all actions
-
app.module.ts
import { StoreModule, ActionReducer, MetaReducer } from '@ngrx/store';
import { reducers } from './reducers';

// console.log all actions
export function debug(reducer: ActionReducer<any>): ActionReducer<any> {
  return function(state, action) {
    console.log('state', state);
    console.log('action', action);

    return reducer(state, action);
  };
}

export const metaReducers: MetaReducer<any>[] = [debug];

@NgModule({
  imports: [
    StoreModule.forRoot(reducers, { metaReducers })
  ],
})
export class AppModule {}
-
-
What is an NgRx feature?
- There are three main building blocks of global state management with @ngrx/store: actions, reducers, and selectors. For a particular feature state, we create a reducer for handling state transitions based on the dispatched actions and selectors to obtain slices of the feature state. Also, we need to define a feature name needed to register the feature reducer in the NgRx store. Therefore, we can consider the NgRx feature as a grouping of the feature name, feature reducer, and selectors for the particular feature state.
-
Using feature creator
-
The
createFeaturefunction reduces repetitive code in selector files by generating a feature selector and child selectors for each feature state property. It accepts an object containing a feature name and a feature reducer as the input argument:-
books.reducer.ts
import { createFeature, createReducer } from '@ngrx/store'; import { Book } from './book.model'; import * as BookListPageActions from './book-list-page.actions'; import * as BooksApiActions from './books-api.actions'; interface State { books: Book[]; loading: boolean; } const initialState: State = { books: [], loading: false, }; export const booksFeature = createFeature({ name: 'books', reducer: createReducer( initialState, on(BookListPageActions.enter, (state) => ({ ...state, loading: true, })), on(BooksApiActions.loadBooksSuccess, (state, { books }) => ({ ...state, books, loading: false, })) ), }); export const { name, // feature name reducer, // feature reducer selectBooksState, // feature selector selectBooks, // selector for `books` property selectLoading, // selector for `loading` property } = booksFeature; -
An object created with the
createFeaturefunction contains a feature name, a feature reducer, a feature selector, and a selector for each feature state property. All generated selectors have the "select" prefix, and the feature selector has the "State" suffix. In this example, the name of the feature selector isselectBooksState, where "books" is the feature name. The names of the child selectors areselectBooksandselectLoading, based on the property names of the books feature state.
-
-
The generated selectors can be used independently or to create other selectors:
-
books.selectors.ts
import { createSelector } from '@ngrx/store';
import { booksFeature } from './books.reducer';

export const selectBookListPageViewModel = createSelector(
  booksFeature.selectBooks,
  booksFeature.selectLoading,
  (books, loading) => ({ books, loading })
);
-
-
-
Feature registration
-
Registering the feature reducer in the store can be done by passing the entire feature object to the
StoreModule.forFeaturemethod:-
books.module.ts
import { NgModule } from '@angular/core';
import { StoreModule } from '@ngrx/store';
import { booksFeature } from './books.reducer';

@NgModule({
  imports: [StoreModule.forFeature(booksFeature)],
})
export class BooksModule {}
-
-
-
Restrictions
-
The
createFeaturefunction cannot be used for features whose state contains optional properties. In other words, all state properties have to be passed to the initial state object. -
So, if the state contains optional properties:
-
books.reducer.ts
interface State {
  books: Book[];
  activeBookId?: string;
}

const initialState: State = {
  books: [],
};
-
-
Each optional symbol (?) have to be replaced with
| nullor| undefined:-
books.reducer.ts
interface State {
  books: Book[];
  activeBookId: string | null;
  // or activeBookId: string | undefined;
}

const initialState: State = {
  books: [],
  activeBookId: null,
  // or activeBookId: undefined,
};
-
-
-
Action groups is a feature to group actions together that belong to the same source. While writing actions, the actions in most of the cases looks like below.
-
products-page.actions.ts
import { createAction, props } from '@ngrx/store'; export const opened = createAction('[Products Page] Opened'); export const paginationChanged = createAction( '[Products Page] Pagination Changed', props<{ page: number; offset: number }>() ); export const queryChanged = createAction( '[Products Page] Query Changed', (query: string) => ({ query }) ); -
In the example we can see that the source (
[Products Page]) is duplicated within each action. With the help of thecreateActionGroupAPI this can be avoided. The next example leveragescreateActionGroupto group actions together that belong to the same source. This makes that defining actions is more compact.-
products-page.actions.ts
import { createActionGroup, emptyProps, props } from '@ngrx/store';

export const ProductsPageActions = createActionGroup({
  source: 'Products Page',
  events: {
    // defining an event without payload using the `emptyProps` function
    'Opened': emptyProps(),

    // defining an event with payload using the `props` function
    'Pagination Changed': props<{ page: number; offset: number }>(),

    // defining an event with payload using the props factory
    'Query Changed': (query: string) => ({ query }),
  }
});
-
-
To dispatch an action from the group, import the group and invoke an action. This returns an action that you can then dispatch to the store.
import { ProductsPageActions } from './products-page.actions';

@Component({ /* ... */ })
export class ProductsComponent implements OnInit {
  constructor(private readonly store: Store) {}

ngOnInit(): void {
    // action type: [Products Page] Opened
    this.store.dispatch(ProductsPageActions.opened());
  }

  onPaginationChange(page: number, offset: number): void {
    // action type: [Products Page] Pagination Changed
    this.store.dispatch(ProductsPageActions.paginationChanged({ page, offset }));
  }

  onQueryChange(query: string): void {
    // action type: [Products Page] Query Changed
    this.store.dispatch(ProductsPageActions.queryChanged(query));
  }
}
-
-
Limitations and Restrictions
- An action group uses the event descriptions to create properties within the group that represent the action(s). The property names are auto-generated and are the camelCased version of the event description. For example
Query ChangedbecomesqueryChanged. This has the drawback that not all characters can be used to describe an event because some characters can't be used to create a valid name. For example, any of the following characters are not allowed and result in a compile error / \ | < > [ ] { } ( ) . , ! ? # % ^ & * + - ~ ' ".
- An action group uses the event descriptions to create properties within the group that represent the action(s). The property names are auto-generated and are the camelCased version of the event description. For example
-
Injecting Reducers
-
To inject the root reducers into your application, use an
InjectionTokenand aProviderto register the reducers through dependency injection.-
app.module.ts
import { NgModule, inject, InjectionToken } from '@angular/core';
import { StoreModule, ActionReducerMap } from '@ngrx/store';

import { SomeService } from './some.service';
import * as fromRoot from './reducers';

export const REDUCER_TOKEN = new InjectionToken<ActionReducerMap<fromRoot.State>>('Registered Reducers', {
  factory: () => {
    const serv = inject(SomeService);
    // return reducers synchronously
    return serv.getReducers();
  }
});

@NgModule({
  imports: [StoreModule.forRoot(REDUCER_TOKEN)]
})
export class AppModule {}
-
-
Reducers are also injected when composing state through feature modules.
-
feature.module.ts
import { NgModule, InjectionToken } from '@angular/core';
import { StoreModule, ActionReducerMap } from '@ngrx/store';

import * as fromFeature from './reducers';

export const FEATURE_REDUCER_TOKEN = new InjectionToken<
  ActionReducerMap<fromFeature.State>
>('Feature Reducers');

export function getReducers(): ActionReducerMap<fromFeature.State> {
  // map of reducers
  return {};
}

@NgModule({
  imports: [StoreModule.forFeature(fromFeature.featureKey, FEATURE_REDUCER_TOKEN)],
  providers: [
    {
      provide: FEATURE_REDUCER_TOKEN,
      useFactory: getReducers,
    },
  ],
})
export class FeatureModule {}
-
-
-
Injecting Meta-Reducers
-
To inject 'middleware' meta reducers, use the
META_REDUCERSinjection token exported in the Store API and aProviderto register the meta reducers through dependency injection.-
app.module.ts
import { ActionReducer, MetaReducer, META_REDUCERS } from '@ngrx/store'; import { SomeService } from './some.service'; import * as fromRoot from './reducers'; export function metaReducerFactory(): MetaReducer<fromRoot.State> { return (reducer: ActionReducer<any>) => (state, action) => { console.log('state', state); console.log('action', action); return reducer(state, action); }; } @NgModule({ providers: [ { provide: META_REDUCERS, deps: [SomeService], useFactory: metaReducerFactory, multi: true, }, ], }) export class AppModule {} -
Careful attention should be called to the use of the
multiproperty in the provider here forMETA_REDUCERS. As this injection token may be utilized by many libraries concurrently, specifyingmulti: trueis critical to ensuring that all library meta reducers are applied to any project that consumes multiple NgRx libraries with registered meta reducers.
-
-
-
Injecting Feature Config
-
To inject the feature store configuration into your module, use an
InjectionTokenand aProviderto register the feature config object through dependency injection.-
feature.module.ts
import { NgModule, InjectionToken } from '@angular/core';
import { StoreModule, StoreConfig } from '@ngrx/store';
import { SomeService } from './some.service';

import * as fromFeature from './reducers';

export const FEATURE_CONFIG_TOKEN = new InjectionToken<StoreConfig<fromFeature.State>>('Feature Config');

export function getConfig(someService: SomeService): StoreConfig<fromFeature.State> {
  // return the config synchronously.
  return {
    initialState: someService.getInitialState(),

    metaReducers: [
      fromFeature.loggerFactory(someService.loggerConfig())
    ]
  };
}

@NgModule({
  imports: [StoreModule.forFeature(fromFeature.featureKey, fromFeature.reducers, FEATURE_CONFIG_TOKEN)],
  providers: [
    {
      provide: FEATURE_CONFIG_TOKEN,
      deps: [SomeService],
      useFactory: getConfig,
    },
  ],
})
export class FeatureModule {}
-
-
-
If you are working on an AngularJS to Angular conversion, you can use @ngrx/store to provide global state to your hybrid application.
-
Downgrading Store service
-
If you want to dispatch an action or select some slice of your store state, you will need to downgrade the Store service to use it in the AngularJS parts of your application.
-
app.module.ts
import { Store } from '@ngrx/store';
import { downgradeInjectable } from '@angular/upgrade/static';
import { module as ngModule } from 'angular';
// app
import { MyActionClass } from 'path/to.my/file.action';
import { mySelectorFunction } from 'path/to.my/file.selector';

// Using the `downgradeInjectable` to create the `ngrxStoreService` factory in AngularJS
ngModule('appName').factory('ngrxStoreService', downgradeInjectable(Store));

// AngularJS controller
export default ngModule('appName').controller('AngularJSController', [
  '$scope',
  '$controller',
  'ngrxStoreService',
  function($scope, $controller, ngrxStoreService) {
    // ...
    ngrxStoreService.dispatch(new MyActionClass(myPayload));
    ngrxStoreService.select(mySelectorFunction).subscribe(/*...*/);
    // ...
  },
]);
-
-
-
Runtime checks are here to guide developers to follow the NgRx and Redux core concepts and best practices. They are here to shorten the feedback loop of easy-to-make mistakes when you're starting to use NgRx, or even a well-seasoned developer might make. During development, when a rule is violated, an error is thrown notifying you what and where something went wrong.
-
@ngrx/storeships with six (6) built-in runtime checks:-
Default On:
- strictStateImmutability: verifies that the state isn't mutated.
- strictActionImmutability: verifies that actions aren't mutated
-
Default Off:
- strictStateSerializability: verifies if the state is serializable
- strictActionSerializability: verifies if the actions are serializable
- strictActionWithinNgZone: verifies if actions are dispatched within NgZone
- strictActionTypeUniqueness: verifies if registered action types are unique
-
All checks will automatically be disabled in production builds.
-
-
Configuring runtime checks
-
It's possible to override the default configuration of runtime checks. To do so, use the
runtimeChecksproperty on the root store's config object. For each runtime check you can toggle the check with a boolean,trueto enable the check,falseto disable the check.@NgModule({ imports: [ StoreModule.forRoot(reducers, { runtimeChecks: { strictStateImmutability: true, strictActionImmutability: true, strictStateSerializability: true, strictActionSerializability: true, strictActionWithinNgZone: true, strictActionTypeUniqueness: true, }, }), ], }) export class AppModule {} -
The serializability runtime checks cannot be enabled if you use
@ngrx/router-storewith theFullRouterStateSerializer. The full serializer has an unserializable router state and actions that are not serializable. To use the serializability runtime checks either use theMinimalRouterStateSerializeror implement a custom router state serializer.
-
-
strictStateImmutability
-
The number one rule of NgRx, immutability. This strictStateImmutability check verifies if a developer tries to modify the state object. This check is important to be able to work with the state in a predictable way, it should always be possible to recreate the state.
-
Example violation of the rule:
export const reducer = createReducer(initialState, on(addTodo, (state, { todo }) => ({ // Violation 1: we assign a new value to `todoInput` directly state.todoInput = '', // Violation 2: `push` modifies the array state.todos.push(todo) })) ); -
To fix the above violation, a new reference to the state has to be created:
export const reducer = createReducer(
  initialState,
  on(addTodo, (state, { todo }) => ({
    ...state,
    todoInput: '',
    todos: [...state.todos, todo],
  }))
);
-
-
strictActionImmutability
-
Uses the same check as strictStateImmutability, but for actions. An action should not be modified.
-
Example violation of the rule:
export const reducer = createReducer(initialState, on(addTodo, (state, { todo }) => ({ // Violation, it's not allowed to modify an action todo.id = generateUniqueId(); return { ...state, todos: [...state.todos, todo] } })) ); -
To fix the above violation, the todo's id should be set in the action creator or should be set in an immutable way. That way we can simply append the todo to the current todos:
export const addTodo = createAction(
  '[Todo List] Add Todo',
  (description: string) => ({ id: generateUniqueId(), description })
);
export const reducer = createReducer(
  initialState,
  on(addTodo, (state, { todo }) => ({
    ...state,
    todos: [...state.todos, todo],
  }))
);
-
-
strictStateSerializability
-
This check verifies if the state is serializable. A serializable state is important to be able to persist the current state to be able to rehydrate the state in the future.
-
Example violation of the rule:
export const reducer = createReducer( initialState, on(completeTodo, (state, { id }) => ({ ...state, todos: { ...state.todos, [id]: { ...state.todos[id], // Violation, Date is not serializable completedOn: new Date(), }, }, })) ); -
As a fix of the above violation the
Dateobject must be made serializable:export const reducer = createReducer( initialState, on(completeTodo, (state, { id }) => ({ ...state, todos: { ...state.todos, [id]: { ...state.todos[id], completedOn: new Date().toJSON(), }, }, })) );
-
-
strictActionSerializability
-
The strictActionSerializability check resembles strictStateSerializability but as the name says, it verifies if the action is serializable. An action must be serializable to be replayed, this can be helpful during development while using the Redux DevTools and in production to be able to debug errors.
-
Example violation of the rule:
const createTodo = createAction('[Todo List] Add new todo', todo => ({ todo, // Violation, a function is not serializable logTodo: () => { console.log(todo); }, })); -
The fix for this violation is to not add functions on actions, as a replacement a function can be created:
const createTodo = createAction( '[Todo List] Add new todo', props<{ todo: Todo }>() ); function logTodo(todo: Todo) { console.log(todo); } -
Please note, you may not need to set
strictActionSerializabilityto true unless you are storing/replaying actions using external resources, for examplelocalStorage.
-
-
strictActionWithinNgZone
-
The
strictActionWithinNgZonecheck verifies that Actions are dispatched by asynchronous tasks running withinNgZone. Actions dispatched by tasks, running outside ofNgZone, will not trigger ChangeDetection upon completion and may result in a stale view. -
Example violation of the rule:
// Callback running outside of NgZone function callbackOutsideNgZone() { this.store.dispatch(clearTodos()); } -
To fix ensure actions are running within
NgZone. Identify the event trigger and then verify if the code can be updated to use aNgZoneaware feature. If this is not possible use theNgZone.runmethod to explicitly run the asynchronous task within NgZone.import { NgZone } from '@angular/core'; constructor(private ngZone: NgZone){} // Callback running outside of NgZone brought back in NgZone. function callbackOutsideNgZone(){ this.ngZone.run(() => { this.store.dispatch(clearTodos()); } }
-
-
strictActionTypeUniqueness
-
The strictActionTypeUniqueness guards you against registering the same action type more than once.
-
Example violation of the rule:
export const customerPageLoaded = createAction('[Customers Page] Loaded'); export const customerPageRefreshed = createAction('[Customers Page] Loaded'); -
The fix of the violation is to create unique action types:
export const customerPageLoaded = createAction('[Customers Page] Loaded');
export const customerPageRefreshed = createAction('[Customers Page] Refreshed');
-
-
Using a Mock Store
-
The
provideMockStore()function registers providers that allow you to mock out theStorefor testing functionality that has a dependency onStorewithout setting up reducers. You can write tests validating behaviors corresponding to the specific state snapshot easily. -
Note: All dispatched actions don't affect the state, but you can see them in the
scannedActions$stream. -
Usage:
-
auth.guard.spec.ts
import { TestBed } from '@angular/core/testing';
import { provideMockStore, MockStore } from '@ngrx/store/testing';
import { cold } from 'jasmine-marbles';

import { AuthGuard } from '../guards/auth.guard';

describe('Auth Guard', () => {
  let guard: AuthGuard;
  let store: MockStore;
  const initialState = { loggedIn: false };

  beforeEach(() => {
    TestBed.configureTestingModule({
      imports: [
        // any modules needed
      ],
      providers: [
        AuthGuard,
        provideMockStore({ initialState }),
        // other providers
      ],
    });

    store = TestBed.inject(MockStore);
    guard = TestBed.inject(AuthGuard);
  });

  it('should return false if the user state is not logged in', () => {
    const expected = cold('(a|)', { a: false });

    expect(guard.canActivate()).toBeObservable(expected);
  });

  it('should return true if the user state is logged in', () => {
    store.setState({ loggedIn: true });

    const expected = cold('(a|)', { a: true });

    expect(guard.canActivate()).toBeObservable(expected);
  });
});
-
-
-
Using Mock Selectors
-
MockStorealso provides the ability to mock individual selectors to return a passed value using theoverrideSelector()method. When the selector is invoked by theselectmethod, the returned value is overridden by the passed value, regardless of the current state in the store. -
overrideSelector()returns aMemoizedSelector. To update the mock selector to return a different value, use theMemoizedSelector'ssetResult() method. Updating a selector's mock value will not cause it to emit automatically. To trigger an emission from all selectors, use theMockStore.refreshState()method after updating the desired selectors. -
overrideSelector()supports mocking theselectmethod (used in RxJS pipe) and the Storeselectinstance method using a string or selector. -
Usage:
-
src/app/state/books.selectors.ts
import { createSelector, createFeatureSelector } from '@ngrx/store'; import { Book } from '../book-list/books.model'; export const selectBooks = createFeatureSelector<ReadonlyArray<Book>>('books'); export const selectCollectionState = createFeatureSelector<ReadonlyArray<string>>('collection'); export const selectBookCollection = createSelector( selectBooks, selectCollectionState, (books, collection) => { return collection.map((id) => books.find((book) => book.id === id)); } ); -
src/app/app.component.spec.ts (Using Mock Selectors)
mockBooksSelector.setResult([ { id: 'firstId', volumeInfo: { title: 'First Title', authors: ['First Author'], }, }, { id: 'secondId', volumeInfo: { title: 'Second Title', authors: ['Second Author'], }, }, ]); mockBookCollectionSelector.setResult([ { id: 'firstId', volumeInfo: { title: 'First Title', authors: ['First Author'], }, }, ]); store.refreshState(); fixture.detectChanges(); expect( fixture.debugElement.queryAll(By.css('.book-list .book-item')).length ).toBe(2); expect( fixture.debugElement.queryAll(By.css('.book-collection .book-item')) .length ).toBe(1); -
In this example based on the walkthrough, we mock the selectBooks selector by using overrideSelector, passing in the selectBooks selector with a default mocked return value of an array of books. Similarly, we mock the selectBookCollection selector and pass the selector together with another array. In the test, we use setResult() to update the mock selectors to return new array values, then we use MockStore.refreshState() to trigger an emission from the selectBooks and selectBookCollection selectors.
-
-
You can reset selectors by calling the MockStore.resetSelectors() method in the afterEach() hook.
-
src/app/app.component.spec.ts (Reset Mock Selector)
describe('AppComponent reset selectors', () => {
  let store: MockStore;

  afterEach(() => {
    store?.resetSelectors();
  });

  it('should return the mocked value', (done: any) => {
    TestBed.configureTestingModule({
      providers: [
        provideMockStore({
          selectors: [
            {
              selector: selectBooks,
              value: [
                {
                  id: 'mockedId',
                  volumeInfo: {
                    title: 'Mocked Title',
                    authors: ['Mocked Author'],
                  },
                },
              ],
            },
          ],
        }),
      ],
    });

    store = TestBed.inject(MockStore);

    store.select(selectBooks).subscribe((mockBooks) => {
      expect(mockBooks).toEqual([
        {
          id: 'mockedId',
          volumeInfo: {
            title: 'Mocked Title',
            authors: ['Mocked Author'],
          },
        },
      ]);
      done();
    });
  });
});
-
-
-
Integration Testing
-
An integration test should verify that the
Storecoherently works together with our components and services that injectStore. An integration test will not mock the store or individual selectors, as unit tests do, but will instead integrate aStoreby usingStoreModule.forRootin yourTestBedconfiguration. Here is part of an integration test for theAppComponentintroduced in the walkthrough.-
src/app/tests/integration.spec.ts (Integrate Store)
TestBed.configureTestingModule({
  declarations: [AppComponent, BookListComponent, BookCollectionComponent],
  imports: [
    HttpClientTestingModule,
    StoreModule.forRoot({
      books: booksReducer,
      collection: collectionReducer,
    }),
  ],
  providers: [GoogleBooksService],
}).compileComponents();

fixture = TestBed.createComponent(AppComponent);
component = fixture.debugElement.componentInstance;

fixture.detectChanges();
-
-
The integration test sets up the dependent
Storeby importing theStoreModule. In this part of the example, we assert that clicking theaddbutton dispatches the corresponding action and is correctly emitted by thecollectionselector.-
src/app/tests/integration.spec.ts (addButton Test)
describe('buttons should work as expected', () => {
  it('should add to collection when add button is clicked and remove from collection when remove button is clicked', () => {
    const addButton = getBookList()[1].query(
      By.css('[data-test=add-button]')
    );

    click(addButton);
    expect(getBookTitle(getCollection()[0])).toBe('Second Title');

    const removeButton = getCollection()[0].query(
      By.css('[data-test=remove-button]')
    );
    click(removeButton);

    expect(getCollection().length).toBe(0);
  });
});

//functions used in the above test
function getCollection() {
  return fixture.debugElement.queryAll(By.css('.book-collection .book-item'));
}

function getBookList() {
  return fixture.debugElement.queryAll(By.css('.book-list .book-item'));
}

function getBookTitle(element) {
  return element.query(By.css('p')).nativeElement.textContent;
}

function click(element) {
  const el: HTMLElement = element.nativeElement;
  el.click();
  fixture.detectChanges();
}
-
-
-
Testing selectors
-
You can use the projector function used by the selector by accessing the
.projectorproperty. The following example tests thebooksselector from the walkthrough.-
src/app/state/books.selectors.spec.ts
import { selectBooks, selectBookCollection } from "./books.selectors";
import { AppState } from "./app.state";

describe("Selectors", () => {
  const initialState: AppState = {
    books: [
      {
        id: "firstId",
        volumeInfo: {
          title: "First Title",
          authors: ["First Author"],
        },
      },
      {
        id: "secondId",
        volumeInfo: {
          title: "Second Title",
          authors: ["Second Author"],
        },
      },
    ],
    collection: ["firstId"],
  };

  it("should select the book list", () => {
    const result = selectBooks.projector(initialState.books);
    expect(result.length).toEqual(2);
    expect(result[1].id).toEqual("secondId");
  });

  it("should select the book collection", () => {
    const result = selectBookCollection.projector(
      initialState.books,
      initialState.collection
    );
    expect(result.length).toEqual(1);
    expect(result[0].id).toEqual("firstId");
  });
});
-
-
-
Testing reducers
-
The following example tests the
booksReducerfrom the walkthrough. In the first test we check that the state returns the same reference when the reducer is not supposed to handle the action (unknown action). The second test checks thatretrievedBookListaction updates the state and returns the new instance of it.-
src/app/state/books.reducer.spec.ts
import * as fromReducer from './books.reducer';
import { retrievedBookList } from './books.actions';
import { Book } from '../book-list/books.model';

describe('BooksReducer', () => {
  describe('unknown action', () => {
    it('should return the default state', () => {
      const { initialState } = fromReducer;
      const action = {
        type: 'Unknown',
      };
      const state = fromReducer.booksReducer(initialState, action);

      expect(state).toBe(initialState);
    });
  });

  describe('retrievedBookList action', () => {
    it('should retrieve all books and update the state in an immutable way', () => {
      const { initialState } = fromReducer;
      const newState: Array<Book> = [
        {
          id: 'firstId',
          volumeInfo: {
            title: 'First Title',
            authors: ['First Author'],
          },
        },
      ];
      const action = retrievedBookList({ Book: newState });
      const state = fromReducer.booksReducer(initialState, action);

      expect(state).toEqual(newState);
      expect(state).not.toBe(initialState);
    });
  });
});
-
-
-
Testing without TestBed
-
The
provideMockStore()function can be also used withInjector.create:-
books.component.spec.ts
import { MockStore, provideMockStore } from '@ngrx/store/testing';
import { Injector } from '@angular/core';

describe('Books Component', () => {
  let store: MockStore;
  const initialState = { books: ['Book 1', 'Book 2', 'Book 3'] };

  beforeEach(() => {
    const injector = Injector.create({
      providers: [
        provideMockStore({ initialState }),
      ],
    });

    store = injector.get(MockStore);
  });
});
-
-
Another option to create the
MockStorewithoutTestBedis by calling thegetMockStore()function:-
books.component.spec.ts
import { MockStore, getMockStore } from '@ngrx/store/testing';

describe('Books Component', () => {
  let store: MockStore;
  const initialState = { books: ['Book 1', 'Book 2', 'Book 3'] };

  beforeEach(() => {
    store = getMockStore({ initialState });
  });
});
-
-
- Effects are an RxJS powered side effect model for
Store. Effects use streams to providenew sourcesof actions to reduce state based on external interactions such as network requests, web socket messages and time-based events.
- In a service-based Angular application, components are responsible for interacting with external resources directly through services. Instead, effects provide a way to interact with those services and isolate them from the components. Effects are where you handle tasks such as fetching data, long-running tasks that produce multiple events, and other external interactions where your components don't need explicit knowledge of these interactions.
- Effects isolate side effects from components, allowing for more pure components that select state and dispatch actions.
- Effects are long-running services that listen to an observable of every action dispatched from the Store.
- Effects filter those actions based on the type of action they are interested in. This is done by using an operator.
- Effects perform tasks, which are synchronous or asynchronous and return a new action.
-
In a service-based application, your components interact with data through many different services that expose data through properties and methods. These services may depend on other services that manage other sets of data. Your components consume these services to perform tasks, giving your components many responsibilities.
-
Imagine that your application manages movies. Here is a component that fetches and displays a list of movies.
-
movies-page.component.ts
@Component({
  template: `
    <li *ngFor="let movie of movies">
      {{ movie.name }}
    </li>
  `
})
export class MoviesPageComponent {
  movies: Movie[];

  constructor(private movieService: MoviesService) {}

  ngOnInit() {
    this.movieService.getAll().subscribe(movies => this.movies = movies);
  }
}
-
-
You also have the corresponding service that handles the fetching of movies.
-
movies.service.ts
@Injectable({
  providedIn: 'root'
})
export class MoviesService {
  constructor (private http: HttpClient) {}

  getAll() {
    return this.http.get('/movies');
  }
}
-
-
The component has multiple responsibilities:
- Managing the state of the movies.
- Using the service to perform a side effect, reaching out to an external API to fetch the movies.
- Changing the state of the movies within the component.
-
Effectswhen used along withStore, decrease the responsibility of the component. In a larger application, this becomes more important because you have multiple sources of data, with multiple services required to fetch those pieces of data, and services potentially relying on other services. -
Effects handle external data and interactions, allowing your services to be less stateful and only perform tasks related to external interactions. Next, refactor the component to put the shared movie data in the
Store. Effects handle the fetching of movie data.-
movies-page.component.ts
@Component({ template: ` <div *ngFor="let movie of movies$ | async"> {{ movie.name }} </div> ` }) export class MoviesPageComponent { movies$: Observable<Movie[]> = this.store.select(state => state.movies); constructor(private store: Store<{ movies: Movie[] }>) {} ngOnInit() { this.store.dispatch({ type: '[Movies Page] Load Movies' }); } } -
The movies are still fetched through the MoviesService, but the component is no longer concerned with how the movies are fetched and loaded. It's only responsible for declaring its intent to load movies and using selectors to access movie list data. Effects are where the asynchronous activity of fetching movies happens. Your component becomes easier to test and less responsible for the data it needs.
-
-
To isolate side-effects from your component, you must create an
Effectsclass to listen for events and perform tasks. -
Effects are injectable service classes with distinct parts:
- An injectable Actions service that provides an observable stream of all actions dispatched after the latest state has been reduced.
- Metadata is attached to the observable streams using the createEffect function. The metadata is used to register the streams that are subscribed to the store. Any action returned from the effect stream is then dispatched back to the Store.
- Actions are filtered using a pipeable ofType operator. The ofType operator takes one or more action types as arguments to filter on which actions to act upon.
- Effects are subscribed to the Store observable.
- Services are injected into effects to interact with external APIs and handle streams.
-
To show how you handle loading movies from the example above, let's look at
MovieEffects.-
movie.effects.ts
import { Injectable } from '@angular/core'; import { Actions, createEffect, ofType } from '@ngrx/effects'; import { EMPTY } from 'rxjs'; import { map, mergeMap, catchError } from 'rxjs/operators'; import { MoviesService } from './movies.service'; @Injectable() export class MovieEffects { loadMovies$ = createEffect(() => this.actions$.pipe( ofType('[Movies Page] Load Movies'), mergeMap(() => this.moviesService.getAll() .pipe( map(movies => ({ type: '[Movies API] Movies Loaded Success', payload: movies })), catchError(() => EMPTY) )) ) ); constructor( private actions$: Actions, private moviesService: MoviesService ) {} } -
The
loadMovies$effect is listening for all dispatched actions through theActionsstream, but is only interested in the[Movies Page] Load Moviesevent using theofTypeoperator. The stream of actions is then flattened and mapped into a new observable using themergeMapoperator. TheMoviesService#getAll()method returns an observable that maps the movies to a new action on success, and currently returns an empty observable if an error occurs. The action is dispatched to theStorewhere it can be handled by reducers when a state change is needed. It's also important to handle errors when dealing with observable streams so that the effects continue running.
-
-
Note: Event streams are not limited to dispatched actions, but can be any observable that produces new actions, such as observables from the Angular Router, observables created from browser events, and other observable streams.
-
Note: You can also write effects using the
@Effect()decorator, which was the previously defined way before effects creators were introduced in NgRx. If you are looking for examples of effect decorators, visit the documentation for versions 7.x and prior.
-
Effects are built on top of observable streams provided by RxJS. Effects are listeners of observable streams that continue until an error or completion occurs. In order for effects to continue running in the event of an error in the observable, or completion of the observable stream, they must be nested within a "flattening" operator, such as
mergeMap,concatMap,exhaustMapand other flattening operators. The example below shows theloadMovies$effect handling errors when fetching movies.-
movie.effects.ts
import { Injectable } from '@angular/core'; import { Actions, createEffect, ofType } from '@ngrx/effects'; import { of } from 'rxjs'; import { map, mergeMap, catchError } from 'rxjs/operators'; import { MoviesService } from './movies.service'; @Injectable() export class MovieEffects { loadMovies$ = createEffect(() => this.actions$.pipe( ofType('[Movies Page] Load Movies'), mergeMap(() => this.moviesService.getAll() .pipe( map(movies => ({ type: '[Movies API] Movies Loaded Success', payload: movies })), catchError(() => of({ type: '[Movies API] Movies Loaded Error' })) ) ) ) ); constructor( private actions$: Actions, private moviesService: MoviesService ) {} } -
The
loadMovies$effect returns a new observable in case an error occurs while fetching movies. The inner observable handles any errors or completions and returns a new observable so that the outer stream does not die. You still use the catchError operator to handle error events, but return an observable of a new action that is dispatched to the Store.
-
-
After you've written your Effects class, you must register it so the effects start running. To register root-level effects, add the
EffectsModule.forRoot()method with an array of your effects to yourAppModule.-
app.module.ts
import { EffectsModule } from '@ngrx/effects'; import { MovieEffects } from './effects/movie.effects'; @NgModule({ imports: [ EffectsModule.forRoot([MovieEffects]) ], }) export class AppModule {} -
The
EffectsModule.forRoot()method must be added to yourAppModuleimports even if you don't register any root-level effects. -
Effects start running immediately after the
AppModuleis loaded to ensure they are listening for all relevant actions as soon as possible.
-
-
For feature modules, register your effects by adding the
EffectsModule.forFeature()method in theimportsarray of yourNgModule.-
admin.module.ts
import { EffectsModule } from '@ngrx/effects'; import { MovieEffects } from './effects/movie.effects'; @NgModule({ imports: [ EffectsModule.forFeature([MovieEffects]) ], }) export class MovieModule {} -
Note: Running an effects class multiple times, either by
forRoot()orforFeature(), (for example via different lazy loaded modules) will not cause Effects to run multiple times. There is no functional difference between effects loaded byforRoot()andforFeature(); the important difference between the functions is thatforRoot()sets up the providers required for effects.
-
-
You can provide root-/feature-level effects with the provider
USER_PROVIDED_EFFECTS.-
movies.module.ts
providers: [ MovieEffects, { provide: USER_PROVIDED_EFFECTS, multi: true, useValue: [MovieEffects], }, ] -
The
EffectsModule.forFeature()method must be added to the moduleimportseven if you only provide effects over token, and don't pass them via parameters. (Same goes forEffectsModule.forRoot())
-
-
If additional metadata is needed to perform an effect besides the initiating action's
type, we should rely on passed metadata from an action creator'spropsmethod. -
Let's look at an example of an action initiating a login request using an effect with additional passed metadata:
-
login-page.actions.ts
import { createAction, props } from '@ngrx/store'; import { Credentials } from '../models/user'; export const login = createAction( '[Login Page] Login', props<{ credentials: Credentials }>() ); -
auth.effects.ts
import { Injectable } from '@angular/core'; import { Actions, ofType, createEffect } from '@ngrx/effects'; import { of } from 'rxjs'; import { catchError, exhaustMap, map } from 'rxjs/operators'; import { LoginPageActions, AuthApiActions, } from '../actions'; import { Credentials } from '../models/user'; import { AuthService } from '../services/auth.service'; @Injectable() export class AuthEffects { login$ = createEffect(() => this.actions$.pipe( ofType(LoginPageActions.login), exhaustMap(action => this.authService.login(action.credentials).pipe( map(user => AuthApiActions.loginSuccess({ user })), catchError(error => of(AuthApiActions.loginFailure({ error }))) ) ) ) ); constructor( private actions$: Actions, private authService: AuthService ) {} } -
The
loginaction has additionalcredentialsmetadata which is passed to a service to log the specific user into the application.
-
-
However, there may be cases when the required metadata is only accessible from state. When state is needed, the RxJS
withLatestFromor the @ngrx/effectsconcatLatestFromoperators can be used to provide it. -
The example below shows the
addBookToCollectionSuccess$effect displaying a different alert depending on the number of books in the collection state.-
collection.effects.ts
import { Injectable } from '@angular/core'; import { Store } from '@ngrx/store'; import { Actions, ofType, createEffect, concatLatestFrom } from '@ngrx/effects'; import { tap } from 'rxjs/operators'; import { CollectionApiActions } from '../actions'; import * as fromBooks from '../reducers'; @Injectable() export class CollectionEffects { addBookToCollectionSuccess$ = createEffect( () => this.actions$.pipe( ofType(CollectionApiActions.addBookSuccess), concatLatestFrom(action => this.store.select(fromBooks.getCollectionBookIds)), tap(([action, bookCollection]) => { if (bookCollection.length === 1) { window.alert('Congrats on adding your first book!'); } else { window.alert('You have added book number ' + bookCollection.length); } }) ), { dispatch: false } ); constructor( private actions$: Actions, private store: Store<fromBooks.State> ) {} } -
Note: For performance reasons, use a flattening operator like
concatLatestFromto prevent the selector from firing until the correct action is dispatched.
-
-
Because effects are merely consumers of observables, they can be used without actions and the ofType operator. This is useful for effects that don't need to listen to some specific actions, but rather to some other observable source.
-
For example, imagine we want to track click events and send that data to our monitoring server. This can be done by creating an effect that listens to the document click event and emits the event data to our server.
-
user-activity.effects.ts
import { Injectable } from '@angular/core';
import { Observable, fromEvent } from 'rxjs';
import { concatMap } from 'rxjs/operators';
import { createEffect } from '@ngrx/effects';

import { UserActivityService } from '../services/user-activity.service';

@Injectable()
export class UserActivityEffects {
  trackUserActivity$ = createEffect(() =>
    fromEvent(document, 'click').pipe(
      concatMap(event => this.userActivityService.trackUserActivity(event)),
    ), { dispatch: false }
  );

  constructor(
    private userActivityService: UserActivityService,
  ) {}
}
-
-
You can install the Effects to your project with the following
ng addcommandng add @ngrx/effects@latest-
This command will automate the following steps:
- Update package.json > dependencies with @ngrx/effects.
- Run npm install to install those dependencies.
- Update your src/app/app.module.ts >
importsarray withEffectsModule.forRoot([AppEffects]). If you provided flags then the command will attempt to locate and update module found by the flags.
-
npm install @ngrx/effects --save
yarn add @ngrx/effects
-
An Effect subscribes to the
ActionsObservable to perform side effects.provideMockActionsprovides a mock provider of theActionsObservable to subscribe to, for each test individually.-
my.effects.spec.ts
import { provideMockActions } from '@ngrx/effects/testing';

let actions$ = new Observable<Action>();

TestBed.configureTestingModule({
  providers: [provideMockActions(() => actions$)],
});
-
-
Later in the test cases, we assign the
actions$variable to a stream of actions.-
my.effects.spec.ts
// by creating an Observable
actions$ = of({ type: 'Action One' });

// or by using a marble diagram
actions$ = hot('--a-', { a: { type: 'Action One' } });
-
-
For time dependant effects, for example
debounceTime, we must be able override the default RxJS scheduler with theTestSchedulerduring our test. That's why we create the effect as a function with parameters. By doing this we can assign default parameter values for the effect, and override these values later in the test cases. -
This practice also allows us to hide the implementation details of the effect. In the debounceTime test case, we can set the debounce time to a controlled value.
-
my.effects.ts
search$ = createEffect(() => ({ // assign default values debounce = 300, scheduler = asyncScheduler } = {}) => this.actions$.pipe( ofType(BookActions.search), debounceTime(debounce, scheduler), ... ) ); -
my.effects.spec.ts
// override the default values
effects.search$({
  debounce: 30,
  scheduler: getTestScheduler(),
});
-
-
Testing Effects via marble diagrams is particularly useful when the Effect is time sensitive or when the Effect has a lot of behavior.
-
For a detailed look on the marble syntax, see Writing marble tests.
-
The
hot,cold, andtoBeObservablemethods are imported from jasmine-marbles. -
my.effects.spec.ts
// create an actions stream to represent a user that is typing
actions$ = hot('-a-b-', {
  a: { type: '[Customers Page] Search Customers', name: 'J' },
  b: { type: '[Customers Page] Search Customers', name: 'Jes' },
})

// mock the service to prevent an HTTP request to return an array of customers
customersServiceSpy.searchCustomers.and.returnValue(
  cold('--a|', { a: [...] })
);

// expect the first action to debounce and not to dispatch
// expect the second action to result in a SUCCESS action
const expected = hot('-------a', {
  a: {
    type: '[Customers API] Search Customers Success',
    customers: [...],
  },
});

expect(
  effects.searchCustomers$({
    debounce: 20,
    scheduler: getTestScheduler(),
  })
).toBeObservable(expected);
-
-
Instead of using
jasmine-marbles, we can also run tests with the RxJSTestScheduler. -
To use the
TestSchedulerwe first have to instantiate it, this can be done in the test case or within abeforeEachblock.-
my.effects.spec.ts
import { TestScheduler } from 'rxjs/testing';

let testScheduler: TestScheduler;

beforeEach(() => {
  testScheduler = new TestScheduler((actual, expected) => {
    expect(actual).toEqual(expected);
  });
});
-
-
The
TestSchedulerprovides arunmethod which expects a callback, it's here where we write the test for an effect. The callback method provides helper methods to mock Observable streams, and also assertion helper methods to verify the output of a stream.-
my.effects.spec.ts
// more info about the API can be found at https://rxjs.dev/guide/testing/marble-testing#api
testScheduler.run(({ cold, hot, expectObservable }) => {
  // use the `hot` and `cold` helper methods to create the action and service streams
  actions$ = hot('-a', { a : { type: '[Customers Page] Get Customers' }});
  customersServiceSpy.getAllCustomers.and.returnValue(cold('--a|', { a: [...] }));

  // use the `expectObservable` helper method to assert if the output matches the expected output
  expectObservable(effects.getAll$).toBe('---c', {
    c: {
      type: '[Customers API] Get Customers Success',
      customers: [...],
    }
  });
});
-
-
By using the
TestSchedulerwe can also test effects dependent on a scheduler. Instead of creating an effect as a method to override properties in test cases, as shown inEffects with parameters, we can rewrite the test case by using theTestScheduler.-
my.effects.spec.ts
testScheduler.run(({ cold, hot, expectObservable }) => {
  // create an actions stream to represent a user that is typing
  actions$ = hot('-a-b-', {
    a: { type: '[Customers Page] Search Customers', name: 'J' },
    b: { type: '[Customers Page] Search Customers', name: 'Jes' },
  })

  // mock the service to prevent an HTTP request to return an array of customers
  customersServiceSpy.searchCustomers.and.returnValue(
    cold('--a|', { a: [...] })
  );

  // the `300ms` is the set debounce time
  // the `5ms` represents the time for the actions stream and the service to return a value
  expectObservable(effects.searchCustomers).toBe('300ms 5ms c', {
    c: {
      type: '[Customers API] Search Customers Success',
      customers: [...],
    },
  });
});
-
-
To test simple Effects, it might be easier to create an Observable instead of using a marble diagram.
-
my.effects.spec.ts
// create an actions stream and immediately dispatch a GET action
actions$ = of({ type: '[Customers Page] Get Customers' });

// mock the service to prevent an HTTP request
customersServiceSpy.getAllCustomers.and.returnValue(of([...]));

// subscribe to the Effect stream and verify it dispatches a SUCCESS action
effects.getAll$.subscribe(action => {
  expect(action).toEqual({
    type: '[Customers API] Get Customers Success',
    customers: [...],
  });
  done();
});
-
-
As an alternative, it's also possible to use
ReplaySubject.-
my.effects.spec.ts
// create a ReplaySubject
actions$ = new ReplaySubject(1);

// mock the service to prevent an HTTP request
customersServiceSpy.getAllCustomers.and.returnValue(of([...]));

// dispatch the GET action
(actions$ as ReplaySubject).next({ type: '[Customers Page] Get Customers' })

// subscribe to the Effect stream and verify it dispatches a SUCCESS action
effects.getAll$.subscribe(action => {
  expect(action).toEqual({
    type: '[Customers API] Get Customers Success',
    customers: [...],
  });
  done();
});
-
-
Until now, we only saw Effects that dispatch an Action and we verified the dispatched action. With an Effect that does not dispatch an action, we can't verify the Effects stream. What we can do, is verify the side-effect has been called.
-
An example of this is to verify we navigate to the correct page.
-
my.effects.spec.ts
it('should navigate to the customers detail page', () => {
  actions$ = of({ type: '[Customers Page] Customer Selected', name: 'Bob' });

  // create a spy to verify the navigation will be called
  spyOn(router, 'navigateByUrl');

  // subscribe to execute the Effect
  effects.selectCustomer$.subscribe();

  // verify the navigation has been called
  expect(router.navigateByUrl).toHaveBeenCalledWith('customers/bob');
});
-
-
Leverage
MockStoreandMockSelectorsto test Effects that are selecting slices of the state. -
An example of this is to not fetch an entity (customer in this case) when it's already in the store state.
-
my.effects.spec.ts
let actions$: Observable<Action>;

TestBed.configureTestingModule({
  providers: [
    CustomersEffects,
    provideMockActions(() => actions$),
    // mock the Store and the selectors that are used within the Effect
    provideMockStore({
      selectors: [
        {
          selector: selectCustomers,
          value: {
            Bob: { name: 'Bob' },
          },
        },
      ],
    }),
  ],
});

effects = TestBed.inject<CustomersEffects>(CustomersEffects);

it('should not fetch if the user is already in the store', () => {
  actions$ = hot('-a--', {
    a: { type: '[Customers Page] Search Customers', name: 'Bob' },
  });

  // there is no output, because Bob is already in the Store state
  const expected = hot('----');

  expect(effects.getByName$).toBeObservable(expected);
});
-
-
Instead of using the Angular
TestBed, we can instantiate the Effect class.-
my.effects.spec.ts
it('should get customers', () => {
  // instead of using `provideMockActions`,
  // define the actions stream by creating a new `Actions` instance
  const actions = new Actions(
    hot('-a--', {
      a: { type: '[Customers Page] Get Customers' },
    })
  );

  // create the effect
  const effects = new CustomersEffects(actions, customersServiceSpy);

  const expected = hot('-a--', {
    a: {
      type: '[Customers API] Get Customers Success',
      customers: [...],
    }
  });

  // expect remains the same
  expect(effects.getAll$).toBeObservable(expected);
})
-
-
For an Effect with store interaction, use
getMockStoreto create a new instance ofMockStore.-
my.effects.spec.ts
it('should get customers', () => {
  // create the store, and provide selectors.
  const store = getMockStore({
      selectors: [
        { selector: selectCustomers, value: { Bob: { name: 'Bob' } } }
      ]
  });

  // instead of using `provideMockActions`,
  // define the actions stream by creating a new `Actions` instance
  const actions = new Actions(
    hot('-a--', {
      a: { type: '[Search Customers Page] Get Customer', name: 'Bob' },
    })
  );

  // create the effect
  const effects = new CustomersEffects(store as Store, actions, customersServiceSpy);

  // there is no output, because Bob is already in the Store state
  const expected = hot('----');

  expect(effects.getByName$).toBeObservable(expected);
});
-
-
After all the root effects have been added, the root effect dispatches a
ROOT_EFFECTS_INITaction. You can see this action as a lifecycle hook, which you can use in order to execute some code after all your root effects have been added.- init.effects.ts
init$ = createEffect(() =>
  this.actions$.pipe(
    ofType(ROOT_EFFECTS_INIT),
    map(action => ...)
  )
);
- init.effects.ts
-
Sometimes you don't want effects to dispatch an action, for example when you only want to log or navigate based on an incoming action. But when an effect does not dispatch another action, the browser will crash because the effect is both 'subscribing' to and 'dispatching' the exact same action, causing an infinite loop. To prevent this, add
{ dispatch: false }to thecreateEffectfunction as the second argument.-
log.effects.ts
import { Injectable } from '@angular/core';
import { Actions, createEffect } from '@ngrx/effects';
import { tap } from 'rxjs/operators';

@Injectable()
export class LogEffects {
  constructor(private actions$: Actions) {}

  logActions$ = createEffect(() =>
    this.actions$.pipe(
      tap(action => console.log(action))
    ), { dispatch: false });
}
-
-
Starting with version 8, when an error happens in the effect's main stream it is reported using Angular's ErrorHandler, and the source effect is automatically resubscribed to (instead of completing), so it continues to listen to all dispatched Actions. By default, effects are resubscribed up to 10 errors.
-
Generally, errors should be handled by users. However, for the cases where errors were missed, this new behavior adds an additional safety net.
-
In some cases where particular RxJS operators are used, the new behavior might produce unexpected results. For example, if the startWith operator is within the effect's pipe then it will be triggered again.
-
To disable resubscriptions add
{useEffectsErrorHandler: false}to thecreateEffectmetadata (second argument).-
disable-resubscribe.effects.ts
import { Injectable } from '@angular/core';
import { Actions, ofType, createEffect } from '@ngrx/effects';
import { of } from 'rxjs';
import { catchError, exhaustMap, map } from 'rxjs/operators';
import {
  LoginPageActions,
  AuthApiActions,
} from '../actions';
import { AuthService } from '../services/auth.service';

@Injectable()
export class AuthEffects {
  logins$ = createEffect(
    () =>
      this.actions$.pipe(
        ofType(LoginPageActions.login),
        exhaustMap(action =>
          this.authService.login(action.credentials).pipe(
            map(user => AuthApiActions.loginSuccess({ user })),
            catchError(error => of(AuthApiActions.loginFailure({ error })))
          )
        )
        // Errors are handled and it is safe to disable resubscription
      ),
    { useEffectsErrorHandler: false }
  );

  constructor(
    private actions$: Actions,
    private authService: AuthService
  ) {}
}
-
-
The behavior of the default resubscription handler can be customized by providing a custom handler using the
EFFECTS_ERROR_HANDLERinjection token. -
This allows you to provide a custom behavior, such as only retrying on certain "retryable" errors, or change the maximum number of retries (it's set to 10 by default).
-
customise-error-handler.effects.ts
import { ErrorHandler, NgModule } from '@angular/core';
import { Observable, throwError } from 'rxjs';
import { retryWhen, mergeMap } from 'rxjs/operators';
import { Action } from '@ngrx/store';
import { EffectsModule, EFFECTS_ERROR_HANDLER } from '@ngrx/effects';
import { MovieEffects } from './effects/movie.effects';
import { CustomErrorHandler, isRetryable } from '../custom-error-handler';

export function effectResubscriptionHandler>T extends Action<(
  observable$: Observable>T<,
  errorHandler?: CustomErrorHandler
): Observable>T< {
  return observable$.pipe(
    retryWhen(errors =>
      errors.pipe(
        mergeMap(e => {
          if (isRetryable(e)) {
            return errorHandler.handleRetryableError(e);
          }

          errorHandler.handleError(e);
          return throwError(() => e);
        })
      )
    )
  );
}

@NgModule({
  imports: [EffectsModule.forRoot([MovieEffects])],
  providers: [
    {
      provide: EFFECTS_ERROR_HANDLER,
      useValue: effectResubscriptionHandler,
    },
    {
      provide: ErrorHandler,
      useClass: CustomErrorHandler
    }
  ],
})
-
-
Implement this interface to dispatch a custom action after the effect has been added. You can listen to this action in the rest of the application to execute something after the effect is registered.
- user.effects.ts
class UserEffects implements OnInitEffects {
  ngrxOnInitEffects(): Action {
    return { type: '[UserEffects]: Init' };
  }
}
- user.effects.ts
-
By default, effects are merged and subscribed to the store. Implement the
OnRunEffectsinterface to control the lifecycle of the resolved effects.-
user.effects.ts
import { Injectable } from '@angular/core';
import { Observable } from 'rxjs';
import { exhaustMap, takeUntil, tap } from 'rxjs/operators';
import {
  Actions,
  OnRunEffects,
  EffectNotification,
  ofType,
  createEffect,
} from '@ngrx/effects';

@Injectable()
export class UserEffects implements OnRunEffects {
  constructor(private actions$: Actions) {}

  updateUser$ = createEffect(() =>
      this.actions$.pipe(
        ofType('UPDATE_USER'),
        tap(action => {
          console.log(action);
        })
      ),
    { dispatch: false });

  ngrxOnRunEffects(resolvedEffects$: Observable<EffectNotification>) {
    return this.actions$.pipe(
      ofType('LOGGED_IN'),
      exhaustMap(() =>
        resolvedEffects$.pipe(
          takeUntil(this.actions$.pipe(ofType('LOGGED_OUT')))
        )
      )
    );
  }
}
-
-
By default, each Effects class is registered once regardless of how many times the Effect class is loaded. By implementing this interface, you define a unique identifier to register an Effects class instance multiple times.
-
user.effects.ts
class EffectWithIdentifier implements OnIdentifyEffects {
  constructor(private effectIdentifier: string) {}

  ngrxOnIdentifyEffects() {
    return this.effectIdentifier;
  }
}
-
- The
ofTypeoperator filters the stream of actions based on either string values (that representtypes of actions) or Action Creators.
The generic for the Actions<TypeUnion> must be provided in order for type inference to work properly with string values. Action Creators that are based on createAction function do not have the same limitation.
The ofType operator takes up to 5 arguments with proper type inference. It can take even more, however the type would be inferred as an Action interface.
-
auth.effects.ts
import { Injectable } from '@angular/core';
import { Actions, ofType, createEffect } from '@ngrx/effects';
import { of } from 'rxjs';
import { catchError, exhaustMap, map } from 'rxjs/operators';
import {
  LoginPageActions,
  AuthApiActions,
} from '../actions';
import { Credentials } from '../models/user';
import { AuthService } from '../services/auth.service';

@Injectable()
export class AuthEffects {
  login$ = createEffect(() =>
    this.actions$.pipe(
      // Filters by Action Creator 'login'
      ofType(LoginPageActions.login),
      exhaustMap(action =>
        this.authService.login(action.credentials).pipe(
          map(user => AuthApiActions.loginSuccess({ user })),
          catchError(error => of(AuthApiActions.loginFailure({ error })))
        )
      )
    )
  );

  constructor(
    private actions$: Actions,
    private authService: AuthService
  ) {}
}
-
The
concatLatestFromoperator functions similarly towithLatestFromwith one important difference- it lazily evaluates the provided Observable factory. -
This allows you to utilize the source value when selecting additional sources to concat.
-
Additionally, because the factory is not executed until it is needed, it also mitigates the performance impact of creating some kinds of Observables.
-
For example, when selecting data from the store with
store.select,concatLatestFromwill prevent the selector from being evaluated until the source emits a value. -
The
concatLatestFromoperator takes an Observable factory function that returns an array of Observables, or a single Observable.-
router.effects.ts
import { Injectable } from '@angular/core';
import { Title } from '@angular/platform-browser';

import { map, tap } from 'rxjs/operators';

import {Actions, concatLatestFrom, createEffect, ofType} from '@ngrx/effects';
import { Store } from '@ngrx/store';
import { routerNavigatedAction } from '@ngrx/router-store';

import * as fromRoot from '@example-app/reducers';

@Injectable()
export class RouterEffects {
  updateTitle$ = createEffect(() =>
    this.actions$.pipe(
      ofType(routerNavigatedAction),
      concatLatestFrom(() => this.store.select(fromRoot.selectRouteData)),
      map(([, data]) => `Book Collection - ${data['title']}`),
      tap((title) => this.titleService.setTitle(title))
    ),
    {
      dispatch: false,
    }
  );

  constructor(
    private actions$: Actions,
    private store: Store,
    private titleService: Title
  ) {}
}
-
- Bindings to connect the Angular Router with
Store. During each router navigation cycle, multiple actions are dispatched that allow you to listen for changes in the router's state. You can then select data from the state of the router to provide additional information to your application.
-
app.module.ts
import { StoreRouterConnectingModule, routerReducer } from '@ngrx/router-store';
import { AppComponent } from './app.component';

@NgModule({
  imports: [
    BrowserModule,
    StoreModule.forRoot({
      router: routerReducer,
    }),
    RouterModule.forRoot([
      // routes
    ]),
    // Connects RouterModule with StoreModule, uses MinimalRouterStateSerializer by default
    StoreRouterConnectingModule.forRoot(),
  ],
  bootstrap: [AppComponent],
})
export class AppModule {}
-
You can install the Router Store to your project with the following ng add command
ng add @ngrx/router-store@latest-
This command will automate the following steps:
- Update package.json > dependencies with @ngrx/router-store.
- Run npm install to install those dependencies.
- By default, will update src/app/app.module.ts > imports array with
StoreRouterConnectingModule.forRoot(). If you provided flags then the command will attempt to locate and update module found by the flags.
-
npm install @ngrx/router-store --save
yarn add @ngrx/router-store
- Router Store provides five navigation actions which are dispatched in a specific order. The routerReducer provided by Router Store updates its state with the latest router state given by the actions. By default we recommend to use the creator functions we provide.
-
routerRequestAction
- At the start of each navigation, the router will dispatch a
ROUTER_REQUESTaction.
- At the start of each navigation, the router will dispatch a
-
routerNavigationAction
-
During navigation, before any guards or resolvers run, the router will dispatch a
ROUTER_NAVIGATIONaction. -
If you want the
ROUTER_NAVIGATIONto be dispatched after guards or resolvers run, change the Navigation Action Timing.
-
-
routerNavigatedAction
- After a successful navigation, the router will dispatch a
ROUTER_NAVIGATEDaction.
- After a successful navigation, the router will dispatch a
-
routerCancelAction
-
When the navigation is cancelled, for example due to a guard saying that the user cannot access the requested page, the router will dispatch a
ROUTER_CANCELaction. -
The action contains the store state before the navigation. You can use it to restore the consistency of the store.
-
-
routerErrorAction
-
When there is an error during navigation, the router will dispatch a
ROUTER_ERRORaction. -
The action contains the store state before the navigation. You can use it to restore the consistency of the store.
-
Note: You can also still use the action type, which was the previously defined way before action creators were introduced in NgRx. If you are looking for examples of the action types, visit the documentation for versions 7.x and prior.
-
-
Success case:
- ROUTER_REQUEST
- ROUTER_NAVIGATION
- ROUTER_NAVIGATED
-
Error / Cancel case (with early Navigation Action Timing):
- ROUTER_REQUEST
- ROUTER_NAVIGATION
- ROUTER_CANCEL / ROUTER_ERROR
-
Error / Cancel case (with late Navigation Action Timing):
- ROUTER_REQUEST
- ROUTER_CANCEL / ROUTER_ERROR
-
The
getSelectorsmethod supplied within@ngrx/router-storeprovides functions for selecting common information from the router state. -
The default behavior of
getSelectorsselects the router state for the router state key. If the default router state config is overwritten with a different router state key, thegetSelectorsmethod takes a selector function to select the piece of state where the router state is being stored. The example below shows how to provide a selector for the top level router key in your state object. -
Note: The
getSelectorsmethod works with the routerReducer provided by@ngrx/router-store. If you use a custom serializer, you'll need to provide your own selectors.
-
router.selectors.ts
import { getSelectors, RouterReducerState } from '@ngrx/router-store'; // `router` is used as the default feature name. You can use the feature name // of your choice by creating a feature selector and pass it to the `getSelectors` function // export const selectRouter = createFeatureSelector<RouterReducerState>('yourFeatureName'); export const { selectCurrentRoute, // select the current route selectFragment, // select the current route fragment selectQueryParams, // select the current route query params selectQueryParam, // factory function to select a query param selectRouteParams, // select the current route params selectRouteParam, // factory function to select a route param selectRouteData, // select the current route data selectUrl, // select the current url selectTitle, // Select the title if available } = getSelectors(); -
car.reducer.ts
import { createReducer, on } from '@ngrx/store'; import { EntityState, createEntityAdapter } from '@ngrx/entity'; import { appInit } from './car.actions'; export interface Car { id: string; year: string; make: string; model: string; } export type CarState = EntityState<Car>; export const carAdapter = createEntityAdapter<Car>({ selectId: (car) => car.id, }); const initialState = carAdapter.getInitialState(); export const reducer = createReducer<CarState>( initialState, on(appInit, (state, { cars }) => carAdapter.addMany(cars, state)) ); -
car.selectors.ts
import { createFeatureSelector, createSelector } from '@ngrx/store'; import { selectRouteParams } from '../router.selectors'; import { carAdapter, CarState } from './car.reducer'; export const carsFeatureSelector = createFeatureSelector<CarState>('cars'); const { selectEntities, selectAll } = carAdapter.getSelectors(); export const selectCarEntities = createSelector( carsFeatureSelector, selectEntities ); export const selectCars = createSelector(carsFeatureSelector, selectAll); // you can combine the `selectRouteParams` with `selectCarEntities` // to get a selector for the active car for this component based // on the route export const selectCar = createSelector( selectCarEntities, selectRouteParams, (cars, { carId }) => cars[carId] ); -
car.component.ts
import { Component } from '@angular/core';
import { Store } from '@ngrx/store';
import { selectCar } from './car.selectors';

@Component({
  selector: 'app-car',
  templateUrl: './car.component.html',
  styleUrls: ['./car.component.css'],
})
export class CarComponent {
  car$ = this.store.select(selectCar);

  constructor(private store: Store) {}
}
-
The
selectRouteParam{s}selector extracts params from the leaf child route segment only.- It means that when using nested routes with the Angular router (use of the children property), only params from the leaf of the matching URL Tree will be extracted.
-
If the routes are defined as:
[ { path: 'my/:urlPath', component: /* ... */, children: [ { path: 'is/:matched', component: /* ... */, }, ], }, ] -
Using
selectRouteParam{s}will get thematchedparam but not theurlPathparam, because it is not located in a leaf of the URL Tree. -
If all params in the URL Tree need to be extracted (both
urlPathandmatched), the following custom selector can be used. It accumulates params of all the segments in the matched route:import { Params } from '@angular/router'; import { createSelector } from '@ngrx/store'; export const selectRouteNestedParams = createSelector(selectRouter, (router) => { let currentRoute = router?.state?.root; let params: Params = {}; while (currentRoute?.firstChild) { currentRoute = currentRoute.firstChild; params = { ...params, ...currentRoute.params, }; } return params; }); export const selectRouteNestedParam = (param: string) => createSelector(selectRouteNestedParams, (params) => params && params[param]);- Beware of using this accumulation technique when two params with the same name exist in the route (e.g.
my/:route/:id/with/another/:id). Only the rightmost value is accessible because leftmost values are overwritten by the rightmost one in the traversal.
- Beware of using this accumulation technique when two params with the same name exist in the route (e.g.
- RouterStore Config
interface StoreRouterConfig { stateKey?: string | Selector<any, RouterReducerState<T>>; serializer?: new (...args: any[]) => RouterStateSerializer; navigationActionTiming?: NavigationActionTiming; routerState?: RouterState; }- stateKey: The name of reducer key, defaults to router. It's also possible to provide a selector function.
- serializer: How a router snapshot is serialized. Defaults to MinimalRouterStateSerializer. See Custom Router State Serializer for more information.
- navigationActionTiming: When the ROUTER_NAVIGATION is dispatched. Defaults to NavigationActionTiming.PreActivation. See Navigation Action Timing for more information.
- routerState: Set this property to decide which serializer should be used, if none is provided, and the metadata on the dispatched action.
-
During each navigation cycle, a RouterNavigationAction is dispatched with a snapshot of the state in its payload, the RouterStateSnapshot. The RouterStateSnapshot is a large complex structure, containing many pieces of information about the current state and what's rendered by the router. This can cause performance issues when used with the Store Devtools. In most cases, you may only need a piece of information from the RouterStateSnapshot. In order to pare down the RouterStateSnapshot provided during navigation, you provide a custom serializer for the snapshot to only return what you need to be added to the payload and store.
-
Your custom serializer should implement the abstract class RouterStateSerializer and return a snapshot which should have an interface extending BaseRouterStoreState.
-
You then provide the serializer through the config.
-
In a custom serializer ts file
-
custom-route-serializer.ts
import { Params, RouterStateSnapshot } from '@angular/router';
import { RouterStateSerializer } from '@ngrx/router-store';

export interface RouterStateUrl {
  url: string;
  params: Params;
  queryParams: Params;
}

export class CustomSerializer implements RouterStateSerializer<RouterStateUrl> {
  serialize(routerState: RouterStateSnapshot): RouterStateUrl {
    let route = routerState.root;

    while (route.firstChild) {
      route = route.firstChild;
    }

    const {
      url,
      root: { queryParams },
    } = routerState;
    const { params } = route;

    // Only return an object including the URL, params and query params
    // instead of the entire snapshot
    return { url, params, queryParams };
  }
}
-
-
In your root reducer
-
index.ts
export interface State {
  router: RouterReducerState<any>;
}

export const reducers: ActionReducerMap<State> = {
  router: routerReducer
};
-
-
In your AppModule
- app.module.ts
@NgModule({
  imports: [
    StoreModule.forRoot(reducers),
    RouterModule.forRoot([
      // routes
    ]),
    StoreRouterConnectingModule.forRoot({
      serializer: CustomSerializer
    })
  ]
})
export class AppModule {}
- app.module.ts
-
ROUTER_NAVIGATIONis by default dispatched before any guards or resolvers run. This may not always be ideal, for example if you rely on the action to be dispatched after guards and resolvers successfully ran and the new route will be activated. You can change the dispatch timing by providing the corresponding config:- app.module.ts
StoreRouterConnectingModule.forRoot({
  navigationActionTiming: NavigationActionTiming.PostActivation,
});
- app.module.ts
- This property decides which router serializer should be used. If there is a custom serializer provided, it will use the provided serializer.
routerStatealso sets the metadata on dispatched@ngrx/router-storeaction.
-
RouterState.Minimal uses the MinimalRouterStateSerializer serializer to serialize the Angular Router's RouterState and RouterEvent.
-
The difference between FullRouterStateSerializer and the MinimalRouterStateSerializer is that this serializer is fully serializable. To make the state and the actions serializable, the properties paramMap, queryParamMap and component are ignored.
- app.module.ts
StoreRouterConnectingModule.forRoot({
  routerState: RouterState.Minimal,
});
- app.module.ts
-
When this property is set to RouterState.Full, @ngrx/router-store uses the FullRouterStateSerializer serializer to serialize the Angular router event.
-
The metadata on the action contains the Angular router event, e.g. NavigationStart and RoutesRecognized.
-
app.module.ts
StoreRouterConnectingModule.forRoot({ routerState: RouterState.Full, }); -
The FullRouterStateSerializer cannot be used when serializability runtime checks are enabled. With serializability runtime checks enabled, the MinimalRouterStateSerializer serializer must be used.
-
-
Entity State adapter for managing record collections.
-
Entity provides an API to manipulate and query entity collections.
- Reduces boilerplate for creating reducers that manage a collection of models.
- Provides performant CRUD operations for managing entity collections.
- Extensible type-safe adapters for selecting entity information.
-
Entity promotes the use of plain JavaScript objects when managing collections. ES6 class instances will be transformed into plain JavaScript objects when entities are managed in a collection. This provides you with some assurances when managing these entities:
- Guarantee that the data structures contained in state don't themselves contain logic, reducing the chance that they'll mutate themselves.
- State will always be serializable allowing you to store and rehydrate from browser storage mechanisms like local storage.
- State can be inspected via the Redux Devtools.
-
This is one of the core principles of NgRx.
ng add @ngrx/entity@latest
npm install @ngrx/entity --save
yarn add @ngrx/entity
-
The Entity State is a predefined generic interface for a given entity collection with the following interface:
- EntityState Interface
interface EntityState<V> { ids: string[] | number[]; entities: { [id: string | id: number]: V }; }- ids: An array of all the primary ids in the collection
- entities: A dictionary of entities in the collection indexed by the primary id
- EntityState Interface
-
Extend this interface to provide any additional properties for the entity state.
-
user.reducer.ts
export interface User {
  id: string;
  name: string;
}

export interface State extends EntityState<User> {
  // additional entity state properties
  selectedUserId: string | null;
}
-
- Provides a generic type interface for the provided entity adapter. The entity adapter provides many collection methods for managing the entity state.
- user.reducer.ts
export const adapter: EntityAdapter<User> = createEntityAdapter<User>();
- user.reducer.ts
-
A method for returning a generic entity adapter for a single entity state collection. The returned adapter provides many adapter methods for performing operations against the collection type. The method takes an object with 2 properties for configuration.
- selectId: A method for selecting the primary id for the collection. Optional when the entity has a primary key of id
- sortComparer: A compare function used to sort the collection. The comparer function is only needed if the collection needs to be sorted before being displayed. Set to false to leave the collection unsorted, which is more performant during CRUD operations.
-
user.reducer.ts
import { EntityState, EntityAdapter, createEntityAdapter } from '@ngrx/entity';

export interface User {
  id: string;
  name: string;
}

export interface State extends EntityState<User> {
  // additional entities state properties
  selectedUserId: string | null;
}

export function selectUserId(a: User): string {
  //In this case this would be optional since primary key is id
  return a.id;
}

export function sortByName(a: User, b: User): number {
  return a.name.localeCompare(b.name);
}

export const adapter: EntityAdapter<User> = createEntityAdapter<User>({
  selectId: selectUserId,
  sortComparer: sortByName,
});
- These methods are provided by the adapter object returned when using createEntityAdapter. The methods are used inside your reducer function to manage the entity collection based on your provided actions.
-
Returns the initialState for entity state based on the provided type. Additional state is also provided through the provided configuration object. The initialState is provided to your reducer function.
-
user.reducer.ts
import { Action, createReducer } from '@ngrx/store';
import { EntityState, EntityAdapter, createEntityAdapter } from '@ngrx/entity';

export interface User {
  id: string;
  name: string;
}

export interface State extends EntityState<User> {
  // additional entities state properties
  selectedUserId: string | null;
}

export const initialState: State = adapter.getInitialState({
  // additional entity state properties
  selectedUserId: null,
});

export const userReducer = createReducer(initialState);
-
-
The entity adapter also provides methods for operations against an entity. - These methods can change one to many records at a time. Each method returns the newly modified state if changes were made and the same state if no changes were made.
- addOne: Add one entity to the collection.
- addMany: Add multiple entities to the collection.
- setAll: Replace current collection with provided collection.
- setOne: Add or Replace one entity in the collection.
- setMany: Add or Replace multiple entities in the collection.
- removeOne: Remove one entity from the collection.
- removeMany: Remove multiple entities from the collection, by id or by predicate.
- removeAll: Clear entity collection.
- updateOne: Update one entity in the collection. Supports partial updates.
- updateMany: Update multiple entities in the collection. Supports partial updates.
- upsertOne: Add or Update one entity in the collection.
- upsertMany: Add or Update multiple entities in the collection.
- mapOne: Update one entity in the collection by defining a map function.
- map: Update multiple entities in the collection by defining a map function, similar to Array.map.
-
user.model.ts
export interface User { id: string; name: string; } -
user.actions.ts
import { createAction, props } from '@ngrx/store'; import { Update, EntityMap, EntityMapOne, Predicate } from '@ngrx/entity'; import { User } from '../models/user.model'; export const loadUsers = createAction('[User/API] Load Users', props<{ users: User[] }>()); export const setUsers = createAction('[User/API] Set Users', props<{ users: User[] }>()); export const addUser = createAction('[User/API] Add User', props<{ user: User }>()); export const setUser = createAction('[User/API] Set User', props<{ user: User }>()); export const upsertUser = createAction('[User/API] Upsert User', props<{ user: User }>()); export const addUsers = createAction('[User/API] Add Users', props<{ users: User[] }>()); export const upsertUsers = createAction('[User/API] Upsert Users', props<{ users: User[] }>()); export const updateUser = createAction('[User/API] Update User', props<{ update: Update<User> }>()); export const updateUsers = createAction('[User/API] Update Users', props<{ updates: Update<User>[] }>()); export const mapUser = createAction('[User/API] Map User', props<{ entityMap: EntityMapOne<User> }>()); export const mapUsers = createAction('[User/API] Map Users', props<{ entityMap: EntityMap<User> }>()); export const deleteUser = createAction('[User/API] Delete User', props<{ id: string }>()); export const deleteUsers = createAction('[User/API] Delete Users', props<{ ids: string[] }>()); export const deleteUsersByPredicate = createAction('[User/API] Delete Users By Predicate', props<{ predicate: Predicate<User> }>()); export const clearUsers = createAction('[User/API] Clear Users'); -
user.reducer.ts
import { Action, createReducer, on } from '@ngrx/store';
import { EntityState, EntityAdapter, createEntityAdapter } from '@ngrx/entity';
import { User } from '../models/user.model';
import * as UserActions from '../actions/user.actions';

export interface State extends EntityState<User> {
  // additional entities state properties
  selectedUserId: string | null;
}

export const adapter: EntityAdapter<User> = createEntityAdapter<User>();

export const initialState: State = adapter.getInitialState({
  // additional entity state properties
  selectedUserId: null,
});

export const userReducer = createReducer(
  initialState,
  on(UserActions.addUser, (state, { user }) => {
    return adapter.addOne(user, state)
  }),
  on(UserActions.setUser, (state, { user }) => {
    return adapter.setOne(user, state)
  }),
  on(UserActions.upsertUser, (state, { user }) => {
    return adapter.upsertOne(user, state);
  }),
  on(UserActions.addUsers, (state, { users }) => {
    return adapter.addMany(users, state);
  }),
  on(UserActions.upsertUsers, (state, { users }) => {
    return adapter.upsertMany(users, state);
  }),
  on(UserActions.updateUser, (state, { update }) => {
    return adapter.updateOne(update, state);
  }),
  on(UserActions.updateUsers, (state, { updates }) => {
    return adapter.updateMany(updates, state);
  }),
  on(UserActions.mapUser, (state, { entityMap }) => {
    return adapter.mapOne(entityMap, state);
  }),
  on(UserActions.mapUsers, (state, { entityMap }) => {
    return adapter.map(entityMap, state);
  }),
  on(UserActions.deleteUser, (state, { id }) => {
    return adapter.removeOne(id, state);
  }),
  on(UserActions.deleteUsers, (state, { ids }) => {
    return adapter.removeMany(ids, state);
  }),
  on(UserActions.deleteUsersByPredicate, (state, { predicate }) => {
    return adapter.removeMany(predicate, state);
  }),
  on(UserActions.loadUsers, (state, { users }) => {
    return adapter.setAll(users, state);
  }),
  on(UserActions.setUsers, (state, { users }) => {
    return adapter.setMany(users, state);
  }),
  on(UserActions.clearUsers, state => {
    return adapter.removeAll({ ...state, selectedUserId: null });
  })
);


export const getSelectedUserId = (state: State) => state.selectedUserId;

// get the selectors
const {
  selectIds,
  selectEntities,
  selectAll,
  selectTotal,
} = adapter.getSelectors();

// select the array of user ids
export const selectUserIds = selectIds;

// select the dictionary of user entities
export const selectUserEntities = selectEntities;

// select the array of users
export const selectAllUsers = selectAll;

// select the total user count
export const selectUserTotal = selectTotal;
-
There are a few caveats to be aware of when updating entities using the entity adapter.
-
The first is that
updateOneandupdateManymake use of theUpdate<T>interface shown below. This supports partial updates.interface UpdateStr<T> { id: string; changes: Partial<T>; } interface UpdateNum<T> { id: number; changes: Partial<T>; } type Update<T> = UpdateStr<T> | UpdateNum<T>; -
Secondly,
upsertOneandupsertManywill perform an insert or update. These methods do not support partial updates.
-
The
getSelectorsmethod returned by the created entity adapter provides functions for selecting information from the entity. -
The
getSelectorsmethod takes a selector function as its only argument to select the piece of state for a defined entity.-
index.ts
import {
  createSelector,
  createFeatureSelector,
  ActionReducerMap,
} from '@ngrx/store';
import * as fromUser from './user.reducer';

export interface State {
  users: fromUser.State;
}

export const reducers: ActionReducerMap<State> = {
  users: fromUser.reducer,
};

export const selectUserState = createFeatureSelector<fromUser.State>('users');

export const selectUserIds = createSelector(
  selectUserState,
  fromUser.selectUserIds // shorthand for usersState => fromUser.selectUserIds(usersState)
);
export const selectUserEntities = createSelector(
  selectUserState,
  fromUser.selectUserEntities
);
export const selectAllUsers = createSelector(
  selectUserState,
  fromUser.selectAllUsers
);
export const selectUserTotal = createSelector(
  selectUserState,
  fromUser.selectUserTotal
);
export const selectCurrentUserId = createSelector(
  selectUserState,
  fromUser.getSelectedUserId
);

export const selectCurrentUser = createSelector(
  selectUserEntities,
  selectCurrentUserId,
  (userEntities, userId) => userId && userEntities[userId]
);
-
-
It's possible to add extra properties to a State extending from EntityState. These properties must be updated manually. Just like in a non-entity state, we can update the added properties in the reducer. This can be done with or without using the @ngrx/entity helper functions.
-
Usage:
-
Declare the
selectedUserIdas an additional property in the interface.-
user.reducer.ts
import { EntityState, EntityAdapter, createEntityAdapter } from '@ngrx/entity';

export interface User {
  id: string;
  name: string;
}

export interface State extends EntityState<User> {
  // additional state property
  selectedUserId: string | null;
}

export const adapter: EntityAdapter<User> = createEntityAdapter<User>();
-
-
Then create an action to update the
selectedUserId-
user.actions.ts
import { createAction, props } from '@ngrx/store';
import { Update } from '@ngrx/entity';

import { User } from '../models/user.model';

export const selectUser = createAction('[Users Page] Select User', props<{ userId: string }>());
export const loadUsers = createAction('[User/API] Load Users', props<{ users: User[] }>());
-
-
The entity adapter is only used to update the EntityState properties.
-
The additional state properties should be updated same as normal state properties, as the example below.
-
user.reducer.ts
import { EntityState, EntityAdapter, createEntityAdapter } from '@ngrx/entity';
import { Action, createReducer, on } from '@ngrx/store';
import { User } from '../models/user.model';
import * as UserActions from '../actions/user.actions';

export interface State extends EntityState<User> {
  // additional state property
  selectedUserId: string | null;
}

export const adapter: EntityAdapter<User> = createEntityAdapter<User>();

export const initialState: State = adapter.getInitialState({
  // additional entity state properties
  selectedUserId: null,
});

export const userReducer = createReducer(
  initialState,
  on(UserActions.selectUser, (state, { userId }) => {
    return { ...state, selectedUserId: userId };
  }),
  on(UserActions.loadUsers, (state, { users }) => {
    return adapter.addMany(users, { ...state, selectedUserId: null });
  })
);

export function reducer(state: State | undefined, action: Action) {
  return userReducer(state, action);
}
-
-
- ComponentStore is a stand-alone library that helps to manage local/component state. It's an alternative to reactive push-based "Service with a Subject" approach.
- Local state has to be initialized, but it can be done lazily.
- Local state is typically tied to the life-cycle of a particular component and is cleaned up when that component is destroyed.
- Users of ComponentStore can update the state through
setStateorupdater, either imperatively or by providing an Observable. - Users of ComponentStore can read the state through
selector a top-levelstate$. Selectors are very performant. - Users of ComponentStore may start side-effects with
effect, both sync and async, and feed the data both imperatively or reactively.
- The Global Store and Component Store are designed to solve different problems and can be used independently from each other.
-
Installing with ng add
ng add @ngrx/component-store@latest -
Installing with npm
npm install @ngrx/component-store --save -
Installing with yarn
yarn add @ngrx/component-store
-
ComponentStore can be initialized in 2 ways:
- through the constructor - it would have the initial state
- by calling
setStateand passing an object that matches the state interface.
-
Initialization through the constructor
-
Initializing through the constructor makes the state immediately available to the ComponentStore consumers.
-
movies.store.ts
export interface MoviesState {
  movies: Movie[];
}

@Injectable()
export class MoviesStore extends ComponentStore<MoviesState> {

  constructor() {
    super({movies: []});
  }
}
-
-
-
Lazy initialization
-
In some cases, developers do not want selectors to return any state until there's meaningful data in the ComponentStore. The solution would be to initialize the state lazily by calling
setStateand passing the full state to it. The same approach can be taken to reset the state.- Note: Initialization has to be done before updating the state, otherwise an error would be thrown.
-
movies-page.component.ts
@Component({
  template: `
    <li *ngFor="let movie of (movies$ | async)">
      {{ movie.name }}
    </li>
  `,
  providers: [ComponentStore],
})
export class MoviesPageComponent {
  readonly movies$ = this.componentStore.state$.pipe(
    map(state => state.movies),
  );

  constructor(
    private readonly componentStore: ComponentStore<{movies: Movie[]}>
  ) {}

  ngOnInit() {
    this.componentStore.setState({movies: []});
  }
}
-
-
select method
-
Reading state is done with the select method, which takes a projector that describes HOW the state is retrieved and/or transformed. Selectors emit new values when those values "change" - the new value is no longer distinct by comparison from the previous value.
-
Another performance benefit of selectors is that they are "shared" - they multicast the value to each subscriber.
-
movies.store.ts
export interface MoviesState { movies: Movie[]; } @Injectable() export class MoviesStore extends ComponentStore<MoviesState> { constructor() { super({movies:[]}); } readonly movies$: Observable<Movie[]> = this.select(state => state.movies); } -
movies-page.component.ts
@Component({
  template: `
    <li *ngFor="let movie of (movies$ | async)">
      {{ movie.name }}
    </li>
  `,
  providers: [MoviesStore],
})
export class MoviesPageComponent {
  movies$ = this.moviesStore.movies$;

  constructor(private readonly moviesStore: MoviesStore) {}
}
-
-
Combining selectors
-
Selectors can be used to combine other Selectors or Observables.
-
movies.store.ts
export interface MoviesState {
  movies: Movie[];
  userPreferredMoviesIds: string[];
}

@Injectable()
export class MoviesStore extends ComponentStore<MoviesState> {

  constructor() {
    super({movies:[], userPreferredMoviesIds:[]});
  }

  readonly movies$ = this.select(state => state.movies);
  readonly userPreferredMovieIds$ = this.select(state => state.userPreferredMoviesIds);

  readonly userPreferredMovies$ = this.select(
        this.movies$,
        this.userPreferredMovieIds$,
        (movies, ids) => movies.filter(movie => ids.includes(movie.id))
  );
}
-
-
Debounce selectors
-
Selectors are synchronous by default, meaning that they emit the value immediately when subscribed to, and on every state change. Sometimes the preferred behavior would be to wait (or debounce) until the state "settles" (meaning all the changes within the current microtask occur) and only then emit the final value. In many cases, this would be the most performant way to read data from the ComponentStore, however its behavior might be surprising sometimes, as it won't emit a value until later on. This makes it harder to test such selectors.
-
Adding the debounce to a selector is done by passing
{debounce: true}as the last argument. -
movies.store.ts
@Injectable()
export class MoviesStore extends ComponentStore<MoviesState> {

  constructor(private movieService: MovieService) {
    super({movies: [], moviesPerPage: 10, currentPageIndex: 0});

    // 👇 effect is triggered whenever debounced data is changed
    this.fetchMovies(this.fetchMoviesData$);
  }

  // Updates how many movies per page should be displayed
  readonly updateMoviesPerPage = this.updater((state, moviesPerPage: number) => ({
    ...state,
    moviesPerPage, // updates with new value
  }));

  // Updates which page of movies that the user is currently on
  readonly updateCurrentPageIndex = this.updater((state, currentPageIndex: number) => ({
    ...state,
    currentPageIndex, // updates with new page index
  }));

  readonly moviesPerPage$ = this.select(state => state.moviesPerPage);

  readonly currentPageIndex$ = this.select(state => state.currentPageIndex);

  private readonly fetchMoviesData$ = this.select(
    moviesPerPage$,
    currentPageIndex$,
    (moviesPerPage, currentPageIndex) => ({moviesPerPage, currentPageIndex}),
    {debounce: true}, // 👈 setting this selector to debounce
  );

  private readonly fetchMovies = this.effect(
    (moviePageData$: Observable<{moviesPerPage: number; currentPageIndex: number}>) => {
      return moviePageData$.pipe(
        concatMap(({moviesPerPage, currentPageIndex}) => {
          return this.movieService
            .loadMovies(moviesPerPage, currentPageIndex)
            .pipe(tap((results) => this.updateMovieResults(results)));
        }),
      );
    },
  );
}
-
-
Selecting from global @ngrx/store
-
ComponentStore is an independent library, however it can easily consume data from
@ngrx/storeor from any other global state management library. -
movies.store.ts
private readonly fetchMoviesData$ = this.select(
  this.store.select(getUserId), // 👈 store.select returns an Observable, which is easily mixed within selector
  moviesPerPage$,
  currentPageIndex$,
  (userId, moviesPerPage, currentPageIndex) => ({userId, moviesPerPage, currentPageIndex}),
);
-
-
getmethod-
While a selector provides a reactive way to read the state from ComponentStore via Observable, sometimes an imperative read is needed. One of such use cases is accessing the state within an
effects and that's wheregetmethod could be used.- The
getmethod is ComponentStore-private, meaning it's accessible only within the ComponentStore. It's done to discourage frequent imperative reads from the state as the NgRx team is in a consensus that such reads promote further potentially harmful architectural decisions.
- The
-
-
ComponentStore can be updated in 3 ways:
- by calling
setState. - by calling
patchState. - by creating an
updaterand passing inputs through it.
- by calling
-
updatermethod-
The
updatermethod describes HOW the state changes. It takes a pure function with the current state and the value as arguments, and should return the new state, updated immutably. -
There could be many updaters within a ComponentStore. They are analogous to "CASE" statements or
on()functions in@ngrx/storereducer. -
Using the
updatermethod allows developers to extract business logic out of components into services, which makes components easier to read and test. -
movies.store.ts
@Injectable() export class MoviesStore extends ComponentStore<MoviesState> { constructor() { super({movies: []}); } readonly addMovie = this.updater((state, movie: Movie) => ({ movies: [...state.movies, movie], })); } -
Updater then can be called with the values imperatively or could take an Observable.
-
movies-page.component.ts
@Component({
  template: `
    <button (click)="add('New Movie')">Add a Movie</button>
  `,
  providers: [MoviesStore],
})
export class MoviesPageComponent {

  constructor(private readonly moviesStore: MoviesStore) {}

  add(movie: string) {
    this.moviesStore.addMovie({ name: movie, id: generateId() });
  }
}
-
-
-
setStatemethod-
The
setStatemethod can be called by either providing the object of state type or as a callback. -
When the object is provided it resets the entire state to the provided value. This is also how lazy initialization is performed.
-
The callback approach allows developers to change the state partially.
-
movies-page.component.ts
@Component({
  template: `...`,
  providers: [ComponentStore],
})
export class MoviesPageComponent implements OnInit {
  constructor(
    private readonly componentStore: ComponentStore<MoviesState>
  ) {}

  ngOnInit() {
    this.componentStore.setState({movies: []});
  }

  resetMovies() {
    //    resets the State to empty array 👇
    this.componentStore.setState({movies: []});
  }

  addMovie(movie: Movie) {
    this.componentStore.setState((state) => {
      return {
        ...state,
        movies: [...state.movies, movie],
      };
    });
  }
}
-
-
patchStatemethod-
The
patchStatemethod can be called by providing a partial state Observable, object, or a partial updater callback. -
When the partial state is provided it patches the state with the provided value.
-
When the partial updater is provided it patches the state with the value returned from the callback.
-
Note: The state has to be initialized before any of patchState calls, otherwise "not initialized" error will be thrown.
-
movies-page.component.ts
interface MoviesState {
  movies: Movie[];
  selectedMovieId: string | null;
}

@Component({
  template: `...`,
  providers: [ComponentStore],
})
export class MoviesPageComponent implements OnInit {
  constructor(
    private readonly componentStore: ComponentStore<MoviesState>
  ) {}

  ngOnInit() {
    this.componentStore.setState({movies: [], selectedMovieId: null});
  }

  updateSelectedMovie(selectedMovieId: string) {
    this.componentStore.patchState({selectedMovieId});
  }

  addMovie(movie: Movie) {
    this.componentStore.patchState((state) => ({
      movies: [...state.movies, movie]
    }));
  }
}
-
-
Effects are designed to extract any side-effects (such as Network calls) from components and handle potential race conditions.
-
Key Concepts
- Effects isolate side effects from components, allowing for more pure components that select state and trigger updates and/or effects in ComponentStore(s).
- Effects are Observables listening for the inputs and piping them through the "prescription".
- Those inputs can either be values or Observables of values.
- Effects perform tasks, which are synchronous or asynchronous.
-
effectmethod-
The
effectmethod takes a callback with an Observable of values, that describes HOW new incoming values should be handled. Each new call of the effect would push the value into that Observable. -
movies.store.ts
@Injectable() export class MoviesStore extends ComponentStore<MoviesState> { constructor(private readonly moviesService: MoviesService) { super({movies: []}); } // Each new call of getMovie(id) pushed that id into movieId$ stream. readonly getMovie = this.effect((movieId$: Observable<string>) => { return movieId$.pipe( // 👇 Handle race condition with the proper choice of the flattening operator. switchMap((id) => this.moviesService.fetchMovie(id).pipe( //👇 Act on the result within inner pipe. tap({ next: (movie) => this.addMovie(movie), error: (e) => this.logError(e), }), // 👇 Handle potential error within inner pipe. catchError(() => EMPTY), )), ); }); readonly addMovie = this.updater((state, movie: Movie) => ({ movies: [...state.movies, movie], })); selectMovie(movieId: string) { return this.select((state) => state.movies.find(m => m.id === movieId)); } } -
The
getMovieeffect could then be used within a component. -
movie.component.ts
@Component({
  template: `...`,
  // ❗️MoviesStore is provided higher up the component tree
})
export class MovieComponent {
  movie$: Observable<Movie>;

  @Input()
  set movieId(value: string) {
    // calls effect with value. 👇 Notice it's a single string value.
    this.moviesStore.getMovie(value);
    this.movie$ = this.moviesStore.selectMovie(value);
  }

  constructor(private readonly moviesStore: MoviesStore) {}

}
-
-
tapResponse
-
An easy way to handle the response in ComponentStore effects in a safe way, without additional boilerplate is to use the tapResponse operator. It enforces that the error case is handled and that the effect would still be running should an error occur. It is essentially a simple wrapper around two operators:
tapthat handles success and errorcatchError(() => EMPTY)that ensures that the effect continues to run after the error.
-
movies.store.ts
readonly getMovie = this.effect((movieId$: Observable<string>) => {
  return movieId$.pipe(
    // 👇 Handle race condition with the proper choice of the flattening operator.
    switchMap((id) => this.moviesService.fetchMovie(id).pipe(
      //👇 Act on the result within inner pipe.
      tapResponse(
        (movie) => this.addMovie(movie),
        (error: HttpErrorResponse) => this.logError(error),
      ),
    )),
  );
});
-
- NgRx ComponentStore comes with lifecycle hooks and observables for performing tasks after the ComponentStore is initially instantiated, after the initial state is first set, and when the ComponentStore is destroyed. You can use these lifecycle hooks to set up long-running effects, wire up additional logic, and other tasks outside the constructor of the ComponentStore.
-
Both lifecycle hooks are enabled by providing the ComponentStore through the
provideComponentStore()function. This function registers the ComponentStore as a provider, sets up a factory provider to instantiate the ComponentStore instance, and calls the implemented lifecycle hooks. -
Currently, Angular provides initializer tokens in a few areas. The
APP_INITIALIZERandBOOTSTRAP_INITIALIZERfor application/bootstrap init logic, and theENVIRONMENT_INITIALIZERfor environment injector init logic. TheprovideComponentStore()mimics this behavior to run the lifecycle hooks. The function is required because there aren't any provided tokens at the component level injector to allow initialization tasks. -
Note: If you implement the lifecycle hooks in the ComponentStore, and register it with providers without using
provideComponentStore(), in development mode, a warning is logged to the browser console.
-
The
OnStoreInitinterface is used the implement thengrxOnStoreInitmethod in the ComponentStore class. This lifecycle method is called immediately after the ComponentStore class is instantiated. -
books.store.ts
export interface BooksState { collection: Book[]; } export const initialState: BooksState = { collection: [] }; @Injectable() export class BooksStore extends ComponentStore<BooksState> implements OnStoreInit { constructor() { super(initialState); } ngrxOnStoreInit() { // called after store has been instantiated } } -
books-page.component.ts
@Component({
  // ... other metadata
  providers: [
    provideComponentStore(BooksStore)
  ]
})
export class BooksPageComponent {
  constructor(private booksStore: BooksStore) {}
}
-
The
OnStateInitinterface is used the implement thengrxOnStateInitmethod in the ComponentStore class. This lifecycle method is called only once after the ComponentStore state is initially set. ComponentStore supports eager and lazy initialization of state, and the lifecycle hook is called appropriately in either scenario. -
Eager State Init
-
books.store.ts
export interface BooksState { collection: Book[]; } export const initialState: BooksState = { collection: [] }; @Injectable() export class BooksStore extends ComponentStore<BooksState> implements OnStateInit { constructor() { // eager state initialization super(initialState); } ngrxOnStateInit() { // called once after state has been first initialized } } -
books-page.component.ts
@Component({
  // ... other metadata
  providers: [
    provideComponentStore(BooksStore)
  ]
})
export class BooksPageComponent {
  constructor(private booksStore: BooksStore) {}
}
-
-
Lazy State Init
-
books.store.ts
export interface BooksState { collection: Book[]; } @Injectable() export class BooksStore extends ComponentStore<BooksState> implements OnStateInit { constructor() { super(); } ngrxOnStateInit() { // called once after state has been first initialized } } export const initialState: BooksState = { collection: [] }; -
books-page.component.ts
@Component({
  // ... other metadata
  providers: [
    provideComponentStore(BooksStore)
  ]
})
export class BooksPageComponent implements OnInit {
  constructor(private booksStore: BooksStore) {}

  ngOnInit() {
    // lazy state initialization
    this.booksStore.setState(initialState);
  }
}
-
-
ComponentStore also implements the
OnDestroyinterface from@angulare/coreto complete any internally created observables. -
It also exposes a
destroy$property on the ComponentStore class that can be used instead of manually creating aSubjectto unsubscribe from any observables created in the component. -
books-page.component.ts
@Component({ // ... other metadata providers: [ComponentStore] }) export class BooksPageComponent implements OnInit { constructor(private cs: ComponentStore) {} ngOnInit() { const timer = interval(1000) .pipe(takeUntil(this.cs.destroy$)) .subscribe(() => { // listen until ComponentStore is destroyed }); } } -
The
provideComponentStore()function is not required to listen to thedestroy$property on the ComoponentStore.
-
Both ComponentStore and Store are designed to manage the state in an Angular application, however they are addressing different problems. These libraries are independent of each other, and, depending on many factors, one or the other or even both in tandem would be recommended.
-
Among the factors that would influence which of the libraries (or both) should be used are the following:
-
Size of the application. How many components does it have?
-
Interconnection of the app. Are these components tied together, or are they independent groups of components sub-trees?
-
Depth of component tree. How many levels of depth does the component tree have?
-
State ownership. Could there be a clear separation of state ownership at different nodes of the components tree?
-
State lifespan. Is the state needed throughout the lifespan of the application, or only when some pages are displayed and we want to automatically clean it up when the user navigates somewhere else?
-
Business Requirements. How well are all of the business requirements understood and finalized before the implementation of the app starts? Would it be changing frequently?
-
Lifespan of the app. Is this a short-lived Minimum Viable Product (MVP) that would be discarded, a solution that won't need much support or changes once it's released, or is it a long-term product that would be constantly changing, based on changing business needs?
-
Backend APIs. Does the team have influence over backend(s) and the APIs that they provide?
-
-
The longer the lifespan of the app and the larger it is, the greater the need to separate how the data is retrieved and how components are displaying it. That drives earlier separation of "Data Transfer Objects" (aka "Network Models") - the models used to communicate with backend(s) - and "View Models" - the models used by components in the templates.
-
ComponentStore is responsible for managing smaller, more local state. While it's possible to have multiple ComponentStores, one has to have a clear understanding of state ownership of each one of them.
-
ComponentStore and Global Store have many benefits, some of which are listed in the introduction. They help organize state, make migrations to new APIs easier, encapsulate changes and side-effects, make our components smaller, easier to test and more performant, but they are also introducing code complexity with indirections.
- Note: It's important to understand what the cost is and why we are adding it.
-
Both of them bring push-based architecture, which is the first indirection. The developer can no longer get the result of a service method call, instead they would be listening for Observable values exposed by that service. The benefit, on the other side, is that the developer no longer has to worry what is changing the state - all the component needs to know is that something has changed it. If the component wants to change the state itself, it sends the message about it (either dispatches an Action in Store, or calls ComponentStore's updater or effect).
-
Actions are the second indirection. They are present in the Global Store only. There are many benefits of this indirection, such as:
- ability to trigger multiple effects/reducers at the same time
- greater scalability
- useful DevTools
-
ComponentStore doesn't have that indirection, however it also loses the above-mentioned benefits.
-
The scale of state that it works with has to be smaller, which brings another set of benefits, such as:
- ComponentStore that is tied to the specific node in the components tree, will be automatically cleaned up when that node is destroyed
- state is fully self-contained with each ComponentStore, and thus allows to have multiple independent instances of the same component
- provides simpler state management to small/medium sized apps
-
The difference between the benefits and trade-offs of Stores make Global Store better suited for managing global shared state, where ComponentStore shines managing more local, encapsulated state, as well as component UI state.
-
Depending on the needs of the application, the developer might choose Store or ComponentStore, or, in cases of the larger apps, both Store and ComponentStore.
-
The Global Store works with the single immutable object, that contains all of the shared state throughout the application. There are multiple reducers, each one responsible for a particular slice of state.
-
Each ComponentStore is fully responsible for its own state. There could be many different ComponentStores, but each one should store its own distinct state.
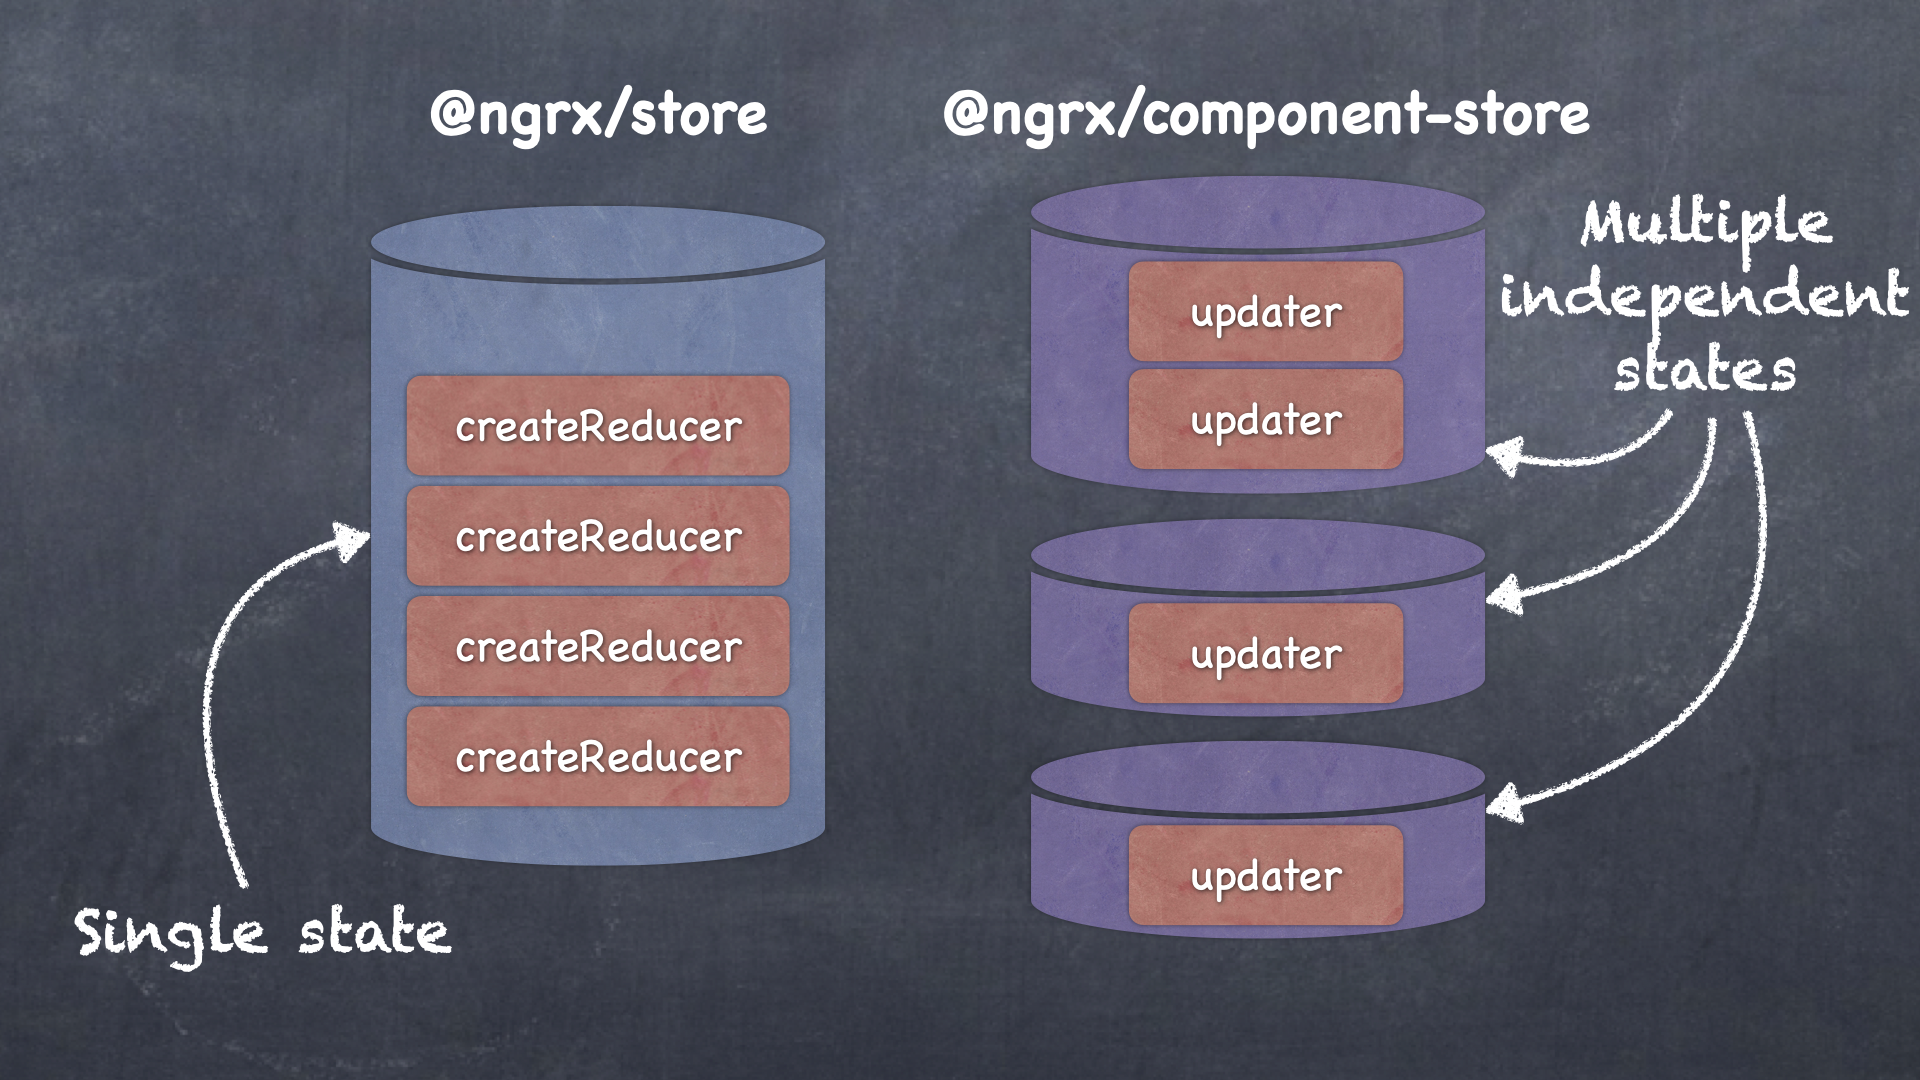
-
ComponentStore is focused on a smaller part of the state, and thus should contain not only the state itself, but also every "prescription" of how it could be changed. All "updaters" and "effects" should be part of the ComponentStore, responsible for the specific state.
-
It makes ComponentStore less scalable - if there are too many updaters and effects in a single class, then it quickly becomes unreadable.
-
Shared selectors should also be part of the ComponentStore, however downstream components might have their component-specific details, such as aggregating all the info needed for their "View Model". In such cases, it's acceptable to create
ComponentStore<object>that won't be managing state and would contain a number of selectors.
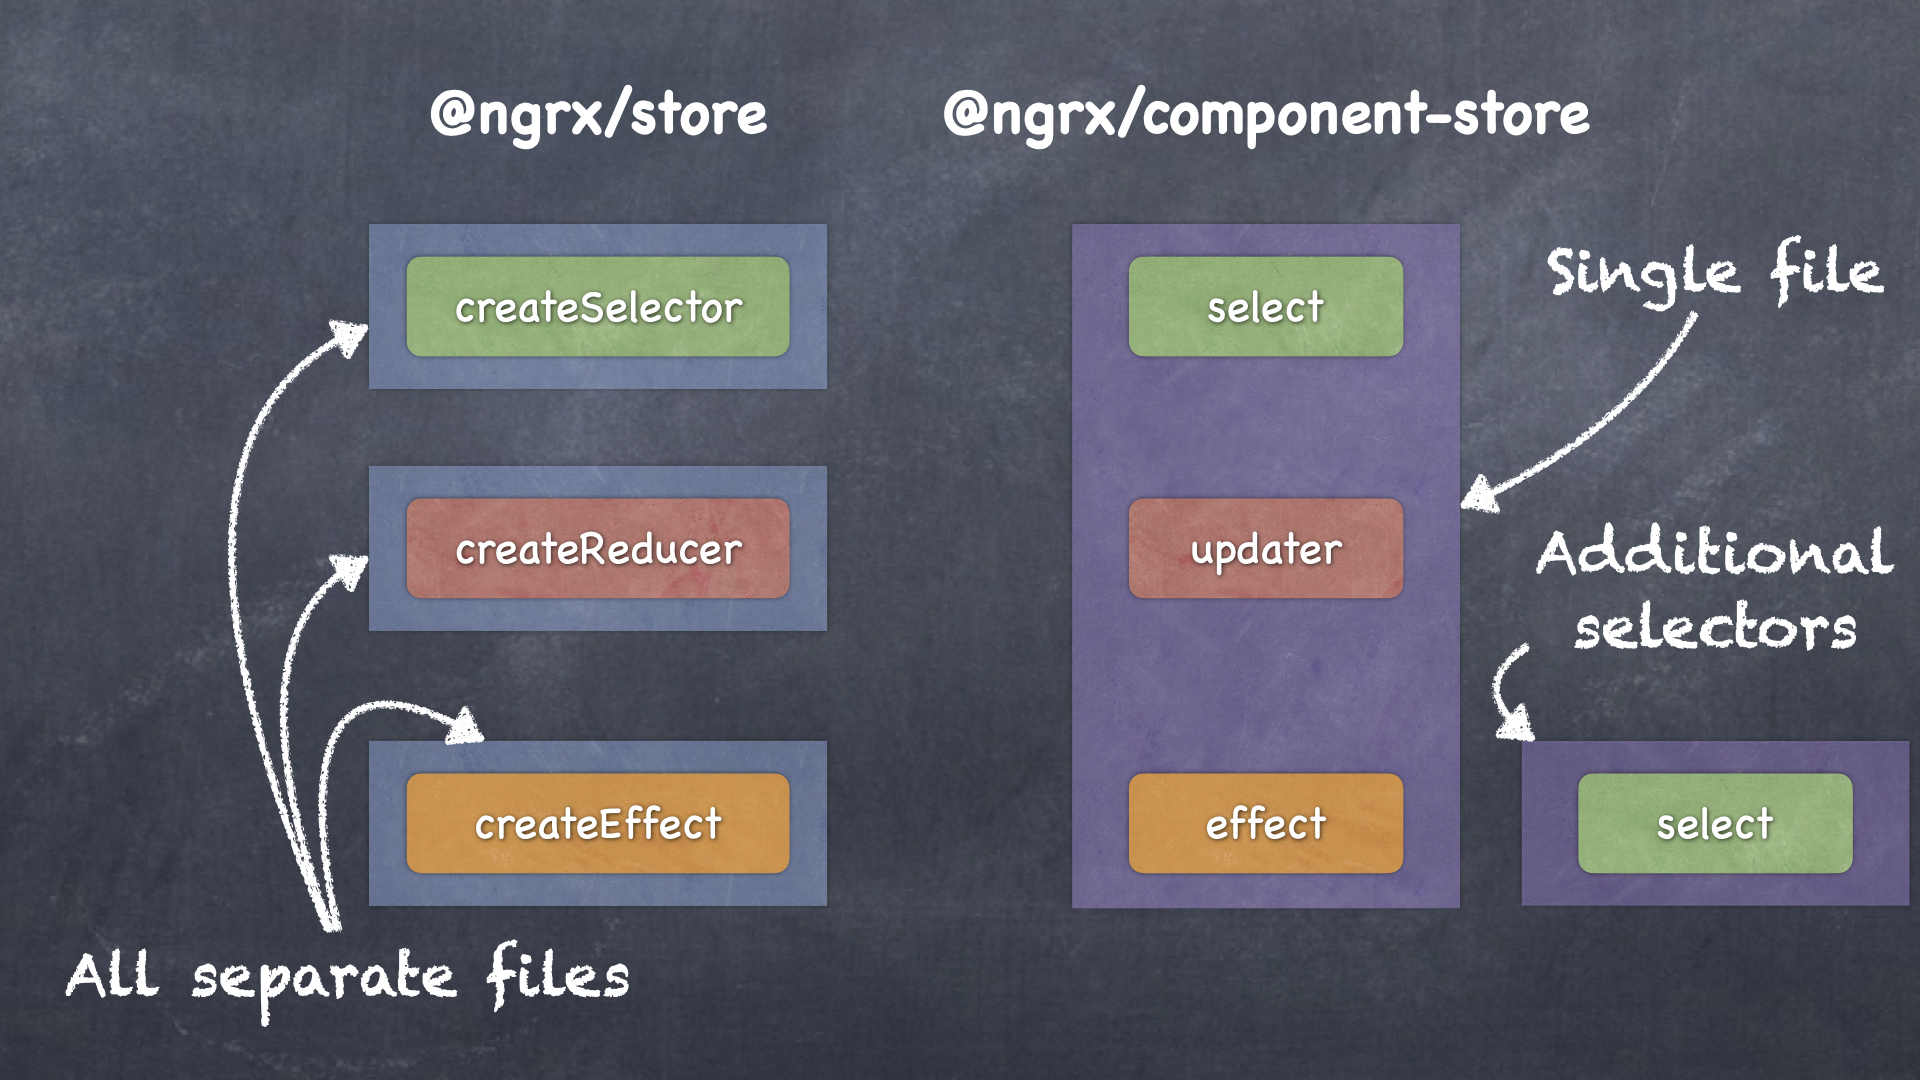
-
There are multiple types of state that exist in the application, and state management libraries are there to help manage/synchronize/update them. The topic of which one to choose, ComponentStore or the Global Store, or maybe both would be helpful, is described at ComponentStore vs Store section.
-
The types of state that developers typically deal with in applications are:
- Server/Backend(s) State. This is the ultimate source of truth of all the data.
- Persisted State. The "snapshots" of backend data transferred to and from application. E.g. Movies data passed as a JSON response, or user's rating for a particular Movie passed as an update request.
- URL State. This is the state of the URL itself. Depending on which URL the user navigates to, the app would open specific pages and thus might request for Persisted State.
- Client State. The state within the application that is not persisted to the backend. E.g. The info about which Tab is open in the application.
- Local UI State. The state within a component itself. E.g. isEnabled toggle state of Toggle Component.
-
There are more types of states, but these are the most important ones in the context of state management.
- Synchronizing these states is one of the most complex tasks that developers have to solve.
-
Here is a small example to demonstrate how even a simple task might involve all of them:
- The user opens the page at a specific URL, "https://www.TheBestMoviesOfAllTimeEver.com/favorites". That changes the URL State.
- The URL has a path for a specific tab, "favorites". That selection becomes part of the Client State.
- This results in API calls to the backend to get the data of the movies that the user marked as "favorites". We receive a snapshot of Persisted State.
- The Toggle Component that lives next to the "is favorite" label is turned ON. The "ON" state is derived from the data that the application received and passed to the Toggle Component through @Input()
isEnabled: boolean. The component itself is not aware of Persisted State or what it even means to be ON in the context of the rest of the application. All it knows is that it needs to be visually displayed as ON. TheisEnabledstate is Local UI State. - The user might decide that this movie is no longer their favorite and would click the Toggle button to turn it OFF. The Local UI State of the component is then changed, the @Output() changed event is emitted and picked up by a container component which would then call the backend to update the Persisted State.
-
This was a very simple example. Typically developers have to solve many problems that are more interconnected. What if the user is not logged in? Should we wait until the new favorite state is persisted to the backend and only then show disabled state or should we do this optimistically? and so on.
- Understanding these types of state helps us define our usage of ComponentStore.
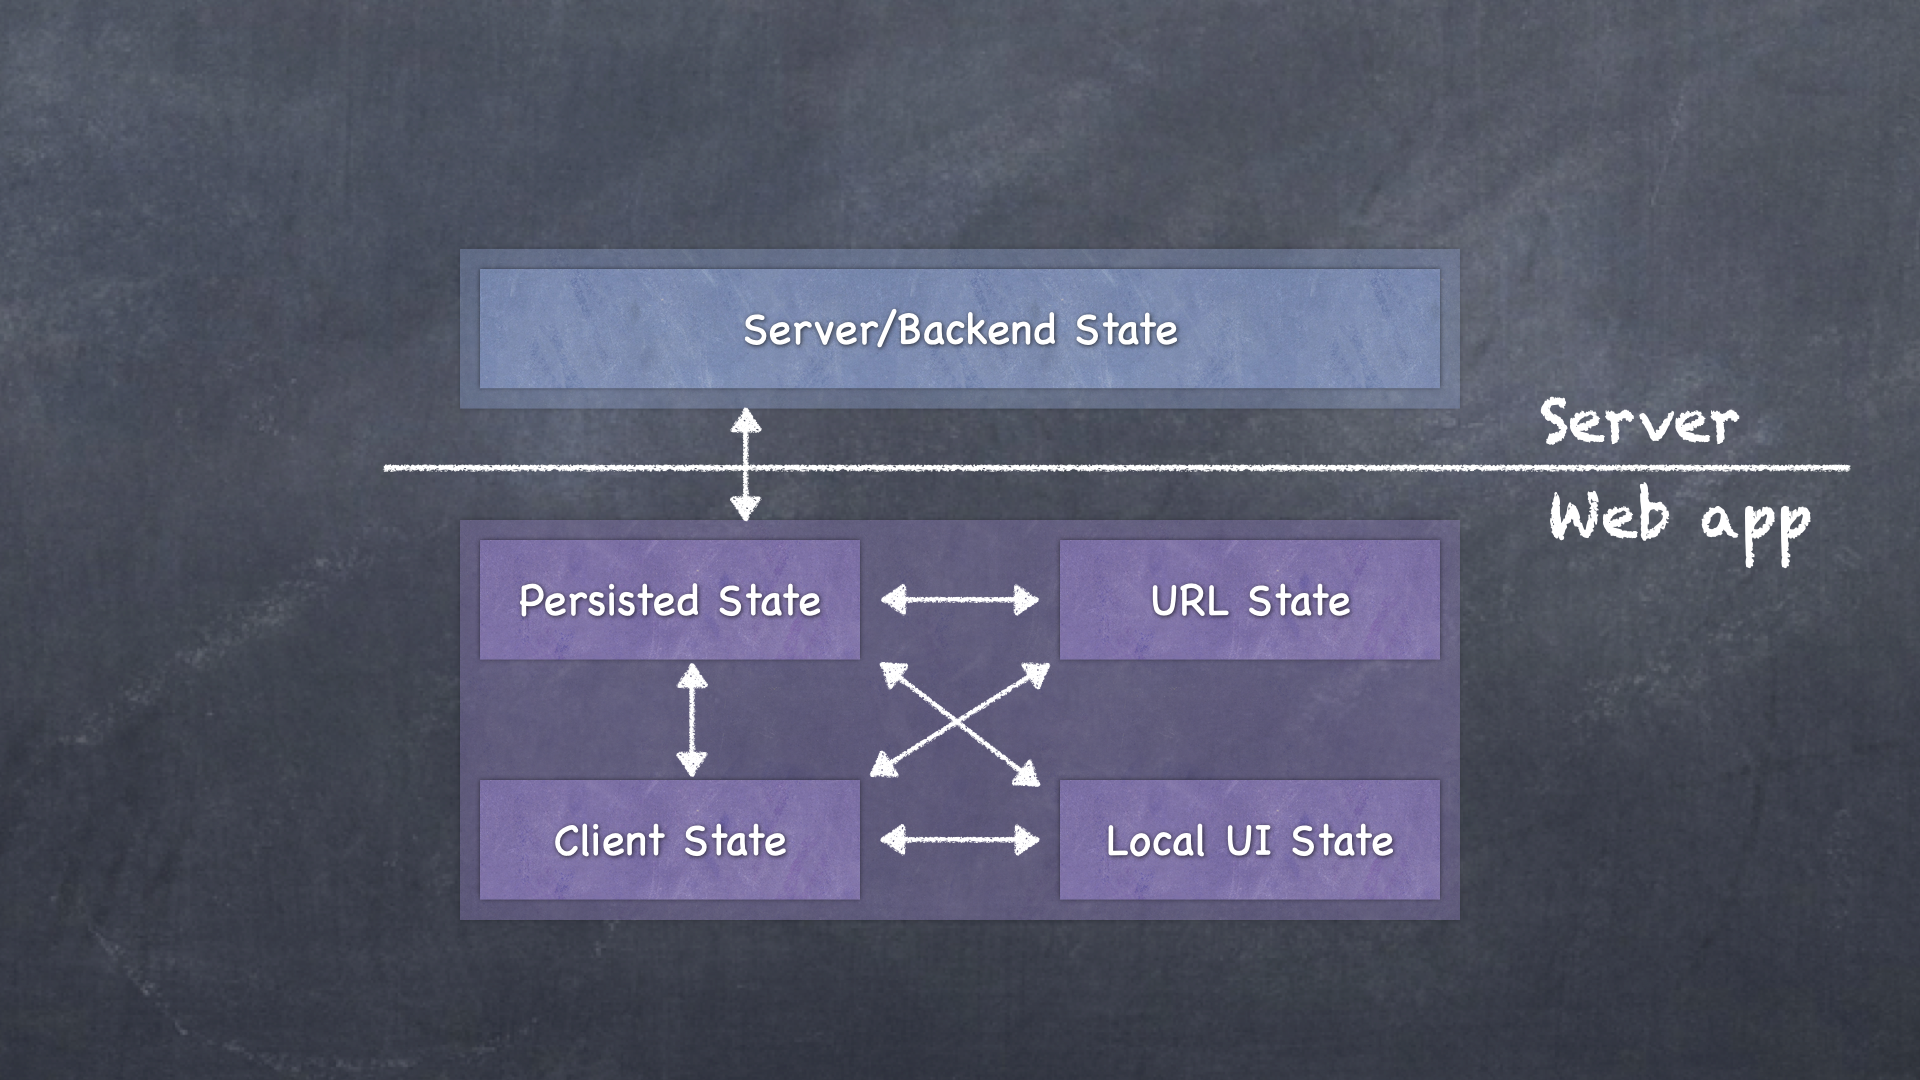
-
Example 1: ComponentStore as part of the component
-
The simplest example usage of ComponentStore is reactive Local UI State.
-
A NOTE ABOUT COMPONENT REACTIVITY
- One of the ways to improve the performance of the application is to use the OnPush change detection strategy. However, contrary to the popular belief, we do not always need to tell Angular's change detection to markForCheck() or detectChanges() (or the Angular Ivy alternatives). As pointed out in this article on change detection, if the event originates from the component itself, the component will be dirty checked. This means that common presentational (aka dumb) components that interact with the rest of the application with Input(s)/Output(s) do not have to be overcomplicated with reactive state, even though we did it to the Toggle Component mentioned above.
-
Having said that, in most cases making Local UI State reactive is beneficial:
- For Zoneless application, the
asyncpipe can easily be substituted with a Zoneless alternative such as thengrxPush pipe - For components with non-trivial business logic, reactivity can organize the state better by clearly separating actual state from derived values and identifying side-effects.
- For Zoneless application, the
-
ComponentStore is not the only reactive Local UI State holder - sometimes FormControls are good enough. They contain the state and they have reactive APIs.
-
Here's the simplified SlideToggleComponent example which uses ComponentStore for Local UI State. In this example, the ComponentStore is provided directly by the component itself, which might not be the best choice for most of the use cases of ComponentStore. Instead, consider a service that extends ComponentStore.
-
src/app/slide-toggle.component.ts
import { Component, Input, ChangeDetectionStrategy, ElementRef, Output, ViewChild, ViewEncapsulation, } from '@angular/core'; import { ComponentStore } from '@ngrx/component-store'; import { tap } from 'rxjs/operators'; export interface SlideToggleState { checked: boolean; } /** Change event object emitted by a SlideToggleComponent. */ export interface MatSlideToggleChange { /** The source MatSlideToggle of the event. */ readonly source: SlideToggleComponent; /** The new `checked` value of the MatSlideToggle. */ readonly checked: boolean; } @Component({ selector: 'mat-slide-toggle', templateUrl: 'slide-toggle.html', styleUrls: ['./slide-toggle.scss'], encapsulation: ViewEncapsulation.None, changeDetection: ChangeDetectionStrategy.OnPush, providers: [ComponentStore], }) export class SlideToggleComponent { @Input() set checked(value: boolean) { this.setChecked(value); } // Observable<MatSlideToggleChange> used instead of EventEmitter @Output() readonly change = this.componentStore.select((state) => ({ source: this, checked: state.checked, })); @ViewChild('input') inputElement: ElementRef<HTMLInputElement>; readonly setChecked = this.componentStore.updater( (state, value: boolean) => ({ ...state, checked: value }) ); // ViewModel for the component readonly vm$ = this.componentStore.select((state) => ({ checked: state.checked, })); constructor( private readonly componentStore: ComponentStore<SlideToggleState> ) { // set defaults this.componentStore.setState({ checked: false, }); } onChangeEvent = this.componentStore.effect<Event>((event$) => { return event$.pipe( tap<Event>((event) => { event.stopPropagation(); this.setChecked(this.inputElement.nativeElement.checked); }) ); }); } -
src/app/slide-toggle.html
<div class="mat-slide-toggle mat-slide-toggle-label-before" *ngIf="vm$ | async as vm" [class.mat-checked]="vm.checked"> <label class="mat-slide-toggle-label" #label> <div #toggleBar class="mat-slide-toggle-bar" [class.mat-slide-toggle-bar-no-side-margin]="!labelContent.textContent || !labelContent.textContent.trim()"> <input #input class="mat-slide-toggle-input cdk-visually-hidden" type="checkbox" role="switch" [checked]="vm.checked" [attr.aria-checked]="vm.checked.toString()" (change)="onChangeEvent($event)" > <div class="mat-slide-toggle-thumb-container" #thumbContainer> <div class="mat-slide-toggle-thumb"></div> <div class="mat-slide-toggle-ripple mat-focus-indicator" mat-ripple [matRippleTrigger]="label" [matRippleCentered]="true" [matRippleRadius]="20" [matRippleAnimation]="{enterDuration: 150}"> <div class="mat-ripple-element mat-slide-toggle-persistent-ripple"></div> </div> </div> </div> <span class="mat-slide-toggle-content" #labelContent> <!-- Add an invisible span so JAWS can read the label --> <span style="display:none"> </span> <ng-content></ng-content> </span> </label> </div> -
Below are the steps of integrating ComponentStore into a component.
-
Step 1. Setting up
-
First, the state for the component needs to be identified. In SlideToggleComponent only the state of whether the toggle is turned ON or OFF is stored.
- src/app/slide-toggle.component.ts
export interface SlideToggleState {
  checked: boolean;
}
- src/app/slide-toggle.component.ts
-
Then we need to provide
ComponentStorein the component's providers, so that each new instance ofSlideToggleComponenthas its ownComponentStore. It also has to be injected into the constructor.-
In this example
ComponentStoreis provided directly in the component. This works for simple cases, however in real-world cases it is recommended to create a separate Service, for exampleSlideToggleStore, that would extendComponentStoreand would contain all the business logic. This new Service is then provided in the component. See examples below. -
src/app/slide-toggle.component.ts
@Component({
  selector: 'mat-slide-toggle',
  templateUrl: 'slide-toggle.html',
/* . . . */
  changeDetection: ChangeDetectionStrategy.OnPush,
  providers: [ComponentStore],
})
export class SlideToggleComponent {
/* . . . */
  constructor(
    private readonly componentStore: ComponentStore<SlideToggleState>
  ) {
/* . . . */
}
-
-
Next, the default state for the component needs to be set. It could be done lazily, however it needs to be done before any of
updaters are executed, because they rely on the state to be present and would throw an error if the state is not initialized by the time they are invoked.-
State is initialized by calling
setStateand passing an object that matches the interface ofSlideToggleState.-
setStatecould be called with either an object or a callback. -
When it is called with an object, state is initialized or reset to that object.
-
When it is called with a callback, the state is updated.
-
-
src/app/slide-toggle.component.ts
constructor(
  private readonly componentStore: ComponentStore<SlideToggleState>
) {
  // set defaults
  this.componentStore.setState({
    checked: false,
  });
}
-
-
-
Step 2. Updating state
-
In the slide-toggle example, the state is updated either through @Input or by a user interaction, which results in a onChangeEvent($event) call in the template. Both of them change the same piece of state - checked: boolean, thus we have the setChecked updater that is reused in two places. This updater describes HOW the state changes - it takes the current state and a value and returns the new state.
-
@Input here is a setter function that passes the value to the setChecked updater.
-
When a user clicks the toggle (triggering a 'change' event), instead of calling the same updater directly, the onChangeEvent effect is called. This is done because we also need to have the side-effect of event.stopPropagation() to prevent this event from bubbling up (slide-toggle output event in named 'change' as well) and only after that the setChecked updater is called with the value of the input element.
-
src/app/slide-toggle.component.ts
@Input() set checked(value: boolean) {
    this.setChecked(value);
  }
/* . . . */
  readonly setChecked = this.componentStore.updater(
    (state, value: boolean) => ({ ...state, checked: value })
  );
/* . . . */
  onChangeEvent = this.componentStore.effect<Event>((event$) => {
    return event$.pipe(
      tap<Event>((event) => {
        event.stopPropagation();
        this.setChecked(this.inputElement.nativeElement.checked);
      })
    );
  });
-
-
Step 3. Reading the state
-
Finally, the state is aggregated with selectors into two properties:
vm$property collects all the data needed for the template - this is the ViewModel ofSlideToggleComponent.changeis the@OutputofSlideToggleComponent. Instead of creating anEventEmitter, here the output is connected to the Observable source directly.
-
src/app/slide-toggle.component.ts
// Observable<MatSlideToggleChange> used instead of EventEmitter
@Output() readonly change = this.componentStore.select((state) => ({
  source: this,
  checked: state.checked,
}));
/* . . . */
// ViewModel for the component
readonly vm$ = this.componentStore.select((state) => ({
  checked: state.checked,
}));
-
-
This example does not have a lot of business logic, however it is still fully reactive.
-
-
-
Example 2: Service extending ComponentStore
-
SlideToggleComponent is a fairly simple component and having ComponentStore within the component itself is still manageable. When components takes more Inputs and/or has more events within its template, it becomes larger and harder to read/maintain.
-
Extracting the business logic of a component into a separate Service also helps reduce the cognitive load while reading the components code.
-
A Service that extends ComponentStore and contains business logic of the component brings many advantages. This is also the recommended usage of ComponentStore.
-
ComponentStorewas designed with such an approach in mind. The main APIs ofComponentStore(updater,selectandeffect) are meant to wrap the HOW state is changed, extracted or effected, and then called with arguments. -
Below are the two examples of a re-implemented Paginator component from Angular Material (a UI component library). These re-implementations are very functionally close alternatives.
-
What we can see is that while the "PaginatorComponent providing ComponentStore" example already makes the component a lot smaller, reactive, removes
this._changeDetectorRef.markForCheck()and organizes it into distinct "read"/"write"/"effect" buckets, it still could be hard to read. The "PaginatorComponent with PaginatorStore" example adds readability and further improves the testability of behaviors and business logic. -
PaginatorComponent with PaginatorStore Service
import { Component, Input, ChangeDetectionStrategy, Output, ViewEncapsulation, } from '@angular/core'; import { PaginatorStore } from './paginator.store'; @Component({ selector: 'paginator', templateUrl: 'paginator.html', host: { 'class': 'mat-paginator', }, styleUrls: ['./paginator.scss'], encapsulation: ViewEncapsulation.None, changeDetection: ChangeDetectionStrategy.OnPush, providers: [PaginatorStore], }) export class PaginatorComponent { @Input() set pageIndex(value: string | number) { this.paginatorStore.setPageIndex(value); } @Input() set length(value: string | number) { this.paginatorStore.setLength(value); } @Input() set pageSize(value: string | number) { this.paginatorStore.setPageSize(value); } @Input() set pageSizeOptions(value: readonly number[]) { this.paginatorStore.setPageSizeOptions(value); } // Outputing the event directly from the page$ Observable<PageEvent> property. /** Event emitted when the paginator changes the page size or page index. */ @Output() readonly page = this.paginatorStore.page$; // ViewModel for the PaginatorComponent readonly vm$ = this.paginatorStore.vm$; constructor(private readonly paginatorStore: PaginatorStore) {} changePageSize(newPageSize: number) { this.paginatorStore.changePageSize(newPageSize); } nextPage() { this.paginatorStore.nextPage(); } firstPage() { this.paginatorStore.firstPage(); } previousPage() { this.paginatorStore.previousPage(); } lastPage() { this.paginatorStore.lastPage(); } } -
src/app/paginator.store.ts
import { Injectable } from '@angular/core'; import { ComponentStore } from '@ngrx/component-store'; import { filter, tap, map, withLatestFrom, pairwise, skip } from 'rxjs/operators'; import { Observable } from 'rxjs'; export interface PaginatorState { /** The current page index. */ pageIndex: number; /** The current page size */ pageSize: number; /** The current total number of items being paged */ length: number; /** The set of provided page size options to display to the user. */ pageSizeOptions: ReadonlySet<number>; } /** * Change event object that is emitted when the user selects a * different page size or navigates to another page. */ export interface PageEvent extends Pick<PaginatorState, 'pageIndex' | 'pageSize' | 'length'> { /** * Index of the page that was selected previously. */ previousPageIndex?: number; } @Injectable() export class PaginatorStore extends ComponentStore<PaginatorState> { constructor() { // set defaults super({ pageIndex: 0, pageSize: 50, length: 0, pageSizeOptions: new Set<number>([50]), }); } // *********** Updaters *********** // readonly setPageIndex = this.updater((state, value: string | number) => ({ ...state, pageIndex: Number(value) || 0, })); readonly setPageSize = this.updater((state, value: string | number) => ({ ...state, pageSize: Number(value) || 0, })); readonly setLength = this.updater((state, value: string | number) => ({ ...state, length: Number(value) || 0, })); readonly setPageSizeOptions = this.updater( (state, value: readonly number[]) => { // Making sure that the pageSize is included and sorted const pageSizeOptions = new Set<number>( [...value, state.pageSize].sort((a, b) => a - b) ); return { ...state, pageSizeOptions }; } ); readonly changePageSize = this.updater((state, newPageSize: number) => { const startIndex = state.pageIndex * state.pageSize; return { ...state, pageSize: newPageSize, pageIndex: Math.floor(startIndex / newPageSize), }; }); // *********** Selectors *********** // readonly hasPreviousPage$ = this.select( ({ pageIndex, pageSize }) => pageIndex >= 1 && pageSize != 0 ); readonly numberOfPages$ = this.select(({ pageSize, length }) => { if (!pageSize) return 0; return Math.ceil(length / pageSize); }); readonly hasNextPage$ = this.select( this.state$, this.numberOfPages$, ({ pageIndex, pageSize }, numberOfPages) => { const maxPageIndex = numberOfPages - 1; return pageIndex < maxPageIndex && pageSize != 0; } ); readonly rangeLabel$ = this.select(({ pageIndex, pageSize, length }) => { if (length === 0 || pageSize === 0) return `0 of ${length}`; length = Math.max(length, 0); const startIndex = pageIndex * pageSize; // If the start index exceeds the list length, do not try and fix the end index to the end. const endIndex = startIndex < length ? Math.min(startIndex + pageSize, length) : startIndex + pageSize; return `${startIndex + 1} – ${endIndex} of ${length}`; }); // ViewModel of Paginator component readonly vm$ = this.select( this.state$, this.hasPreviousPage$, this.hasNextPage$, this.rangeLabel$, (state, hasPreviousPage, hasNextPage, rangeLabel) => ({ pageSize: state.pageSize, pageSizeOptions: Array.from(state.pageSizeOptions), pageIndex: state.pageIndex, hasPreviousPage, hasNextPage, rangeLabel, }) ); private readonly pageIndexChanges$ = this.state$.pipe( // map instead of select, so that non-distinct value could go through map((state) => state.pageIndex), pairwise() ); readonly page$: Observable<PageEvent> = this.select( // first Observable 👇 this.pageIndexChanges$, // second Observable 👇 this.select((state) => [state.pageSize, state.length]), // Now combining the results from both of these Observables into a PageEvent object ([previousPageIndex, pageIndex], [pageSize, length]) => ({ pageIndex, previousPageIndex, pageSize, length, }), // debounce, so that we let the state "settle" { debounce: true } ).pipe( // Skip the emission of the initial state values skip(1) ); readonly nextPage = this.effect((trigger$) => { return trigger$.pipe( withLatestFrom(this.hasNextPage$), filter(([, hasNextPage]) => hasNextPage), tap(() => { this.setPageIndex(this.get().pageIndex + 1); }) ); }); readonly firstPage = this.effect((trigger$) => { return trigger$.pipe( withLatestFrom(this.hasPreviousPage$), filter(([, hasPreviousPage]) => hasPreviousPage), tap(() => { this.setPageIndex(0); }) ); }); readonly previousPage = this.effect((trigger$) => { return trigger$.pipe( withLatestFrom(this.hasPreviousPage$), filter(([, hasPreviousPage]) => hasPreviousPage), tap(() => { this.setPageIndex(this.get().pageIndex - 1); }) ); }); readonly lastPage = this.effect((trigger$) => { return trigger$.pipe( withLatestFrom(this.hasNextPage$, this.numberOfPages$), filter(([, hasNextPage]) => hasNextPage), tap(([, , numberOfPages]) => { this.setPageIndex(numberOfPages - 1); }) ); }); } -
PaginatorComponent providing ComponentStore
import { Component, Input, ChangeDetectionStrategy, Output, EventEmitter, ViewEncapsulation, } from '@angular/core'; import { ComponentStore } from '@ngrx/component-store'; import { filter, tap, withLatestFrom, map, pairwise, skip } from 'rxjs/operators'; export interface PaginatorState { /** The current page index. */ pageIndex: number; /** The current page size */ pageSize: number; /** The current total number of items being paged */ length: number; /** The set of provided page size options to display to the user. */ pageSizeOptions: ReadonlySet<number>; } /** * Change event object that is emitted when the user selects a * different page size or navigates to another page. */ export interface PageEvent extends Pick<PaginatorState, 'pageIndex' | 'pageSize' | 'length'> { /** * Index of the page that was selected previously. */ previousPageIndex?: number; } @Component({ selector: 'paginator', templateUrl: 'paginator.html', host: { 'class': 'mat-paginator', }, styleUrls: ['./paginator.scss'], encapsulation: ViewEncapsulation.None, changeDetection: ChangeDetectionStrategy.OnPush, providers: [ComponentStore], }) export class PaginatorComponent { @Input() set pageIndex(value: string | number) { this.setPageIndex(value); } @Input() set length(value: string | number) { this.componentStore.setState((state) => ({ ...state, length: Number(value) || 0, })); } @Input() set pageSize(value: string | number) { this.componentStore.setState((state) => ({ ...state, pageSize: Number(value) || 0, })); } @Input() set pageSizeOptions(value: readonly number[]) { this.componentStore.setState((state) => { // Making sure that the pageSize is included and sorted const pageSizeOptions = new Set<number>( [...value, state.pageSize].sort((a, b) => a - b) ); return { ...state, pageSizeOptions }; }); } private readonly pageIndexChanges$ = this.componentStore.state$.pipe( // map instead of select, so that non-distinct value could go through map((state) => state.pageIndex), pairwise() ); @Output() readonly page = this.componentStore.select( // first Observable � this.pageIndexChanges$, // second Observable � this.componentStore.select((state) => [state.pageSize, state.length]), // Now combining the results from both of these Observables into a PageEvent object ([previousPageIndex, pageIndex], [pageSize, length]) => ({ pageIndex, previousPageIndex, pageSize, length, }), // debounce, so that we let the state "settle" before emitting a value { debounce: true } ).pipe( // Skip the emission of the initial state values skip(1) ); // *********** Updaters *********** // readonly setPageIndex = this.componentStore.updater( (state, value: string | number) => ({ ...state, pageIndex: Number(value) || 0, }) ); readonly changePageSize = this.componentStore.updater( (state, newPageSize: number) => { const startIndex = state.pageIndex * state.pageSize; return { ...state, pageSize: newPageSize, pageIndex: Math.floor(startIndex / newPageSize), }; } ); // *********** Selectors *********** // readonly hasPreviousPage$ = this.componentStore.select( ({ pageIndex, pageSize }) => pageIndex >= 1 && pageSize != 0 ); readonly numberOfPages$ = this.componentStore.select( ({ pageSize, length }) => { if (!pageSize) return 0; return Math.ceil(length / pageSize); } ); readonly hasNextPage$ = this.componentStore.select( this.componentStore.state$, this.numberOfPages$, ({ pageIndex, pageSize }, numberOfPages) => { const maxPageIndex = numberOfPages - 1; return pageIndex < maxPageIndex && pageSize != 0; } ); readonly rangeLabel$ = this.componentStore.select( ({ pageIndex, pageSize, length }) => { if (length == 0 || pageSize == 0) { return `0 of ${length}`; } length = Math.max(length, 0); const startIndex = pageIndex * pageSize; // If the start index exceeds the list length, do not try and fix the end index to the end. const endIndex = startIndex < length ? Math.min(startIndex + pageSize, length) : startIndex + pageSize; return `${startIndex + 1} – ${endIndex} of ${length}`; } ); // ViewModel of Paginator component readonly vm$ = this.componentStore.select( this.componentStore.state$, this.hasPreviousPage$, this.hasNextPage$, this.rangeLabel$, (state, hasPreviousPage, hasNextPage, rangeLabel) => ({ pageSize: state.pageSize, pageSizeOptions: Array.from(state.pageSizeOptions), pageIndex: state.pageIndex, hasPreviousPage, hasNextPage, rangeLabel, }) ); // *********** Effects *********** // readonly lastPage = this.componentStore.effect((trigger$) => { return trigger$.pipe( withLatestFrom(this.numberOfPages$), tap(([, numberOfPages]) => { this.setPageIndex(numberOfPages - 1); }) ); }); constructor(private readonly componentStore: ComponentStore<PaginatorState>) { // set defaults this.componentStore.setState({ pageIndex: 0, pageSize: 50, length: 0, pageSizeOptions: new Set<number>([50]), }); } } -
Updating the state
-
With
ComponentStoreextracted intoPaginatorStore, the developer is now using updaters and effects to update the state.@Inputvalues are passed directly into updaters as their arguments. -
src/app/paginator.store.ts
@Input() set pageIndex(value: string | number) { this.paginatorStore.setPageIndex(value); } @Input() set length(value: string | number) { this.paginatorStore.setLength(value); } @Input() set pageSize(value: string | number) { this.paginatorStore.setPageSize(value); } @Input() set pageSizeOptions(value: readonly number[]) { this.paginatorStore.setPageSizeOptions(value); } -
Not all
updaters have to be called in the @Input. For example,changePageSizeis called from the template.
-
-
Effects are used to perform additional validation and get extra information from sources with derived data (i.e. selectors).
- src/app/paginator.store.ts
changePageSize(newPageSize: number) {
  this.paginatorStore.changePageSize(newPageSize);
}
nextPage() {
  this.paginatorStore.nextPage();
}
firstPage() {
  this.paginatorStore.firstPage();
}
previousPage() {
  this.paginatorStore.previousPage();
}
lastPage() {
  this.paginatorStore.lastPage();
}
- src/app/paginator.store.ts
-
Reading the state
-
PaginatorStoreexposes the two properties:vm$for an aggregated ViewModel to be used in the template andpage$that would emit whenever data aggregated from aPageEventchanges. -
src/app/paginator.component.ts
// Outputing the event directly from the page$ Observable<PageEvent> property. /** Event emitted when the paginator changes the page size or page index. */ @Output() readonly page = this.paginatorStore.page$; // ViewModel for the PaginatorComponent readonly vm$ = this.paginatorStore.vm$; -
src/app/paginator.store.ts
// ViewModel of Paginator component readonly vm$ = this.select( this.state$, this.hasPreviousPage$, this.hasNextPage$, this.rangeLabel$, (state, hasPreviousPage, hasNextPage, rangeLabel) => ({ pageSize: state.pageSize, pageSizeOptions: Array.from(state.pageSizeOptions), pageIndex: state.pageIndex, hasPreviousPage, hasNextPage, rangeLabel, }) ); private readonly pageIndexChanges$ = this.state$.pipe( // map instead of select, so that non-distinct value could go through map((state) => state.pageIndex), pairwise() ); readonly page$: Observable<PageEvent> = this.select( // first Observable � this.pageIndexChanges$, // second Observable � this.select((state) => [state.pageSize, state.length]), // Now combining the results from both of these Observables into a PageEvent object ([previousPageIndex, pageIndex], [pageSize, length]) => ({ pageIndex, previousPageIndex, pageSize, length, }), // debounce, so that we let the state "settle" { debounce: true } ).pipe( // Skip the emission of the initial state values skip(1) ); -
page$would emitPageEventwhen page size or page index changes, however in some cases updater would update both of these properties at the same time. To avoid "intermediary" emissions,page$selector is using{debounce: true}configuration.
-
-
-
Local UI State patterns
-
Components that use
ComponentStorefor managing Local UI State are frequently callingupdaters directly. -
Effects can also be used when:
- side effects are required (e.g. event.stopPropagation())
- derived data (from selectors) is needed to influence the new state
- they are orchestrating a number of well-defined updaters
-
The last point can sometimes be refactored into another
updater. Use your best judgment. -
@Output()s and derived data are reacting to these state changes and are generated usingselectors. -
A ViewModel for the component is also composed from
selectors.
-
- NgRx Data is an extension that offers a gentle introduction to NgRx by simplifying management of entity data while reducing the amount of explicitness.
-
Many applications have substantial domain models with 10s or 100s of entity types.
-
Such applications typically create, retrieve, update, and delete entity data that are "persisted" in a database of some sort, hosted on a remote server.
-
Developers who build these apps with the NgRx Store, Effects, and Entity libraries alone tend to write a large number of actions, action-creators, reducers, effects, dispatchers, and selectors as well as the HTTP GET, PUT, POST, and DELETE methods for each entity type. There will be a lot of repetitive code to create, maintain, and test. The more entities in your model, the bigger the challenge.
-
With NgRx Data you can develop large entity models quickly with very little code and without knowing much NgRx at all. Yet all of NgRx remains accessible to you, when and if you want it.
-
NgRx Data is an abstraction over the Store, Effects, and Entity that radically reduces the amount of code you'll write. As with any abstraction, while you gain simplicity, you lose the explicitness of direct interaction with the supporting NgRx libraries.
-
NgRx Data
- automates the creation of actions, reducers, effects, dispatchers, and selectors for each entity type.
- provides default HTTP GET, PUT, POST, and DELETE methods for each entity type.
- holds entity data as collections within a cache which is a slice of NgRx store state.
- supports optimistic and pessimistic save strategies
- enables transactional save of multiple entities of multiple types in the same request.
- makes reasonable default implementation choices
- offers numerous extension points for changing or augmenting those default behaviors.
-
NgRx Data targets management of persisted entity data, like Customers and Orders, that many apps query and save to remote storage. That's its sweet spot.
-
It is ill-suited to non-entity data. Value types, enumerations, session data and highly idiosyncratic data are better managed with standard NgRx. Real-world apps will benefit from a combination of NgRx techniques, all sharing a common store.
-
Entity
-
An entity is an object with long-lived data values that you read from and write to a database. An entity refers to some "thing" in the application domain. Examples include a Customer, Order, LineItem, Product, Person and User.
-
An entity is a specific kind of data, an object defined by its thread of continuity and identity.
-
We experience its "continuity" by storing and retrieving ("persisting") entity objects in a permanent store on a server, a store such as a database. Whether we retrieve the "Sally" entity today or tomorrow or next week, we "mean" that we're getting the same conceptual "Sally" no matter how her data attributes have changed.
-
In NgRx Data we maintain the entity object's identity by means of its primary key. Every entity in NgRx Data must have a primary key. The primary key is usually a single attribute of the object. For example, that "Sally" entity object might be an instance of the "Customer" entity type, an instance whose permanent, unchanging primary key is the id property with a value of 42.
-
The primary key doesn't have to be a single attribute. It can consist of multiple attributes of the object if you need that feature. What matters is that the primary key uniquely identifies that object within a permanent collection of entities of the same type. There can be exactly one Customer entity with id: 42 and that entity is "Sally".
-
-
Entity Collection
-
The notion of an Entity Collection is also fundamental to NgRx Data. All entities belong to a collection of the same entity type. A Customer entity belongs to a Customers collection.
-
Even if you have only one instance of an entity type, it must be held within an entity collection: perhaps a collection with a single element.
-
-
A
EntityMetadataMaptells NgRx Data about your entities. Add a property to the set for each entity name. -
entity-metadata.ts
import { EntityMetadataMap } from '@ngrx/data'; const entityMetadata: EntityMetadataMap = { Hero: {}, Villain: {} }; // because the plural of "hero" is not "heros" const pluralNames = { Hero: 'Heroes' }; export const entityConfig = { entityMetadata, pluralNames }; -
Export the entity configuration to be used when registering it in your AppModule.
-
Once the entity configuration is created, you need to put it into the root store for NgRx. This is done by importing the
entityConfigand then passing it to theEntityDataModule.forRoot()function. -
app.module.ts
import { NgModule } from '@angular/core';
import { HttpClientModule } from '@angular/common/http';
import { EffectsModule } from '@ngrx/effects';
import { StoreModule } from '@ngrx/store';
import { DefaultDataServiceConfig, EntityDataModule } from '@ngrx/data';
import { entityConfig } from './entity-metadata';

@NgModule({
  imports: [
    HttpClientModule,
    StoreModule.forRoot({}),
    EffectsModule.forRoot([]),
    EntityDataModule.forRoot(entityConfig)
  ]
})
export class AppModule {}
-
NgRx Data handles creating, retrieving, updating, and deleting data on your server by extending
EntityCollectionServiceBasein your service class. -
hero.service.ts
import { Injectable } from '@angular/core';
import {
  EntityCollectionServiceBase,
  EntityCollectionServiceElementsFactory
} from '@ngrx/data';
import { Hero } from '../core';

@Injectable({ providedIn: 'root' })
export class HeroService extends EntityCollectionServiceBase<Hero> {
  constructor(serviceElementsFactory: EntityCollectionServiceElementsFactory) {
    super('Hero', serviceElementsFactory);
  }
}
-
To access the entity data, components should inject entity data services.
-
heroes.component.ts
import { Component, OnInit } from '@angular/core'; import { Observable } from 'rxjs'; import { Hero } from '../../core'; import { HeroService } from '../hero.service'; @Component({ selector: 'app-heroes', templateUrl: './heroes.component.html', styleUrls: ['./heroes.component.scss'] }) export class HeroesComponent implements OnInit { loading$: Observable<boolean>; heroes$: Observable<Hero[]>; constructor(private heroService: HeroService) { this.heroes$ = heroService.entities$; this.loading$ = heroService.loading$; } ngOnInit() { this.getHeroes(); } add(hero: Hero) { this.heroService.add(hero); } delete(hero: Hero) { this.heroService.delete(hero.id); } getHeroes() { this.heroService.getAll(); } update(hero: Hero) { this.heroService.update(hero); } }-
In this example, you need to listen for the stream of heroes. The
heroes$property references theheroService.entities$Observable. When state is changed as a result of a successful HTTP request (initiated bygetAll(), for example), theheroes$property will emit the latest Hero array. -
By default, the service includes the loading$ Observable to indicate whether an HTTP request is in progress. This helps applications manage loading states.
-
-
Installing with ng add
ng add @ngrx/data@latest-
This command will automate the following steps:
- Update package.json > dependencies with @ngrx/data.
- Run npm install to install those dependencies.
- Update your src/app/app.module.ts > imports array with
EntityDataModuleorEntityDataModuleWithoutEffectsdepending on theeffectsflag.
-
-
Installing with npm
npm install @ngrx/data --save -
Installing with yarn
yarn add @ngrx/data
-
You describe your entity model to NgRx Data in a few lines of entity metadata and let the library do the rest of the work.
-
Your component injects an NgRx Data EntityCollectionService and calls one or more of the standard set of command methods for dispatching actions.
-
Your component also subscribes to one or more of the service's
Observableselectors in order to reactively process and display entity state changes produced by those commands. -
NgRx Data is really just NgRx under the hood. The data flows in typical NgRx fashion. The following diagram illustrates the journey of a persistence
EntityActionsuch asQUERY_ALLfor theHeroentity type.-
The view/component calls
EntityCollectionService.getAll(), which dispatches the hero'sQUERY_ALLEntityActionto the store. -
NgRx kicks into gear ...
-
The NgRx Data
EntityReducerreads the action'sentityNameproperty (Heroin this example) and forwards the action and existing entity collection state to theEntityCollectionReducerfor heroes. -
The collection reducer picks a switch-case based on the action's
entityOp(operation) property. That case processes the action and collection state into a new (updated) hero collection. -
The store updates the entity cache in the state tree with that updated collection.
-
NgRx observable selectors detect and report the changes (if any) to subscribers in the view.
-
The original
EntityActionthen goes to theEntityEffects. -
The effect selects an
EntityDataServicefor that entity type. The data service sends an HTTP request to the server. -
The effect turns the HTTP response into a new success action with heroes (or an error action if the request failed).
-
NgRx effects Dispatches that action to the store, which reiterates step #2 to update the collection with heroes and refresh the view.
-
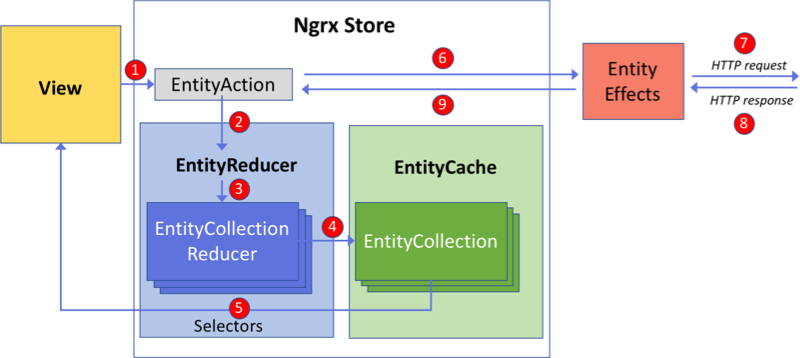
-
The NgRx Data library maintains a cache of entity collection data in the NgRx store.
-
You tell the NgRx Data library about those collections and the entities they contain with entity metadata.
-
The entities within a collection belong to the same entity type. Each entity type appears as named instance of the NgRx Data
EntityMetadata<T>interface. -
You can specify metadata for several entities at the same time in an EntityMetadataMap.
-
Here is an example
EntityMetadataMapsimilar to the one in the demo app that defines metadata for two entities,HeroandVillain. -
app-entity-metadata.ts
export const appEntityMetadata: EntityMetadataMap = { Hero: { /* optional settings */ filterFn: nameFilter, sortComparer: sortByName }, Villain: { villainSelectId, // necessary if key is not `id` /* optional settings */ entityName: 'Villain', // optional because same as map key filterFn: nameAndSayingFilter, entityDispatcherOptions: { optimisticAdd: true, optimisticUpdate: true } } }; -
Register metadata
-
You must register the metadata with the NgRx Data
EntityDefinitionService. -
The easiest way to register metadata is to define a single
EntityMetadataMapfor the entire application and specify it in the one place where you initialize the NgRx Data library:EntityDataModule.forRoot({ ... entityMetadata: appEntityMetadata, ... }) -
If you define entities in several, different eagerly-loaded Angular modules, you can add the metadata for each module with the multi-provider.
{ provide: ENTITY_METADATA_TOKEN, multi: true, useValue: someEntityMetadata } -
This technique won't work for a lazy-loaded module. The
ENTITY_METADATA_TOKENprovider was already set and consumed by the time the lazy-loaded module arrives. -
The module should inject the
EntityDefinitionServiceinstead and register metadata directly with one of the registration methods.@NgModule({...}) class LazyModule { constructor(eds: EntityDefinitionService) { eds.registerMetadataMap(this.lazyMetadataMap); } ... }
-
-
Metadata Properties
-
The
EntityMetadata<T>interface describes aspects of an entity type that tell the NgRx Data library how to manage collections of entity data of typeT. -
Type
Tis your application's TypeScript representation of that entity; it can be an interface or a class. -
entityName
-
The entityName of the type is the only required metadata property. It's the unique key of the entity type's metadata in cache.
-
It must be specified for individual EntityMetadata instances. If you omit it in an EntityMetadataMap, the map key becomes the entityName as in this example.
const map = { Hero: {} // "Hero" becomes the entityName }; -
The spelling and case (typically PascalCase) of the entityName is important for NgRx Data conventions. It appears in the generated entity actions, in error messages, and in the persistence operations.
-
Importantly, the default entity dataservice creates HTTP resource URLs from the lowercase version of this name. For example, if the entityName is "Hero", the default data service will POST to a URL such as 'api/hero'.
-
Note:
-
By default it generates the plural of the entity name when preparing a collection resource URL.
-
It isn't good at pluralization. It would produce 'api/heros' for the URL to fetch all heroes because it blindly adds an 's' to the end of the lowercase entity name.
-
Of course the proper plural of "hero" is "heroes", not "heros". You'll see how to correct this problem below.
-
-
-
filterFn
-
Many applications allow the user to filter a cached entity collection.
-
In the accompanying demonstration app, the user can filter heroes by name and can filter villains by name or the villain's saying.
-
We felt this common scenario is worth building into the NgRx Data library. So every entity can have an optional filter function.
-
Each collection's filteredEntities selector applies the filter function to the collection, based on the user's filtering criteria, which are held in the stored entity collection's filter property.
-
If there is no filter function, the filteredEntities selector is the same as the selectAll selector, which returns all entities in the collection.
-
A filter function (see EntityFilterFn) takes an entity collection and the user's filtering criteria (the filter pattern) and returns an array of the selected entities.
-
Here's an example that filters for entities with a
nameproperty whose value contains the search string.export function nameFilter(entities: { name: string }[], search: string) { return entities.filter(e => -1 < e.name.indexOf(search)); } -
The NgRx Data library includes a helper function,
PropsFilterFnFactory<T>, that creates an entity filter function which will treat the user's input as a case-insensitive, regular expression and apply it to one or more properties of the entity. -
The demo uses this helper to create hero and villain filters. Here's how the app creates the
nameAndSayingFilterfunction for villains./** * Filter for entities whose name or saying * matches the case-insensitive pattern. */ export function nameAndSayingFilter(entities: Villain[], pattern: string) { return PropsFilterFnFactory<Villain> ['name', 'saying'](entities, pattern); }
-
-
selectId
-
Every entity type must have a primary key whose value is an integer or a string.
-
The NgRx Data library assumes that the entity has an id property whose value is the primary key.
-
Not every entity will have a primary key property named id. For some entities, the primary key could be the combined value of two or more properties.
-
In these cases, you specify a selectId function that, given an entity instance, returns an integer or string primary key value.
-
In the EntityCollectionReducer tests, the Villain type has a string primary key property named
key. The selectorId function is this:selectId: (villain: Villain) => villain.key;
-
-
sortComparer
-
The NgRx Data library keeps the collection entities in a specific order.
- This is actually a feature of the underlying NgRx Entity library.
-
The default order is the order in which the entities arrive from the server. The entities you add are pushed to the end of the collection.
-
You may prefer to maintain the collection in some other order. When you provide a
sortComparerfunction, the NgRx-lib keeps the collection in the order prescribed by your comparer. -
In the demo app, the villains metadata has no comparer so its entities are in default order.
-
The hero metadata have a
sortByNamecomparer that keeps the collection in alphabetical order by name.export function sortByName(a: { name: string }, b: { name: string }): number { return a.name.localeCompare(b.name); } -
Run the demo app and try changing existing hero names or adding new heroes.
-
Your app can call the
selectKeyselector to see the collection's ids property, which returns an array of the collection's primary key values in sorted order.
-
-
entityDispatcherOptions
-
These options determine the default behavior of the collection's dispatcher which sends actions to the reducers and effects.
-
A dispatcher save command will add, delete, or update the collection before sending a corresponding HTTP request (optimistic) or after (pessimistic). The caller can specify in the optional
isOptimisticparameter. If the caller doesn't specify, the dispatcher chooses based on default options. -
The defaults are the safe ones: optimistic for delete and pessimistic for add and update. You can override those choices here.
-
-
additionalCollectionState
-
Each NgRx Data entity collection in the store has predefined properties.
-
You can add your own collection properties by setting the additionalCollectionState property to an object with those custom collection properties.
-
The EntitySelectors tests illustrate by adding foo and bar collection properties to test hero metadata.
additionalCollectionState: { foo: 'Foo', bar: 3.14 }-
The property values become the initial collection values for those properties when NgRx Data first creates the collection in the store.
-
The NgRx Data library generates selectors for these properties, but has no way to update them. You'll have to create or extend the existing reducers to do that yourself.
-
If the property you want to add comes from backend, you will need some additional work to make sure the property can be saved into the store from Effects correctly.
-
Step 1: Implement PersistenceResultHandler to save data from backend to action.payload
- Create a new class AdditionalPersistenceResultHandler that extends DefaultPersistenceResultHandler and overwrite the handleSuccess method, the purpose is to parse the data received from DataService, retrieve the additional property, and then save this to the action.payload. Note that the default reducer for success actions requires that action.payload.data is an array of entities or an entity. This would need to be set after retrieving the additional property, not shown in the example below.
export class AdditionalPersistenceResultHandler extends DefaultPersistenceResultHandler { handleSuccess(originalAction: EntityAction): (data: any) => Action { const actionHandler = super.handleSuccess(originalAction); // return a factory to get a data handler to // parse data from DataService and save to action.payload return function(data: any) { const action = actionHandler.call(this, data); if (action && data && data.foo) { // save the data.foo to action.payload.foo (action as any).payload.foo = data.foo; } return action; }; } } -
Step 2: Overwrite EntityCollectionReducerMethods to save the additional property from action.payload to the EntityCollection instance
- Following the prior step, we have added the additional property to the action.payload. Up next we need to set it to the instance of EntityCollection in the reducer. In order to accomplish that, we need to create an AdditionalEntityCollectionReducerMethods that extends EntityCollectionReducerMethods. In addition, we will need to overwrite the method to match your action. For example, if the additional property foo is only available in queryMany action(triggered by EntityCollectionService.getWithQuery), we can follow this approach.
export class AdditionalEntityCollectionReducerMethods<T> extends EntityCollectionReducerMethods<T> { constructor(public entityName: string, public definition: EntityDefinition<T>) { super(entityName, definition); } protected queryManySuccess( collection: EntityCollection<T>, action: EntityAction<T[]> ): EntityCollection<T> { const ec = super.queryManySuccess(collection, action); if ((action.payload as any).foo) { // save the foo property from action.payload to entityCollection instance (ec as any).foo = (action.payload as any).foo; } return ec; } } -
Step 3: Register customized EntityCollectionReducerMethods and AdditionalPersistenceResultHandler.
-
Finally we need to register the AdditionalPersistenceResultHandler and AdditionalEntityCollectionReducerMethods to replace the default implementation.
-
Register AdditionalPersistenceResultHandler in NgModule,
@NgModule({ { provide: PersistenceResultHandler, useClass: AdditionalPersistenceResultHandler }, }) -
Register AdditionalEntityCollectionReducerMethods, to do that, we need to create an AdditionalEntityCollectionReducerMethodFactory, for details, see Entity Reducer
@Injectable() export class AdditionalEntityCollectionReducerMethodsFactory { constructor(private entityDefinitionService: EntityDefinitionService) {} /** Create the {EntityCollectionReducerMethods} for the named entity type */ create<T>(entityName: string): EntityCollectionReducerMethodMap<T> { const definition = this.entityDefinitionService.getDefinition<T>(entityName); const methodsClass = new AdditionalEntityCollectionReducerMethods(entityName, definition); return methodsClass.methods; } } -
Register AdditionalEntityCollectionReducerMethodsFactory to NgModule,
@NgModule({
  {
    provide: EntityCollectionReducerMethodsFactory,
    useClass: AdditionalEntityCollectionReducerMethodsFactory
  },
})
-
-
Now you can get
foofrom backend just like another EntityCollection level property.
-
-
-
-
Pluralizing the entity name
-
The NgRx Data DefaultDataService relies on the HttpUrlGenerator to create conventional HTTP resource names (URLs) for each entity type.
-
By convention, an HTTP request targeting a single entity item contains the lowercase, singular version of the entity type name. For example, if the entity type entityName is "Hero", the default data service will POST to a URL such as 'api/hero'.
-
By convention, an HTTP request targeting multiple entities contains the lowercase, plural version of the entity type name. The URL of a GET request that retrieved all heroes should be something like 'api/heroes'.
-
The HttpUrlGenerator can't pluralize the entity type name on its own. It delegates to an injected pluralizing class, called Pluralizer.
-
The Pluralizer class has a pluralize() method that takes the singular string and returns the plural string.
-
The default Pluralizer handles many of the common English pluralization rules such as appending an 's'. That's fine for the Villain type (which becomes "Villains") and even for Company (which becomes "Companies").
-
It's far from perfect. For example, it incorrectly turns Hero into "Heros" instead of "Heroes".
-
Fortunately, the default Pluralizer also injects a map of singular to plural strings (with the PLURAL_NAMES_TOKEN).
-
Its pluralize() method looks for the singular entity name in that map and uses the corresponding plural value if found. Otherwise, it returns the default pluralization of the entity name.
-
If this scheme works for you, create a map of singular-to-plural entity names for the exceptional cases:
export const pluralNames = { // Case matters. Match the case of the entity name. Hero: 'Heroes' }; -
Then specify this map while configuring the NgRx Data library.
EntityDataModule.forRoot({ ... pluralNames: pluralNames }) -
If you define your entity model in separate Angular modules, you can incrementally add a plural names map with the multi-provider.
{ provide: PLURAL_NAMES_TOKEN, multi: true, useValue: morePluralNames }
-If this scheme isn't working for you, replace the Pluralizer class with your own invention.
{ provide: Pluralizer, useClass: MyPluralizer } -
-
The EntityCollectionService dispatches an EntityAction to the NgRx store when you call one of its commands to query or update entities in a cached collection.
-
Action and EntityAction
-
A vanilla NgRx Action is a message. The message describes an operation that can change state in the store.
-
The action's
typeidentifies the operation. It's optionalpayloadcarries the message data necessary to perform the operation. -
An EntityAction is a super-set of the NgRx Action. It has additional properties that guide NgRx Data's handling of the action. Here's the full interface.
-
EntityAction
export interface EntityAction<P = any> extends Action { readonly type: string; readonly payload: EntityActionPayload<P>; } -
EntityActionPayload
export interface EntityActionPayload<P = any> extends EntityActionOptions { readonly entityName: string; readonly entityOp: EntityOp; readonly data?: P; // EntityActionOptions (also an interface) readonly correlationId?: any; readonly isOptimistic?: boolean; readonly mergeStrategy?: MergeStrategy; readonly tag?: string; error?: Error; skip?: boolean }- type - action name, typically generated from the tag and the entityOp.
- entityName - the name of the entity type.
- entityOp - the name of an entity operation.
- data? - the message data for the action.
- correlationId? - a serializable object (typically a string) for correlating related actions.
- isOptimistic? - true if should perform the action optimistically (before the server responds).
- mergeStrategy - how to merge an entity into the cache. See Change Tracking.
- tag? - the tag to use within the generated type. If not specified, the entityName is the tag.
- error? - an unexpected action processing error.
- skip? - true if downstream consumers should skip processing the action.
-
details: The type is the only property required by NgRx. It is a string that uniquely identifies the action among the set of all the types of actions that can be dispatched to the store.
NgRx Data doesn't care about the type. It pays attention to the entityName and entityOp properties.
The entityName is the name of the entity type. It identifies the entity collection in the NgRx Data cache to which this action applies. This name corresponds to NgRx Data metadata for that collection. An entity interface or class name, such as 'Hero', is a typical entityName.
The entityOp identifies the operation to perform on the entity collection, one of the EntityOp enumerations that correspond to one of the almost sixty distinct operations that NgRx Data can perform on a collection.
The data is conceptually the body of the message. Its type and content should fit the requirements of the operation to be performed.
The optional correlationId? is an optional serializable object (usually a GUID) that correlates two or more actions such as the action that initiates a server action ("get all heroes") and the subsequent actions that follow after the server action completed ("got heroes successfully" or "error while getting heroes").
The optional mergeStrategy tells NgRx Data how to "merge" the result of the action into the cache. Mostly this is an instruction to the the Change Tracking sub-system.
The optional tag appears in the generated type text when the EntityActionFactory creates this EntityAction.
The entityName is the default tag that appears between brackets in the formatted type, e.g., '[Hero] NgRx Data/query-all'. You can set this tag to identify the purpose of the operation and "who" dispatched it. NgRx Data will put your tag between the brackets in the formatted type.
The error property indicates that something went wrong while processing the action. See more below.
The skip property tells downstream action receivers that they should skip the usual action processing. This flag is usually missing and is implicitly false. See more below.
-
-
EntityAction consumers
- The NgRx Data library ignores the Action.type. All NgRx Data library behaviors are determined by the entityName and entityOp properties alone.
The NgRx Data EntityReducer redirects an action to an EntityCollectionReducer based on the entityName and that reducer processes the action based on the entityOp.
EntityEffects intercepts an action if its entityOp is among the small set of persistence EntityAction.entityOp names. The effect picks the right data service for that action's entityName, then tells the service to make the appropriate HTTP request and handle the response.
-
Creating an EntityAction
- You can create an EntityAction by hand if you wish. The NgRx Data library considers any action with an entityName and entityOp properties to be an EntityAction.
The EntityActionFactory.create() method helps you create a consistently well-formed EntityAction instance whose type is a string composed from the tag (the entityName by default) and the entityOp.
For example, the default generated Action.type for the operation that queries the server for all heroes is '[Hero] NgRx Data/query-all'.
-
Note:
- The EntityActionFactory.create() method calls the factory's formatActionType() method to produce the Action.type string.
Because NgRx Data ignores the type, you can replace formatActionType() with your own method if you prefer a different format or provide and inject your own EntityActionFactory.
-
Note that each entity type has its own unique Action for each operation, as if you had created them individually by hand.
-
Tagging the EntityAction
-
A well-formed action type can tell the reader what changed and who changed it.
The NgRx Data library doesn't look at the type of an EntityAction, only its entityName and entityOp. So you can get the same behavior from several different actions, each with its own informative type, as long as they share the same entityName and entityOp.
The optional tag parameter of the EntityActionFactory.create() method makes it easy to produce meaningful EntityActions.
You don't have to specify a tag. The entityName is the default tag that appears between brackets in the formatted type, e.g., '[Hero] NgRx Data/query-all'.
-
Here's an example that uses the injectable EntityActionFactory to construct the default "query all heroes" action.
const action = this.entityActionFactory.create<Hero>( 'Hero', EntityOp.QUERY_ALL ); store.dispatch(action); -
Thanks to the NgRx Data Effects, this produces two actions in the log, the first to initiate the request and the second with the successful response:
[Hero] ngrx/data/query-all [Hero] ngrx/data/query-all/success -
This default entityName tag identifies the action's target entity collection. But you can't understand the context of the action from these log entries. You don't know who dispatched the action or why. The action type is too generic.
-
You can create a more informative action by providing a tag that better describes what is happening and also make it easier to find where that action is dispatched by your code.
-
For example,
const action = this.entityActionFactory.create<Hero>( 'Hero', EntityOp.QUERY_ALL, null, { tag: 'Load Heroes On Start' } ); store.dispatch(action); -
The action log now looks like this:
[Load Heroes On Start] ngrx/data/query-all [Load Heroes On Start] ngrx/data/query-all/success -
Handcrafted EntityAction
-
You don't have to create entity actions with the EntityActionFactory. Any action object with an entityName and entityOp property is an entity action, as explained below.
-
The following example creates the initiating "query all heroes" action by hand.
const action = { type: 'some/arbitrary/action/type', entityName: 'Hero', entityOp: EntityOp.QUERY_ALL }; store.dispatch(action); -
It triggers the HTTP request via NgRx Data effects, as in the previous examples.
-
Just be aware that NgRx Data effects uses the EntityActionFactory to create the second, success Action. Without the tag property, it produces a generic success action.
-
The log of the two action types will look like this:
some/arbitrary/action/type
[Hero] NgRx Data/query-all-success
-
-
-
Where are the EntityActions?
-
In an NgRx Data app, the NgRx Data library creates and dispatches EntityActions for you.
-
EntityActions are largely invisible when you call the EntityCollectionService API. You can see them in action with the NgRx store dev-tools.
-
-
Why this matters
-
In an ordinary NgRx application, you hand-code every Action for every state in the store as well as the reducers that process those actions.
-
It takes many actions, a complex reducer, and the help of an NgRx Effect to manage queries and saves for a single entity type.
-
The NgRx Entity library makes the job considerably easier.
- The NgRx Data library internally delegates much of the heavy lifting to NgRx Entity.
-
But you must still write a lot of code for each entity type. You're expected to create eight actions per entity type and write a reducer that responds to these eight actions by calling eight methods of an NgRx EntityAdapter.
-
These artifacts only address the cached entity collection.
-
You may write as many as eighteen additional actions to support a typical complement of asynchronous CRUD (Create, Retrieve, Update, Delete) operations. You'll have to dispatch them to the store where you'll process them with more reducer methods and effects that you must also hand code.
-
With vanilla NgRx, you'll go through this exercise for every entity type. That's a lot of code to write, test, and maintain.
-
With the help of NgRx Data, you don't write any of it. NgRx Data creates the actions and the dispatchers, reducers, and effects that respond to those actions.
-
-
EntityAction.error
-
The presence of an EntityAction.error property indicates that something bad happened while processing the action.
-
An EntityAction should be immutable. The EntityAction.error property is the only exception and is strictly an internal property of the NgRx Data system. You should rarely (if ever) set it yourself.
-
The primary use case for error is to catch reducer exceptions. NgRx stops subscribing to reducers if one of them throws an exception. Catching reducer exceptions allows the application to continue operating.
-
NgRx Data traps an error thrown by an EntityCollectionReducer and sets the EntityAction.error property to the caught error object.
-
The error property is important when the errant action is a persistence action (such as SAVE_ADD_ONE). The EntityEffects will see that such an action has an error and will return the corresponding failure action (SAVE_ADD_ONE_ERROR) immediately, without attempting an HTTP request.
- This is the only way we've found to prevent a bad action from getting through the effect and triggering an HTTP request.
-
-
EntityAction.skip
-
The skip property tells downstream action receivers that they should skip the usual action processing. This flag is usually missing and is implicitly false.
-
The NgRx Data sets skip=true when you try to delete a new entity that has not been saved. When the EntityEffects.persist$ method sees this flag set true on the EntityAction envelope, it skips the HTTP request and dispatches an appropriate _SUCCESS action with the original request payload.
-
This feature allows NgRx Data to avoid making a DELETE request when you try to delete an entity that has been added to the collection but not saved. Such a request would have failed on the server because there is no such entity to delete.
-
See the EntityChangeTracker page for more about change tracking.
-
-
EntityCache-level actions
-
A few actions target the entity cache as a whole.
-
SET_ENTITY_CACHE replaces the entire cache with the object in the action payload, effectively re-initializing the entity cache to a known state.
-
MERGE_ENTITY_CACHE replaces specific entity collections in the current entity cache with those collections present in the action payload. It leaves the other current collections alone.
-
-
Learn about them in the "EntityReducer" document.
-
-
The NgRx Data library maintains a cache (EntityCache) of entity collections for each entity type in the NgRx store.
-
An entity_collection implements the EntityCollection interface for an entity type.
PROPERTY MEANING ids Primary key values in default sort order entities Map of primary key to entity data values filter The user's filtering criteria loaded Whether collection was filled by QueryAll; forced false after clear loading Whether currently waiting for query results to arrive from the server changeState When change-tracking is enabled, the ChangeStates of unsaved entities -
You can extend an entity types with additional properties via entity metadata.
-
EntityCollectionService
-
An EntityCollectionService is a facade over the NgRx Data dispatcher and selectors$ that manages an entity T collection cached in the NgRx store.
-
The Dispatcher features command methods that dispatch entity actions to the NgRx store. These commands either update the entity collection directly or trigger HTTP requests to a server. When the server responds, the NgRx Data library dispatches new actions with the response data and these actions update the entity collection.
-
The EntityCommands interface lists all the commands and what they do.
-
Your application calls these command methods to update the cached entity collection in the NgRx store.
-
Selectors$ are properties returning selector observables. Each observable watches for a specific change in the cached entity collection and emits the changed value.
-
The EntitySelectors$ interface lists all of the pre-defined selector observable properties and explains which collection properties they observe.
-
Your application subscribes to selector observables in order to process and display entities in the collection.
-
-
Examples from the demo app
-
Here are simplified excerpts from the demo app's HeroesComponent showing the component calling command methods and subscribing to selector observables.
constructor(EntityCollectionServiceFactory: EntityCollectionServiceFactory) { this.heroService = EntityCollectionServiceFactory.create<Hero>('Hero'); this.filteredHeroes$ = this.heroService.filteredEntities$; this.loading$ = this.heroService.loading$; } getHeroes() { this.heroService.getAll(); } add(hero: Hero) { this.heroService.add(hero); } deleteHero(hero: Hero) { this.heroService.delete(hero.id); } update(hero: Hero) { this.heroService.update(hero); } -
Create the EntityCollectionService with a factory
- The component injects the NgRx Data EntityCollectionServiceFactory and creates an EntityCollectionService for Hero entities.
-
Create the EntityCollectionService as a class
-
Alternatively, you could have created a single HeroEntityService elsewhere, perhaps in the AppModule, and injected it into the component's constructor.
-
There are two basic ways to create the service class.
- Derive from
EntityCollectionServiceBase<T> - Write a HeroEntityService with just the API you need.
When HeroEntityService derives from
EntityCollectionServiceBase<T>it must inject the EntityCollectionServiceFactory into its constructor. There are examples of this approach in the demo app.
- Derive from
-
When defining an HeroEntityService with a limited API, you may also inject EntityCollectionServiceFactory as a source of the functionality that you choose to expose.
-
Let your preferred style and app needs determine which creation technique you choose.
-
-
Set component selector$ properties
-
A selector$ property is an observable that emits when a selected state property changes.
- Some folks refer to such properties as state streams.
-
The example component has two such properties that expose two EntityCollectionService selector observables: filteredEntities$ and loading$.
-
The filteredEntities$ observable produces an array of the currently cached Hero entities that satisfy the user's filter criteria. This observable produces a new array of heroes if the user changes the filter or if some action changes the heroes in the cached collection.
-
The loading$ observable produces true while the data service is waiting for heroes from the server. It produces false when the server responds. The demo app subscribes to loading$ so that it can turn a visual loading indicator on and off.
- These component and EntityCollectionService selector property names end in '$' which is a common convention for a property that returns an Observable. All selector observable properties of an EntityCollectionService follow this convention.
-
The selector observable versus the selector function
-
The selector$ observable (ending with an '$') differs from the similarly named and closely-related selector function (no '$' suffix)
-
A selector is a function that selects a slice of state from the entity collection. A selector$ observable emits that slice of state when the state changes.
-
NgRx Data creates a selector$ observable by passing the selector function to the NgRx select operator and piping it onto the NgRx store, as seen in the following example:
loading$ = this.store.select(selectLoading);
-
-
Using selectors$
-
The component class does not subscribe to these selector$ properties but the component template does.
-
The template binds to them and forwards their observables to the Angular AsyncPipe, which subscribes to them. Here's an excerpt of the filteredHeroes$ binding.
<div *ngIf="filteredHeroes$ | async as heroes"> ... </div> -
-
-
Call command methods
-
Most of the HeroesComponent methods delegate to EntityCollectionService command methods such as getAll() and add().
-
There are two kinds of commands:
- Commands that trigger requests to the server.
- Cache-only commands that update the cached entity collection.
-
The server commands are simple verbs like "add" and "getAll". They dispatch actions that trigger asynchronous requests to a remote server.
-
The cache-only command methods are longer verbs like "addManyToCache" and "removeOneFromCache" and their names all contain the word "cache". They update the cached collection immediately (synchronously).
-
Most applications call the server commands because they want to query and save entity data.
-
Apps rarely call the cache-only commands because direct updates to the entity collection are lost when the application shuts down.
-
-
Many EntityCollectionService command methods take a value. The value is typed (often as Hero) so you won't make a mistake by passing in the wrong kind of value.
-
Internally, an entity service method creates an entity action that corresponds to the method's intent. The action's payload is either the value passed to the method or an appropriate derivative of that value.
-
Immutability is a core principle of the redux pattern. Several of the command methods take an entity argument such as a Hero. An entity argument must never be a cached entity object. It can be a copy of a cached entity object and it often is. The demo application always calls these command methods with copies of the entity data.
-
All command methods return void. A core principle of the redux pattern is that commands never return a value. They just do things that have side-effects.
-
Rather than expect a result from the command, you subscribe to a selector$ property that reflects the effects of the command. If the command did something you care about, a selector$ property should be able to tell you about it.
-
-
-
EntityCollectionServiceFactory
- The
create<T>()method of the NgRx Data EntityCollectionServiceFactory produces a new instance of theEntityCollectionServiceBase<T>class that implements the EntityCollectionService interface for the entity type T.
- The
-
The NgRx Data library expects to persist entity data with calls to a REST-like web api with endpoints for each entity type.
-
The EntityDataService maintains a registry of service classes dedicated to persisting data for a specific entity type.
-
When the NgRx Data library sees an action for an entity persistence operation, it asks the EntityDataService for the registered data service that makes HTTP calls for that entity type, and calls the appropriate service method.
-
A data service is an instance of a class that implements the EntityCollectionDataService. This interface supports a basic set of CRUD operations for an entity. Each that return Observables:
METHOD MEANING HTTP METHOD WITH ENDPOINT add(entity: T): Observable<T>Add a new entity POST /api/hero/ delete(id: number | string): Observable<number | string>Delete an entity by primary key value DELETE /api/hero/5 getAll(): Observable<T[]>Get all instances of this entity type GET /api/heroes/ getById(id: number | string): Observable<T>Get an entity by its primary key GET /api/hero/5 getWithQuery(queryParams: QueryParams | string): Observable<T[]>Get entities that satisfy the query GET /api/heroes/?name=bombasto update(update: Update<T>): Observable<T>Update an existing entity PUT /api/hero/5 -
Note:
-
QueryParams is a parameter-name/value map You can also supply the query string itself. HttpClient safely encodes both into an encoded query string.
-
Update<T>is an object with a strict subset of the entity properties. It must include the properties that participate in the primary key (e.g., id). The update property values are the properties-to-update; unmentioned properties should retain their current values.
-
-
The default data service methods return the Observables returned by the corresponding Angular HttpClient methods.
-
Your API should return an object in the shape of the return type for each data service method. For example: when calling .add(entity) your API should create the entity and then return the full entity matching T as that is the value that will be set as the record in the store for that entities primary key. The one method that differs from the others is delete. delete requires a response type of the entities primary key, string | number, instead of the full object, T, that was deleted.
- Note:
- If you create your own data service alternatives, they should return similar Observables.
- Note:
-
-
Register data services
-
The EntityDataService registry is empty by default.
-
You can add custom data services to it by creating instances of those classes and registering them with EntityDataService in one of two ways.
-
register a single data service by entity name with the registerService() method.
-
register several data services at the same time with by calling registerServices with an entity-name/service map.
- You can create and import a module that registers your custom data services as shown in the EntityDataService tests
-
-
If you decide to register an entity data service, be sure to do so before you ask NgRx Data to perform a persistence operation for that entity.
-
Otherwise, the NgRx Data library will create and register an instance of the default data service
DefaultDataService<T>for that entity type.
-
-
The DefaultDataService
-
The demo app doesn't register any entity data services. It relies entirely on a DefaultDataService, created for each entity type, by the injected DefaultDataServiceFactory.
-
A
DefaultDataService<T>makes REST-like calls to the server's web api with Angular's HttpClient. -
It composes HTTP URLs from a root path (see "Configuration" below) and the entity name.
-
For example,
- if the persistence action is to delete a hero with id=42 and
- the root path is 'api' and
- the entity name is 'Hero', then
- the DELETE request URL will be 'api/hero/42'.
-
When the persistence operation concerns multiple entities, the DefaultDataService substitutes the plural of the entity type name for the resource name.
-
The QUERY_ALL action to get all heroes would result in an HTTP GET request to the URL 'api/heroes'.
-
The DefaultDataService doesn't know how to pluralize the entity type name. It doesn't even know how to create the base resource names.
-
It relies on an injected HttpUrlGenerator service to produce the appropriate endpoints. And the default implementation of the HttpUrlGenerator relies on the Pluralizer service to produce the plural collection resource names.
-
The Entity Metadata guide explains how to configure the default Pluralizer .
-
Configure the DefaultDataService
-
The collection-level data services construct their own URLs for HTTP calls. They typically rely on shared configuration information such as the root of every resource URL.
-
The shared configuration values are almost always specific to the application and may vary according the runtime environment.
-
The NgRx Data library defines a DefaultDataServiceConfig for conveying shared configuration to an entity collection data service.
-
The most important configuration property, root, returns the root of every web api URL, the parts that come before the entity resource name. If you are using a remote API, this value can include the protocol, domain, port, and root path, such as https://my-api-domain.com:8000/api/v1.
-
For a
DefaultDataService<T>, the default value is 'api', which results in URLs such as api/heroes. -
The timeout property sets the maximum time (in ms) before the ng-lib persistence operation abandons hope of receiving a server reply and cancels the operation. The default value is 0, which means that requests do not timeout.
-
The delete404OK flag tells the data service what to do if the server responds to a DELETE request with a 404 - Not Found.
-
In general, not finding the resource to delete is harmless and you can save yourself the headache of ignoring a DELETE 404 error by setting this flag to true, which is the default for the
DefaultDataService<T>. -
When running a demo app locally, the server may respond more quickly than it will in production. You can simulate real-world by setting the getDelay and saveDelay properties.
-
Provide a custom configuration
- First, create a custom configuration object of type DefaultDataServiceConfig :
const defaultDataServiceConfig: DefaultDataServiceConfig = { root: 'https://my-api-domain.com:8000/api/v1', timeout: 3000, // request timeout } - Provide it in an eagerly-loaded NgModule such as the EntityStoreModule in the sample application:
@NgModule({
  providers: [{ provide: DefaultDataServiceConfig, useValue: defaultDataServiceConfig }]
})
- First, create a custom configuration object of type DefaultDataServiceConfig :
-
-
-
Custom EntityDataService
-
While the NgRx Data library provides a configuration object to modify certain aspects of the DefaultDataService, you may want to further customize what happens when you save or retrieve data for a particular collection.
-
For example, you may need to modify fetched entities to convert strings to dates, or to add additional properties to an entity.
-
You could do this by creating a custom data service and registering that service with the EntityDataService.
-
To illustrate this, the sample app adds a dateLoaded property to the Hero entity to record when a hero is loaded from the server into the NgRx-store entity cache.
export class Hero { readonly id: number; readonly name: string; readonly saying: string; readonly dateLoaded: Date; } -
To support this feature, we 'll create a HeroDataService class that implements the
EntityCollectionDataService<T>interface. -
In the sample app the HeroDataService derives from the NgRx Data
DefaultDataService<T>in order to leverage its base functionality. It only overrides what it really needs.-
store/entity/hero-data-service.ts
import { Injectable } from '@angular/core';
import { HttpClient } from '@angular/common/http';
import {
  EntityCollectionDataService,
  DefaultDataService,
  HttpUrlGenerator,
  Logger,
  QueryParams
} from '@ngrx/data';

import { Observable } from 'rxjs';
import { map } from 'rxjs/operators';
import { Hero } from '../../core';

@Injectable()
export class HeroDataService extends DefaultDataService<Hero> {
  constructor(http: HttpClient, httpUrlGenerator: HttpUrlGenerator, logger: Logger) {
    super('Hero', http, httpUrlGenerator);
    logger.log('Created custom Hero EntityDataService');
  }

  getAll(): Observable<Hero[]> {
    return super.getAll().pipe(map(heroes => heroes.map(hero => this.mapHero(hero))));
  }

  getById(id: string | number): Observable<Hero> {
    return super.getById(id).pipe(map(hero => this.mapHero(hero)));
  }

  getWithQuery(params: string | QueryParams): Observable<Hero[]> {
    return super.getWithQuery(params).pipe(map(heroes => heroes.map(hero => this.mapHero(hero))));
  }

  private mapHero(hero: Hero): Hero {
    return { ...hero, dateLoaded: new Date() };
  }
}
-
-
This HeroDataService hooks into the get operations to set the Hero.dateLoaded on fetched hero entities. It also tells the logger when it is created (see the console output of the running sample) .
-
Finally, we must tell NgRx Data about this new data service.
-
The sample app provides HeroDataService and registers it by calling the registerService() method on the EntityDataService in the app's entity store module:
-
store/entity-store.module.ts
import { EntityDataService } from '@ngrx/data'; // <-- import the NgRx Data data service registry

import { HeroDataService } from './hero-data-service';

@NgModule({
  imports: [ ... ],
  providers: [ HeroDataService ] // <-- provide the data service
})
export class EntityStoreModule {
  constructor(
    entityDataService: EntityDataService,
    heroDataService: HeroDataService,
  ) {
    entityDataService.registerService('Hero', heroDataService); // <-- register it
  }
}
-
-
A custom DataService - You don't have to override members of the DefaultDataService. You could write a completely custom alternative that queries and saves entities by any mechanism you choose.
- You can register it the same way as long as it adheres to the interface.
// Register custom data service entityDataService.registerService('Hero', peculiarHeroDataService);
- You can register it the same way as long as it adheres to the interface.
-
-
Work in Progress
-
Effects are a way to trigger side effects with actions.
-
A one common, desirable side effect is an asynchronous HTTP call to the remote server to fetch or save entity data.
-
You implement one or more effects with the help of the NgRx Effects library.
-
Actions dispatched to the NgRx store can be detected and processed by your effect method. After processing, whether synchronously or asynchronously, your method can dispatch new action(s) to the store
-
The NgRx Data library implements an effect named persist$ in its EntityEffects class.
-
The persist$ method filters for certain EntityAction.op values. These values turn into HTTP GET, PUT, POST, and DELETE requests with entity data. When the server responds (whether favorably or with an error), the persist$ method dispatches new EntityActions to the store with the appropriate response data.
-
-
Cancellation
-
You can try to cancel a save by dispatching a CANCEL_PERSIST EntityAction with the correlation id of the persistence action that you want to cancel.
-
The EntityCache.cancel$ watches for this action and is piped into the EntityCache.persist$, where it can try to cancel an entity collection query or save operation or at least prevent the server response from updating the cache.
-
Note:
-
It's not obvious that this is ever a great idea for a save operation. You cannot tell the server to cancel this way and cannot know if the server did or did not save. Nor can you count on processing the cancel request before the client receives the server response and applies the changes on the server or to the cache.
-
If you cancel before the server results arrive, the EntityEffect will not try to update the cached collection with late arriving server results. The effect will issue a CANCELED_PERSIST action instead. The EntityCollection reducer ignores this action but you can listen for it among the store actions and thus know that the cancellation took effect on the client.
-
-
-
More to come on the subject of effects
-
The Entity Reducer is the master reducer for all entity collections in the stored entity cache.
-
The library doesn't have a named entity reducer type. Rather it relies on the EntityCacheReducerFactory.create() method to produce that reducer, which is an NgRx
ActionReducer<EntityCache, EntityAction>. -
Such a reducer function takes an EntityCache state and an EntityAction action and returns an EntityCache state.
-
The reducer responds either to an EntityCache-level action (rare) or to an EntityAction targeting an entity collection (the usual case). All other kinds of Action are ignored and the reducer simply returns the given state.
- The reducer filters specifically for the action's entityType property. It treats any action with an entityType property as an EntityAction.
-
The entity reducer's primary job is to
- extract the EntityCollection for the action's entity type from the state.
- create a new, initialized entity collection if necessary.
- get or create the EntityCollectionReducer for that entity type.
- call the entity collection reducer with the collection and the action.
- replace the entity collection in the EntityCache with the new collection returned by the entity collection reducer.
-
EntityCollectionReducers
-
An EntityCollectionReducer applies actions to an EntityCollection in the EntityCache held in the NgRx store.
-
here is always a reducer for a given entity type. The EntityCollectionReducerFactory maintains a registry of them. If it can't find a reducer for the entity type, it creates one, with the help of the injected EntityCollectionReducerFactory, and registers that reducer so it can use it again next time.
-
Register custom reducers
-
You can create a custom reducer for an entity type and register it directly with EntityCollectionReducerRegistry.registerReducer().
-
You can register several custom reducers at the same time by calling EntityCollectionReducerRegistry.registerReducers(reducerMap) where the reducerMap is a hash of reducers, keyed by entity-type-name.
-
-
-
Default EntityCollectionReducer
-
The EntityCollectionReducerFactory creates a default reducer that leverages the capabilities of the NgRx EntityAdapter, guided by the app's entity metadata.
-
The default reducer decides what to do based on the EntityAction.op property,whose string value it expects will be a member of the EntityOp enum.
-
Many of the EntityOp values are ignored; the reducer simply returns the entity collection as given.
-
Certain persistence-oriented ops, for example, are meant to be handled by the NgRx Data persist$ effect. They don't update the collection data (other than, perhaps, to flip the loading flag).
-
Others add, update, and remove entities from the collection.
- Remember that immutable objects are a core principle of the redux/NgRx pattern. These reducers don't actually change the original collection or any of the objects in it. They make a copy of the collection and only update copies of the objects within the collection.
-
See the NgRx Entity EntityAdapter collection methods for a basic guide to the cache altering operations performed by the default entity collection reducer.
-
The EntityCollectionReducerFactory class and its tests are the authority on how the default reducer actually works.
-
-
Initializing collection state
-
The NgRxDataModule adds an empty EntityCache to the NgRx Data store. There are no collections in this cache.
-
If the master EntityReducer can't find a collection for the action's entity type, it creates a new, initialized collection with the help of the EntityCollectionCreator, which was injected into the EntityCacheReducerFactory.
-
The creator returns an initialized collection from the initialState in the entity's EntityDefinition. If the entity type doesn't have a definition or the definition doesn't have an initialState property value, the creator returns an EntityCollection.
-
The entity reducer then passes the new collection in the state argument of the entity collection reducer.
-
-
Customizing entity reducer behavior
-
You can replace any entity collection reducer by registering a custom alternative.
-
You can replace the default entity reducer by providing a custom alternative to the EntityCollectionReducerFactory.
-
You could even replace the master entity reducer by providing a custom alternative to the EntityCacheReducerFactory.
-
But quite often you'd like to extend a collection reducer with some additional reducer logic that runs before or after.
-
-
EntityCache-level actions
-
A few actions target the entity cache as a whole.
-
SET_ENTITY_CACHE replaces the entire cache with the object in the action payload, effectively re-initializing the entity cache to a known state.
-
MERGE_ENTITY_CACHE replaces specific entity collections in the current entity cache with those collections present in the action payload. It leaves the other current collections alone.
- See entity-reducer.spec.ts for examples of these actions.
-
These actions might be part of your plan to support offline scenarios or rollback changes to many collections at the same time.
-
For example, you could subscribe to the EntityServices.entityCache$ selector. When the cache changes, you could serialize the cache to browser local storage. You might want to debounce for a few seconds to reduce churn.
-
Later, when relaunching the application, you could dispatch the SET_ENTITY_CACHE action to initialize the entity-cache even while disconnected. Or you could dispatch the MERGE_ENTITY_CACHE to rollback selected collections to a known state as in error-recovery or "what-if" scenarios.
- Important: MERGE_ENTITY_CACHE replaces the currently cached collections with the entity collections in its payload. It does not merge the payload collection entities into the existing collections as the name might imply. May reconsider and do that in the future.
-
If you want to create and reduce additional, cache-wide actions, consider the EntityCache MetaReducer, described in the next section.
-
-
MetaReducers
-
The NgRx/store supports MetaReducers that can inspect and process actions flowing through the store and potentially change state in the store.
-
A MetaReducer is a function that takes a reducer and returns a reducer. NgRx composes these reducers with other reducers in a chain of responsibility.
-
NgRx calls the reducer returned by a MetaReducer just as it does any reducer. It calls it with a state object and an action.
-
The MetaReducer can do what it wants with the state and action. It can log the action, handle the action on its own, delegate to the incoming reducer, post-process the updated state, or all of the above.
- Remember that the actions themselves are immutable. Do not change the action!
-
Like every reducer, the state passed to a MetaReducer's reducer is only the section of the store that is within the reducer's scope.
-
NgRx Data supports two levels of MetaReducer
- EntityCache MetaReducer, scoped to the entire entity cache
- EntityCollection MetaReducer, scoped to a particular collection.
-
Entity Cache MetaReducers
-
The EntityCache MetaReducer helps you inspect and apply actions that affect the entire entity cache. You might add custom actions and an EntityCache MetaReducer to update several collections at the same time.
-
An EntityCache MetaReducer reducer must satisfy three requirements:
- always returns the entire entity cache.
- return synchronously (no waiting for server responses).
- never mutate the original action; clone it to change it.
- We intend to explain how in a documentation update. For now, see the NgRx Data entity-data.module.spec.ts for examples.
-
-
Entity Collection MetaReducers
-
An entity collection MetaReducer takes an entity collection reducer as its reducer argument and returns a new entity collection reducer.
-
The new reducer receives the EntityCollection and EntityAction arguments that would have gone to the original reducer.
-
It can do what it wants with those arguments, such as:
- log the action,
- transform the action into a different action (for the same entity collection),
- call the original reducer,
- post-process the results from original reducer.
-
The new entity collection reducer must satisfy three requirements:
- always returns an EntityCollection for the same entity.
- return synchronously (no waiting for server responses).
- never mutate the original action; clone it to change it.
-
Compared to Store MetaReducers
-
While the entity collection MetaReducer is modeled on the NgRx Store MetaReducer ("Store MetaReducer"), it is crucially different in several respects.
-
The Store MetaReducer broadly targets store reducers. It wraps store reducers, sees all actions, and can update any state within its scope.
-
But a Store MetaReducer neither see nor wrap an entity collection reducer. These entity collection reducers are internal to the EntityCache Reducer that is registered with the NgRx Data feature.
-
An entity collection MetaReducer is narrowly focused on manipulation of a single, target entity collection. It wraps all entity collection reducers.
-
Note that it can't access other collections, the entity cache, or any other state in the store. If you need a cross-collection MetaReducer, try the EntityCache MetaReducer described above.
-
-
Provide Entity MetaReducers to the factory
-
Create one or more entity collection MetaReducers and add them to an array.
-
Provide this array with the ENTITY_COLLECTION_META_REDUCERS injection token where you import the NgRxDataModule.
-
The EntityCollectionReducerRegistry injects it and composes the array of MetaReducers into a single meta-MetaReducer. The earlier MetaReducers wrap the later ones in the array.
-
When the factory register an EntityCollectionReducer, including the reducers it creates, it wraps that reducer in the meta-MetaReducer before adding it to its registry.
-
All EntityActions dispatched to the store pass through this wrapper on their way in and out of the entity-specific reducers.
-
-
We intend to explain how to create and provide entity collection MetaReducers in a documentation update. For now, see the entity-reducer.spec.ts for examples.
-
-
-
EntityServices is a facade over the NgRx Data services and the NgRx Data EntityCache.
-
Registry of EntityCollectionServices
-
It is primarily a registry of EntityCollectionServices.
-
Call its EntityServices.getEntityCollectionService(entityName) method to get the singleton EntityCollectionService for that entity type.
-
Here's a component doing that.
-
heroes-component.ts
import { EntityCollectionService, EntityServices } from '@ngrx/data'; import { Hero } from '../../model'; @Component({...}) export class HeroesComponent implements OnInit { heroesService: EntityCollectionService<Hero>; constructor(entityServices: EntityServices) { this.heroesService = entityServices.getEntityCollectionService('Hero'); } }
-
-
If the EntityCollectionService service does not yet exist, EntityServices creates a default instance of that service and registers that instance for future reference.
-
-
Create a custom EntityCollectionService
-
You'll often create custom EntityCollectionService classes with additional capabilities and convenience members, as explained in the EntityCollectionService doc.
-
Here's an example.
-
heroes.service.ts
import { Injectable } from '@angular/core'; import { EntityCollectionServiceBase, EntityCollectionServiceElementsFactory } from '@ngrx/data'; import { Hero } from '../model'; @Injectable() export class HeroesService extends EntityCollectionServiceBase<Hero> { constructor(elementsFactory: EntityCollectionServiceElementsFactory) { super('Hero', elementsFactory); } // ... your special sauce here }
-
-
Of course you must provide the custom service before you use it, typically in an Angular NgModule.
-
heroes.module.ts
... import { HeroesService } from './heroes.service'; @NgModule({ imports: [...], declarations: [...], providers: [HeroesService] }) export class HeroesModule {}
-
-
The following alternative example uses the preferred "tree-shakable" Injectable() to provide the service in the root module.
@Injectable({ providedIn: 'root' }) export class HeroesService extends EntityCollectionServiceBase<Hero> { ... } -
You can inject that custom service directly into the component.
-
heroes.component.ts (v2)
@Component({...}) export class HeroesComponent { heroes$: Observable<Hero[]>; loading$: Observable<boolean>; constructor(public heroesService: HeroesService) { this.heroes$ = this.heroesService.entities$; this.loading$ = this.heroesService.loading$; } ... }
-
-
Nothing new so far. But we want to be able to get the HeroesService from EntityServices.getEntityCollectionService() just as we get the default collection services.
-
This consistency will pay off when the app has a lot of collection services
-
-
Register the custom EntityCollectionService
-
When you register an instance of a custom EntityCollectionService with EntityServices, other callers of EntityServices.getEntityCollectionService() get that custom service instance.
-
You'll want to do that before anything tries to acquire it via the EntityServices.
-
One solution is to inject custom collection services in the constructor of the module that provides them, and register them there.
-
The following example demonstrates.
- app.module.ts
@NgModule({ ... }) export class AppModule { // Inject the service to ensure it registers with EntityServices constructor( entityServices: EntityServices, // custom collection services hs: HeroesService, vs: VillainsService ){ entityServices.registerEntityCollectionServices([hs, vs]); } }
- app.module.ts
-
-
Sub-class EntityServices for application class convenience
-
Another useful solution is to create a sub-class of EntityServices that both injects the custom collection services and adds convenience members for your application.
-
The following AppEntityServices demonstrates.
-
app-entity-services.ts
import { Injectable } from '@angular/core'; import { EntityServicesBase, EntityServicesElements } from '@ngrx/data'; import { SideKick } from '../../model'; import { HeroService, VillainService } from '../../services'; @Injectable() export class AppEntityServices extends EntityServicesBase { constructor( elements: EntityServicesElements, // Inject custom services, register them with the EntityServices, and expose in API. readonly heroesService: HeroesService, readonly villainsService: VillainsService ) { super(elements); this.registerEntityCollectionServices([heroesService, villainsService]); } /** get the (default) SideKicks service */ get sideKicksService() { return this.getEntityCollectionService<SideKick>('SideKick'); } }
-
-
AppEntityService first injects the EntityServicesElements helper which it passes straight through to the base class constructor. The "elements" enclose the ingredients that the base class needs to make and manage the entities you described in metadata.
-
Then it injects your two custom collection services, HeroesService and VillainsService, and exposes them directly to consumers as convenience properties for accessing those services.
-
In this example, we don't need a custom collection service for the SideKick entity. The default service will do.
-
Nonetheless, we add a sideKicksService property that gets or creates a default service for SideKick. Consumers will find this more discoverable and easier to call than getEntityCollectionService().
-
Of course the base class EntityServices members, such as getEntityCollectionService(), entityCache$, and registerEntityCollectionService() are all available.
-
Next, provide AppEntityServices in an Angular NgModule both as itself (AppEntityServices) and as an alias for EntityServices.
-
In this manner, an application class references this same AppEntityServices service instance, whether it injects AppEntityServices or EntityServices.
-
See it here in the sample app.
- store/entity/entity-module
@NgModule({ imports: [ ... ], providers: [ AppEntityServices, { provide: EntityServices, useExisting: AppEntityServices }, ... ] }) export class EntityStoreModule { ... }
- store/entity/entity-module
-
-
Access multiple EntityCollectionServices
-
A complex component may need access to multiple entity collections. The EntityServices registry makes this easy, even when the EntityCollectionServices are customized for each entity type.
-
You'll only need a single injected constructor parameter, the EntityServices.
-
character-container.component.ts
import { EntityCollectionService, EntityServices } from '@ngrx/data'; import { SideKick } from '../../model'; import { HeroService, VillainService } from '../../services'; @Component({...}) export class CharacterContainerComponent implements OnInit { heroesService: HeroService; sideKicksService: EntityCollectionService<SideKick>; villainService: VillainService; heroes$: Observable<Hero>; ... constructor(entityServices: EntityServices) { this.heroesService = entityServices.getEntityCollectionService('Hero'); this.sidekicksService = entityServices.getEntityCollectionService('SideKick'); this.villainService = entityServices.getEntityCollectionService('Villain'); this.heroes$ = this.heroesService.entities$; ... } ... }
-
-
An application-specific sub-class of EntityServices, such as the AppEntityServices above, makes this a little nicer.
-
character-container.component.ts (with AppEntityServices)
import { AppEntityServices } from '../../services'; @Component({...}) export class CharacterContainerComponent implements OnInit { heroes$: Observable<Hero>; ... constructor(private appEntityServices: AppEntityServices) { this.heroes$ = appEntityServices.heroesService.entities$; ... } ... }
-
-
-
Many apps must save several entities at the same time in the same transaction.
-
Multiple entity saves are a first class feature. By "first class" we mean that NgRx Data offers a built-in, multiple entity save solution that is consistent with NgRx Data itself:
- defines a ChangeSet, describing ChangeOperations to be performed on multiple entities of multiple types.
- has a set of SAVE_ENTITIES... cache-level actions.
- has an EntityCacheDispatcher to dispatch those actions.
- offers EntityCacheEffects that sends SAVE_ENTITIES async requests to the server and returns results as SAVE_ENTITIES_SUCCESS or SAVE_ENTITIES_ERROR actions.
- offers a default EntityCacheDataService to make those http server requests. integrates with change tracking.
- delegates each collection-level change to the (customizable) entity-collection-reducer-methods.
-
Note:
-
You could implement multiple-entity saves yourself by, prior to version 6.1. You could define your own protocol and manipulate the EntityCache directly by dispatching SET_ENTITY_CACHE after updating a copy of the current cache before and after save. The collection-level reducers in entity-collection-reducer-methods and the NgRx EntityAdapters would help.
-
It wouldn't be easy and there are many steps that can be easily overlooked. But you could do it.
-
-
Save with EntityCacheDispatcher.saveEntities()
-
This NgRx Data version includes a new EntityCacheDispatcher whose methods make it easier to create and dispatch all of the entity cache actions.
-
Save a bunch of entity changes with the saveEntities() dispatcher method. Call it with a URL and a ChangeSet describing the entity changes that the server API (at the URL endpoint) should save.
-
The sample application demonstrates a simple saveEntities scenario. A button on the Villains page deletes all of the villains.
-
In the following example, we want to add a Hero and delete two Villains in the same transaction. We assume a server is ready to handle such a request.
-
First create the changes (each a ChangeSetItem) for the ChangeSet.
import { ChangeSetOperation } from '@ngrx/data'; ... const changes: ChangeSetItem[] = [ { op: ChangeSetOperation.Add, entityName: 'Hero', entities: [hero] }, { op: ChangeSetOperation.Delete, entityName: 'Villain', entities: [2, 3] // delete by their ids } ]; -
The changeSetItemFactory makes it easier to write these changes.
import { changeSetItemFactory as cif } from '@ngrx/data'; ... const changes: ChangeSetItem[] = [ cif.add('Hero', hero), cif.delete('Villain', [2, 3]) ]; -
Now dispatch a saveEntities with a ChangeSet for those changes.
const changeSet: ChangeSet = { changes, tag: 'Hello World'} cacheEntityDispatcher.saveEntities(changeSet, saveUrl).subscribe( result => log('Saved ChangeSet') ); -
The saveEntities(changeSet, saveUrl) returns an
Observable<ChangeSet>, which emits a new ChangeSet after the server API (at the saveUrl endpoint) returns a successful response. -
That emitted ChangeSet holds the server's response data for all affected entities.
-
The app can wait for the saveEntities() observable to terminate (either successfully or with an error), before proceeding (e.g., routing to another page).
-
How it works
-
Internally, the method creates a SAVE_ENTITIES action whose payload data includes the ChangeSet. The action also has the URL to which the requested save should be sent and a correlationId (see below).
-
The method dispatches this action to the NgRx store where it is processed by the EntityCacheReducer. If the action is "optimistic", the reducer updates the cache with changes immediately.
-
Then the EntityCacheEffects picks up the SAVE_ENTITIES action and sends a "save changes" request to the server's API endpoint (the URL).
-
If the request succeeds, the server returns data for all of the changed (and deleted) entities. The EntityCacheEffects packages that data into a SAVE_ENTITIES_SUCCESS action and dispatches it to the store.
-
The EntityCacheReducer for the SAVE_ENTITIES_SUCCESS action updates the cache with the (possibly altered) entity data from the server.
-
Meanwhile, the
Observable<ChangeSet>from the saveEntities() dispatcher method is watching the stream of actions dispatched to the store. When a SAVE_ENTITIES_SUCCESS (or SAVE_ENTITIES_ERROR) action emerges and it has the same correlationId as the original SAVE_ENTITIES action, the observable emits the ChangeSet (or error). -
The subscriber to that observable now knows that this particular save entities request is "done".
- This complicated dance is standard NgRx. Fortunately, all you have to know is that you can call saveEntities() with the ChangeSet and URL, then wait for the returned observable to emit.
-
-
ChangeSet
-
The ChangeSet interface is a simple structure with only one critical property, changes, which holds the entity data to save.
-
ChangeSet
export interface ChangeSet<T = any> { /** An array of ChangeSetItems to be processed in the array order */ changes: ChangeSetItem[]; /** * An arbitrary, serializable object that should travel with the ChangeSet. * Meaningful to the ChangeSet producer and consumer. Ignored by NgRx Data. */ extras?: T; /** An arbitrary string, identifying the ChangeSet and perhaps its purpose */ tag?: string; }
-
-
At the heart of it is changes, an array of ChangeSetItems that describes a change operation to be performed with one or more entities of a particular type.
-
For example,
- a ChangeSetAdd could add 3 new Hero entities to the server's Hero collection.
- a ChangeSetUpdate could update 2 existing Villain entities.
- a ChangeSetDelete could delete a SideKick entity by its primary key.
- a ChangeSetUpsert could add two new SuperPower entities and update a third SuperPower entity.
-
There are four ChangeSetOperations
-
ChangeSetOperation
export enum ChangeSetOperation { Add = 'Add', Delete = 'Delete', Update = 'Update', Upsert = 'Upsert' } -
Upsert is a request to treat the entities in the ChangeSetItem as either new entities or updates to existing entities.
-
-
Each kind of ChangeSetItem follows a pattern similar to ChangeSetAdd.
- ChangeSetAdd
export interface ChangeSetAdd<T = any> { op: ChangeSetOperation.Add; entityName: string; entities: T[]; }
- ChangeSetAdd
-
The ChangeSetItem flavors all have op, entityName and entities properties. They differ substantively only in the nature of the entities array which corresponds to the change operation:
- Add: entities
- Delete: primary keys of the entities to delete
- Update: NgRx Entity
Update<T>s - Upsert: entities
-
-
Pessimistic / Optimistic save
-
The EntityCacheDispatcher.saveEntities dispatches the SAVE_ENTITIES action (with its ChangeSet) to the store where it is processed by the EntityCacheReducer.
-
If the action is "pessimistic", the reducer sets the collection loading flags but doesn't update the entities in cache. The reducer for the SAVE_ENTITIES_SUCCESS action, whose payload holds the successfully saved entities, will update the cached entities.
-
If the action is "optimistic", the reducer applies the changes to the cache immediately, before you send them to the server.
-
You can specify "optimistic" or "pessimistic" in the options parameter. If you don't specify this option, NgRx Data uses the default value in EntityDispatcherDefaultOptions.optimisticSaveEntities. It is false (pessimistic) by default.
-
-
Specify your own defaults
- You can provide alternative defaults.
{ provide: EntityDispatcherDefaultOptions, useValue: myDispatcherDefaultOptions }
- You can provide alternative defaults.
-
Server
-
The server API (the usual recipient of a ChangeSet) must be able to process the request. NgRx Data doesn't know if the API can or cannot process a ChangeSet (and that includes whether the server can or cannot handle upserts).
-
As always, make sure only to send something that the server API can handle.
-
-
EntityCacheEffects
-
You can handle the async HTTP save changes request yourself, making your own calls to the server in your own way.
-
Your solution can use the EntityCacheDispacher to dispatch SAVE_ENTITIES, SAVE_ENTITIES_SUCCESS and SAVE_ENTITIES_ERROR actions for updating the cache and managing the ChangeState of the entities in the ChangeSet.
-
Perhaps better, you can let the EntityCacheEffects handle this for you in a manner similar to the v6 EntityEffects for single-entity saves.
-
The EntityCacheEffects.saveEntities$ effect listens for SAVE_ENTITIES and makes a request to the designated URL via the (new) EntityCacheDataService. It takes the response and dispatches either a SAVE_ENTITIES_SUCCESS or SAVE_ENTITIES_ERROR, as appropriate.
- If you prefer to handle server interaction yourself, you can disable the EntityCacheEffects by providing a null implementation, in your NgModule, e.g.,
{ provide: EntityCacheEffects: useValue: {} }
- If you prefer to handle server interaction yourself, you can disable the EntityCacheEffects by providing a null implementation, in your NgModule, e.g.,
-
-
EntityCacheDataService
-
The EntityCacheDataService constructs and POSTS the actual request to the given API URL.
-
We anticipate that most server API implementors will not support the NgRx Entity Update structure within the ChangeSet. So the EntityCacheDataService.saveEntities() method extracts the changes from the
Updates<T>[] and sends these to the server; it then reconstructs the Updates[] entities in from the server response so that the NgRx Data consumer of the response sees those Update structures. -
As always, you can provide an alternative implementation:
{ provide: EntityCacheDataService: useClass: MyCacheDataService }
-
-
Updating the store with server response data
-
If the save was pessimistic, the EntityCache is unchanged until the server responds. You need the results from the server to update the cache.
- The changes are already in cache with an optimistic save. But the server might have made additional changes to the data, in which case you'd want to (re)apply the server response data to cache.
-
The server API is supposed to return all changed entity data in the form of a ChangeSet.
-
Often the server processes the saved entities without changing them. There's no real need for the server to return the data. The original request ChangeSet has all the information necessary to update the cache. Responding with a "204-No Content" instead would save time, bandwidth, and processing.
-
The server can respond "204-No Content" and send back nothing. The EntityCacheEffects recognizes this condition and returns a success action derived from the original request ChangeSet.
-
If the save was pessimistic, it returns a SaveEntitiesSuccess action with the original ChangeSet in the payload.
-
If the save was optimistic, the changes are already in the cache and there's no point in updating the cache. Instead, the effect returns a merge observable that clears the loading flags for each entity type in the original CacheSet.
-
-
New EntityOPs for multiple entity save
-
When the server responds with a ChangeSet, or the effect re-uses the original request ChangeSet, the effect returns a SAVE_ENTITIES_SUCCESS action with the ChangeSet in the payload.
-
This ChangeSet has the same structure as the one in the SAVE_ENTITIES action, which was the source of the HTTP request.
-
The EntityCacheReducer converts the ChangeSet.changes into a sequence of EntityActions to the entity collection reducers.
-
The store never sees these reducer calls (and you won't see them in the redux tools). They are applied synchronously, in succession to an instance of the EntityCache object.
-
After all ChangeSet.changes have been reduced, the EntityCacheReducer returns the updated EntityCache and the NgRx Store gets the new, fully-updated cache in one shot.
-
That should mean that the cache is in a stable state, with all relationships updated, before any code outside the store hears of the changes.
-
At that point, all affected entity selectors$ will emit.
-
-
New EntityOPs for multiple entity save
-
As always, the entity collection reducers know what to do based on the EntityAction.entityOp.
-
Before v6.1, the save EntityOps only worked for single entities. This version adds multi-entity save actions to EntityOp: SAVE_ADD_MANY...,SAVE_DELETE_MANY..., SAVE_UPDATE_MANY...,SAVE_UPSERT_MANY....
- These ops do not have corresponding EntityCommands because a multi-entity save is dispatched (via SAVE_ENTITIES.. actions) to the EntityCache reducer, not to a collection reducer (at least not in this version).
-
-
Transactions
-
It is up to the server to process the ChangeSet as a transaction. That's easy if the server-side store is a relational database.
-
If your store doesn't support transactions, you'll have to decide if the multiple-entity save facility is right for you.
-
On the NgRx Data client, it is "transactional" in the sense that a successful result returned by the server will be applied to the cache all at once. If the server returns an error result, the cache is not touched.
-
Important: if you saved "optimisitically", NgRx Data updates the cache before sending the request to the server.
-
NgRx Data does not roll back the EntityCache automatically when an optimistic save fails.
-
Fortunately, the NgRx Data collection reducers updated the ChangeState of the affected entities before merging the changes into the cache (see the NgRx Data ChangeTracker).
-
You have good options if the save fails.
- You could rollback using the ChangeTracker.
- You could try again.
- You could fail the app.
-
Let your failure analysis and application business rules guide your decision.
-
-
Cancellation
-
You can try to cancel a save by dispatching the SAVE_ENTITIES_CANCEL action with the correlation id of the save action that you want to cancel.
-
An optional EntityNames array argument tells the EntityCache reducer to turn off the loading flags for the collections named in that array (these flags would have been turned on by SAVE_ENTITIES). You can also supply a cancellation "reason" and the usual action tag.
-
The EntityCacheEffects.saveEntitiesCancel$ watches for this action and is piped into the EntityCacheEffects.saveEntities$, where it can try to cancel the save operation or at least prevent the server response from updating the cache.
-
It's not obvious that this is ever a great idea. You cannot tell the server to cancel this way and cannot know if the server did or did not save. Nor can you count on processing the cancel request before the client receives the server response and applies the changes on the server or to the cache.
-
If you cancel before the server results arrive, the EntityCacheEffect will not try to update the cache with late arriving server results. The effect will issue a SAVE_ENTITIES_CANCELED action instead. The EntityCache reducer ignores this action but you can listen for it among the store actions and thus know that the cancellation took effect on the client.
-
-
-
-
NgRx Data tracks entity changes that haven't yet been saved on the server. It also preserves "original values" for these changes and you can revert them with undo actions.
-
Change-tracking and undo are important for applications that make optimistic saves.
-
Optimistic versus Pessimistic save
-
An optimistic save stores a new or changed entity in the cache before making a save request to the server. It also removes an entity from the store before making a delete request to the server.
- The EntityAction.isOptimistic flag is one of the EntityActionOptions. Set it to override the action's default optimistic or pessimistic behavior.
-
Many apps are easier to build when saves are "optimistic" because the changes are immediately available to application code that is watching collection selectors. The app doesn't have to wait for confirmation that the entity operation succeeded on the server.
-
A pessimistic save doesn't update the store until the server confirms that the save succeeded, which NgRx Data then turns into a "SUCCESS" action that updates the collection. With a pessimistic save, the changes won't be available in the store
-
This confirmation cycle can (and usually will) take significant time and the app has to account for that gap somehow. The app could "freeze" the UX (perhaps with a modal spinner and navigation guards) until the confirmation cycle completes. That's tricky code to write and race conditions are inevitable. And it's difficult to hide this gap from the user and keep the user experience responsive.
-
This isn't a problem with optimistic saves because the changed data are immediately available in the store.
- The developer always has the option to wait for confirmation of an optimistic save. But the changed entity data will be in the store during that wait.
-
Save errors
-
The downside of optimistic save is that the save could fail for many reasons including lost connection, timeout, or rejection by the server.
-
When the client or server rejects the save request, the nrgx EntityEffect.persist$ dispatches an error action ending in _ERROR.
-
The default entity reducer methods do nothing with save errors.
-
There is no issue if the operation was pessimistic. The collection had not been updated so there is no obvious inconsistency between the state of the entity in the collection and on the server.
-
If the operation was optimistic, the entity in the cached collection has been added, removed, or updated. The entity and the collection are no longer consistent with the state on the server.
-
That may be a problem for your application. If the save fails, the entity in cache no longer accurately reflects the state of the entity on the server. While that can happen for other reasons (e.g., a different user changed the same data), when you get a save error, you're almost certainly out-of-sync and should be able to do something about it.
-
Change tracking gives the developer the option to respond to a server error by dispatching an undo action for the entity (or entities) and thereby reverting the entity (or entities) to the last known server state.
-
Undo is NOT automatic. You may have other save error recovery strategies that preserve the user's unsaved changes. It is up to you if and when to dispatch one of the UNDO_... actions.
-
-
-
-
Change Tracking
-
The NgRx Data tracks an entity's change-state in the collection's changeState property.
-
When change tracking is enabled (the default), the changeState is a primary key to changeState map.
- You can disable change tracking for an individual action or the collection as a whole as described below.
-
ChangeState
-
A changeState map adheres to the following interface
-
ChangeState
export interface ChangeState<T> { changeType: ChangeType; originalValue: T | undefined; } export enum ChangeType { Unchanged, // the entity has not been changed. Added, // the entity was added to the collection Updated, // the entity in the collection was updated Deleted, // the entity is scheduled for delete and was removed from collection. }
-
-
A ChangeState describes an entity that changed since its last known server value. The changeType property tells you how it changed.
- Unchanged is an implied state. Only changed entities are recorded in the collection's changeState property. If an entity's key is not present, assume it is Unchanged and has not changed since it was last retrieved from or successfully saved to the server.
-
The original value is the last known value from the server. The changeState object holds an entity's original value for two of these states: Updated and Deleted. For an Unchanged entity, the current value is the original value so there is no need to duplicate it. There could be no original value for an entity this is added to the collection but no yet saved.
-
-
-
EntityActions and change tracking.
-
The collection is created with an empty changeState map.
-
Recording a change state
-
Many EntityOp reducer methods will record an entity's change state. Once an entity is recorded in the changeState, its changeType and originalValue generally do not change. Once "added", "deleted" or "updated", an entity stays that way until committed or undone.
-
Delete (remove) is a special case with special rules. See below.
-
Here are the most important EntityOps that record an entity in the changeState map:
// Save operations when isOptimistic flag is true SAVE_ADD_ONE SAVE_ADD_MANY SAVE_DELETE_ONE SAVE_DELETE_MANY SAVE_UPDATE_ONE SAVE_UPDATE_MANY SAVE_UPSERT_ONE SAVE_UPSERT_MANY // Cache operations ADD_ONE ADD_MANY REMOVE_ONE REMOVE_MANY UPDATE_ONE UPDATE_MANY UPSERT_ONE UPSERT_MANY
-
-
Removing an entity from the changeState map.
-
An entity which has no entry in the ChangeState map is presumed to be unchanged.
-
The commit and undo operations remove entries from the ChangeState which means, in effect, that they are "unchanged."
-
The commit operations simply remove entities from the changeState. They have no other effect on the collection.
-
The undo operations replace entities in the collection based on information in the changeState map, reverting them their last known server-side state, and removing them from the changeState map. These entities become "unchanged."
-
An entity ceases to be in a changed state when the server returns a new version of the entity. Operations that put that entity in the store also remove it from the changeState map.
-
Here are the operations that remove one or more specified entities from the changeState map.
QUERY_ALL_SUCCESS QUERY_BY_KEY_SUCCESS QUERY_LOAD_SUCCESS QUERY_MANY_SUCCESS SAVE_ADD_ONE_SUCCESS SAVE_ADD_MANY_SUCCESS SAVE_DELETE_ONE_SUCCESS SAVE_DELETE_MANY_SUCCESS SAVE_UPDATE_ONE_SUCCESS SAVE_UPDATE_MANY_SUCCESS SAVE_UPSERT_ONE_SUCCESS SAVE_UPSERT_MANY_SUCCESS COMMIT_ONE COMMIT_MANY UNDO_ONE UNDO_MANY
-
-
Operations that clear the changeState map.
-
The EntityOps that replace or remove every entity in the collection also reset the changeState to an empty object. All entities in the collection (if any) become "unchanged".
ADD_ALL QUERY_LOAD_SUCCESS REMOVE_ALL COMMIT_ALL UNDO_ALL -
Two of these may surprise you.
-
ADD_ALL is interpreted as a cache load from a known state. These entities are presumed unchanged. If you have a different intent, use ADD_MANY.
-
REMOVE_ALL is interpreted as a cache clear with nothing to save. If you have a different intent, use removeMany.
-
-
You can (re)set the changeState to anything with EntityOp.SET_CHANGE_STATE.
-
This is a super-powerful operation that you should rarely perform. It's most useful if you've created your own entity action and are modifying the collection in some unique way.
-
-
-
Undo (revert) an unsaved change
-
You have many options for handling an optimistic save error. One of them is to revert the change to the entity's last known state on the server by dispatching an undo action.
-
There are three undo EntityOps that revert entities: UNDO_ONE, UNDO_MANY and UNDO_ALL.
-
For UNDO_ONE and UNDO_MANY, the id(s) of the entities to revert are in the action payload.
-
UNDO_ALL reverts every entity in the changeState map.
-
Each entity is reverted as follows:
-
ADDED - Remove from the collection and discard
-
DELETED - Add the original value of the removed entity to the collection. If the collection is sorted, it will be moved into place. If unsorted, it's added to the end of the collection.
-
UPDATED - Update the collection with the entity's original value.
-
-
If you try to undo/revert an entity whose id is not in the changeState map, the action is silently ignored.
-
Deleting/removing entities
-
There are special change tracking rules for deleting/removing an entity from the collection
-
Added entities
-
When you remove or delete an "added" entity, the change tracker removes the entity from the changeState map because there is no server state to which such an entity could be restored.
-
The reducer methods that delete and remove entities should immediately remove an added entity from the collection.
- The default delete and remove reducer methods remove these entities immediately.
-
They should not send HTTP DELETE requests to the server because these entities do not exist on the server.
- The default EntityEffects.persist$ effect does not make HTTP DELETE requests for these entities.
-
-
Updated entities
- An entity registered in the changeState map as "updated" is reclassified as "deleted". Its originalValue stays the same. Undoing the change will restore the entity to the collection in its pre-update state.
-
-
Merge Strategies
-
You can determine how NgRx Data will merge entities after a query, a save, or a cache operation by setting the entity action's optional mergeStrategy property to one of the three strategy enums:
-
IgnoreChanges - Update the collection entities and ignore all change tracking for this operation. Each entity's changeState is untouched.
-
PreserveChanges - Updates current values for unchanged entities. For each changed entity it preserves the current value and overwrites the originalValue with the merge entity. This is the query-success default.
-
OverwriteChanges - Replace the current collection entities. For each merged entity it discards the changeState and sets the changeType to "unchanged". This is the save-success default.
-
-
Disabling change tracking with IgnoreChanges is the most frequent choice.
-
-
Disable change tracking
-
You can opt-out of change tracking for the entire collection by setting the collection's noChangeTracking flag to true in its entityMetadata. When true, NgRx Data does not track any changes for this collection and the EntityCollection.changeState property remains an empty object.
-
You can opt-out of change tracking for a specific entity action by supplying the mergeStrategy in the optional EntityActionOptions that you can pass in the action payload.
- If you don't specify a MergeStrategy, NgRx Data uses the default for that action.
-
If you are dispatching an action with EntityDispatcher and you don't want that action to be change-tracked, you might write something like this:
const hero: Hero = { id: 42, name: 'Francis' }; dispatcher.addOneToCache(hero, { mergeStrategy: MergeStrategy.IgnoreChanges, }); -
You can also pass that option to methods of a helpful EntityCollectionService facade such as your custom HeroService
const hero: Hero = { id: 42, name: 'Francis' }; heroService.addOneToCache(hero, { mergeStrategy: MergeStrategy.IgnoreChanges, }); -
If you prepare the EntityAction directly with an EntityActionFactory, it might look like this:
const hero: Hero = { id: 42, name: 'Francis' }; const payload: EntityActionPayload = { entityName: 'Hero', entityOp: EntityOp.ADD_ONE, data: hero, mergeStrategy: MergeStrategy.IgnoreChanges, // .. other options .. }; const action = factory.create(payload);
-
-
- Work in progress
-
Hold on. We said "you may never write an action, reducer, selector, or effect."
-
That doesn’t mean you won’t ever. In fact, a critical feature of NgRx Data is that you can add your own properties to collections, additional actions, reducer cases, selectors, etc.
-
You aren't locked in to the way NgRx Data does things. You can customize almost anything, both at the single entity-type level and for all entity types.
-
But you ONLY do so when you want to do something unusual … and that, by definition, is not boilerplate.
-
An entity is an object with long-lived data values that you read from and write to a database.
- Operations that access the database are called persistence operations.
-
An entity refers to some "thing" in the application domain, such as a customer. Such things are unique even as their values change. Accordingly each entity has a unique primary key, also called its identifier.
-
Each entity object is an instance of an entity type. That type could be represented explicitly as a class or an interface. Or it could just be a bag of data.
-
To manage entities with NgRx Data, you describe each entity type with entity metadata.
-
The application's entity model is the set of all entity types in your application that are described with entity metadata.
-
In some definitions, the entity type and entity model describe both the data and the logic that govern that data such as data integrity rules (e.g., validations) and behaviors (e.g., calculations). The current version of NgRx Data library is unaware of entity logic beyond what is strictly necessary to persist entity data values.
-
No! The NgRx Data library is narrowly focused on a single objective: to simplify management of entity data.
-
Entity data are a particularly opportune target for simplification because they appear in high volume in many applications and the sheer number of similar-but-different NgRx code artifacts necessary to manage that data is daunting.
-
Anything we can do to shrink entity management code and to leverage the commonalities across entity types will repay the effort handsomely.
-
But entity data is only one kind of application data.
-
Configuration data, user roles, the user's prior selections, the current state of screen layouts ... these are all important and highly idiosyncratic data that can benefit from custom coding with standard NgRx techniques.
-
Data streamed from remote sources such as trading systems, mobile asset tracking systems, and IoT devices are not entity data and may not be a good fit for the NgRx Data library. They are still worth managing with NgRx.
-
It bears repeating: the NgRx Data library is good for querying, caching, and saving entity data ... and that's it.
-
NgRx is a collection of libraries for writing Angular applications in a "reactive style" that combines the redux pattern and tools with RxJS Observables.
-
NgRx Data builds upon three NgRx libraries: Store, Effects, and Entity.
-
The NgRx Data library extends Entity.
-
The Entity library provides the core representation of a single entity collection within an NgRx Store. Its
EntityAdapterdefines common operations for querying and updating individual cached entity collections. -
The NgRx Data library leverages these capabilities while offering higher-level features including:
-
metadata-driven entity model.
-
actions, reducers, and selectors for all entity types in the model.
-
asynchronous fetch and save HTTP operations as NgRx Effects.
-
a reactive
EntityCollectionServicewith a simple API that encapsulates NgRx interaction details.
-
-
Nothing is hidden from you. The store, the actions, the adapter, and the entity collections remain visible and directly accessible.
-
The fixes and enhancements in future NgRx Entity versions flow through NgRx Data to your application.
-
Redux is an implementation of a pattern for managing application state in a web client application.
-
It is notable for:
-
Holding all shared state as objects in a single, central store.
-
All objects in the store are immutable. You never directly set any property of any object held in a redux store.
-
You update the store by dispatching actions to the store.
-
An action is like a message. It always has a type. It often has a payload which is the data for that message.
-
Action instances are immutable.
-
Action instances are serializable (because the redux dev tools demand it and we should be able to persist them to local browser storage between user sessions).
-
All store values are immutable and serializable.
-
actions sent to the store are processed by reducers. A reducer may update the store by replacing old objects in the store with new objects that have the updated state.
-
All reducers are “pure” functions. They have no side-effects.
-
The store publishes an event when updated by a reducer.
-
Your application listens for store events; when it hears an event of interest, the app pulls the corresponding object(s) from the store.
-
-
NgRx is similar in almost all important respects. It differs most significantly in replacing events with observables.
-
NgRx relies on
RxJS Observablesto listen for store events, select those that matter, and push the selected object(s) to your application.
-
State is data. Applications have several kinds of state including:
-
application state is session data that determine how your application works. Filter values and router configurations are examples of application state.
-
persistent state is "permanent" data that you store in a remote database. Entities are a prime example of persistent state.
-
shared state is data that are shared among application components and services.
-
-
In NgRx, as in the redux pattern, all stored state is (or should be) immutable. You never change the properties of objects in the store. You replace them with new objects, created through a merge of the previous property values and new property values.
-
Arrays are completely replaced when you add, remove, or replace any of their items.
-
RxJS Observables is a library for programming in a "reactive style".
-
Many Angular APIs produce RxJS Observables so programming "reactively" with Observables is familiar to many Angular developers. Search the web for many helpful resources on RxJS.
-
Some folks try to conquer the "too much boilerplate" problem by generating the code.
-
Adding the Foo entity type? Run a code generator to produce actions, action-creators, reducers, effects, dispatchers, and selectors for Foo. Run another one to produce the service that makes HTTP GET, PUT, POST, and DELETE calls for Foo.
-
Maybe it generates canned tests for them too.
-
Now you have ten (or more) new files for Foo. Multiply that by a 100 entity model and you have 1000 files. Cool!
-
Except you're responsible for everyone of those files. Overtime you're bound to modify some of them to satisfy some peculiarity of the type.
-
Then there is a bug fix or a new feature or a new way to generate some of these files. It's your job to upgrade them. Which ones did you change? Why?
-
Good luck!
-
Component is a library for building reactive Angular templates. It provides a set of declarables that can work with or without
zone.js. They give more control over rendering and provide further reactivity for Angular applications.- This package is still experimental and may change during development.
- Rendering observable events in a performant way.
- Displaying different content based on the current state of an observable.
- Creating readable templates by using aliases for nested properties.
- Building fully reactive Angular applications regardless of whether
zone.jsis present or not.
-
Installing with ng add
ng add @ngrx/component@latest -
Installing with npm
npm install @ngrx/component --save -
Installing with yarn
yarn add @ngrx/component
- The
*ngrxLetdirective serves a convenient way of binding observables to a view context (DOM element's scope). It also helps with several internal processing under the hood.
-
The
*ngrxLetdirective is provided through theLetModule. To use it, add theLetModuleto theimportsof your standalone component or NgModule:import { Component } from '@angular/core'; import { LetModule } from '@ngrx/component'; @Component({ // ... other metadata standalone: true, imports: [ // ... other imports LetModule, ], }) export class MyStandaloneComponent {} -
The
*ngrxLetdirective can be also used by importing theReactiveComponentModule:import { NgModule } from '@angular/core'; import { ReactiveComponentModule } from '@ngrx/component'; @NgModule({ imports: [ // ... other imports ReactiveComponentModule, ], }) export class MyFeatureModule {}ReactiveComponentModuleis deprecated in favor ofLetModule. See the migration guide for more information.
-
The current way of binding an observable to the view looks like this:
<ng-container *ngIf="number$ | async as n"> <app-number [number]="n"></app-number> <app-number-special [number]="n"></app-number-special> </ng-container>- The problem is that
*ngIfis interfering with rendering. In case of0(falsy value), the component would be hidden.
- The problem is that
-
The
*ngrxLetdirective takes over several things and makes it more convenient and safe to work with streams in the template:<ng-container *ngrxLet="number$ as n"> <app-number [number]="n"></app-number> </ng-container> <ng-container *ngrxLet="number$; let n"> <app-number [number]="n"></app-number> </ng-container>
-
In addition to that it provides us information from the whole observable context. We can track next, error, and complete events:
<ng-container *ngrxLet="number$ as n; let e = $error; let c = $complete"> <app-number [number]="n" *ngIf="!e && !c"> </app-number> <p *ngIf="e">There is an error: {{ e }}</p> <p *ngIf="c">Observable is completed.</p> </ng-container>
-
There is an option to pass the suspense template that will be displayed when an observable is in a suspense state:
<ng-container *ngrxLet="number$ as n; suspenseTpl: loading"> <app-number [number]="n"></app-number> </ng-container> <ng-template #loading> <p>Loading...</p> </ng-template>-
An observable is in a suspense state until it emits the first event (next, error, or complete).
-
In case a new observable is passed to the *ngrxLet directive at runtime, the suspense template will be displayed again until the new observable emits the first event.
-
-
The *ngrxLet directive can also accept static (non-observable) values as input argument. This feature provides the ability to create readable templates by using aliases for deeply nested properties:
<ng-container *ngrxLet="userForm.controls.email as email"> <input type="text" [formControl]="email" /> <ng-container *ngIf="email.errors && (email.touched || email.dirty)"> <p *ngIf="email.errors.required">This field is required.</p> <p *ngIf="email.errors.email">This field must be an email.</p> </ng-container> </ng-container>
- Binding is present even for falsy values. (See "Comparison with *ngIf and async" section)
- Takes away the multiple usages of the
asyncorngrxPushpipe. - Allows displaying different content based on the current state of an observable.
- Provides a unified/structured way of handling
nullandundefined. - Provides the ability to create readable templates by using aliases for nested properties.
- Triggers change detection using the
RenderSchedulerthat behaves differently in zone-full and zone-less mode. - Distinct the same values in a row for better performance.
- The
ngrxPushpipe serves as a drop-in replacement for theasyncpipe. It contains intelligent handling of change detection to enable us running in zone-full as well as zone-less mode without any changes to the code.
-
The
ngrxPushpipe is provided through thePushModule. To use it, add thePushModuleto theimportsof your standalone component or NgModule:import { Component } from '@angular/core'; import { PushModule } from '@ngrx/component'; @Component({ // ... other metadata standalone: true, imports: [ // ... other imports PushModule, ], }) export class MyStandaloneComponent {} -
The
ngrxPushpipe can be also used by importing theReactiveComponentModule:import { NgModule } from '@angular/core'; import { ReactiveComponentModule } from '@ngrx/component'; @NgModule({ imports: [ // ... other imports ReactiveComponentModule, ], }) export class MyFeatureModule {}ReactiveComponentModuleis deprecated in favor ofPushModule. See the migration guide for more information.
-
The current way of binding an observable to the view looks like this:
<p>{{ number$ | async }}</p> <ng-container *ngIf="number$ | async as n">{{ n }}</ng-container> <app-number [number]="number$ | async"></app-number> -
The
asyncpipe marks the component and all its ancestors as dirty, but does not trigger the change detection mechanism. It needs thezone.jsmicrotask queue to exhaust untilApplicationRef.tickis called to render all dirty marked components. To use theasyncpipe in zone-less mode, we have to manually trigger the change detection each time an observable emits a new value. -
Fortunately, the
ngrxPushpipe solves this problem by scheduling a new change detection cycle in zone-less mode when an observable emits a new value. It can be used as follows:<p>{{ number$ | ngrxPush }}</p> <ng-container *ngIf="number$ | ngrxPush as n">{{ n }}</ng-container> <app-number [number]="number$ | ngrxPush"></app-number>
- Takes observables or promises, retrieves their values, and passes the value to the template.
- Handles
nullandundefinedvalues in a clean unified/structured way. - Triggers change detection using the
RenderSchedulerthat behaves differently in zone-full and zone-less mode. - Distinct the same values in a row for better performance.
-
Store Devtools provides developer tools and instrumentation for Store.
-
Setup
-
Instrumentation with the Chrome / Firefox Extension
-
Download the Redux Devtools Extension
-
In your
AppModuleadd instrumentation to the module imports usingStoreDevtoolsModule.instrument:
-
app.module.ts
import { StoreDevtoolsModule } from '@ngrx/store-devtools'; import { environment } from '../environments/environment'; // Angular CLI environment @NgModule({ imports: [ StoreModule.forRoot(reducers), // Instrumentation must be imported after importing StoreModule (config is optional) StoreDevtoolsModule.instrument({ maxAge: 25, // Retains last 25 states logOnly: environment.production, // Restrict extension to log-only mode autoPause: true, // Pauses recording actions and state changes when the extension window is not open }), ], }) export class AppModule {}
-
-
-
Installing with ng add
ng add @ngrx/store-devtools@latest -
Installing with npm
npm install @ngrx/store-devtools --save -
Installing with yarn
yarn add @ngrx/store-devtools
- Instrumentation options
- When you call the instrumentation, you can give an optional configuration object. As stated, each property in the object provided is optional.
-
maxAge
- number (>1) | false - maximum allowed actions to be stored in the history tree. The oldest actions are removed once maxAge is reached. It's critical for performance. Default is false (infinite).
-
logOnly
- boolean - connect to the Devtools Extension in log-only mode. Default is false which enables all extension features.
-
autoPause
- boolean - Pauses recording actions and state changes when the extension window is not open. Default is false.
-
name
- string - the instance name to show on the monitor page. Default value is NgRx Store DevTools.
-
monitor
- function - the monitor function configuration that you want to hook.
-
actionSanitizer
- function - takes
actionobject and id number as arguments, and should return anactionobject.
- function - takes
-
stateSanitizer
- function - takes
stateobject and index as arguments, and should return astateobject.
- function - takes
-
serialize
-
options
- undefined - will use regular JSON.stringify to send data
- false - will handle also circular references
- true - will handle also date, regex, undefined, primitives, error objects, symbols, maps, sets and functions
- object - which contains date, regex, undefined, NaN, infinity, Error, Symbol, Map, Set and function keys. For each of them, you can indicate if they have to be included by setting them to true. For function keys, you can also specify a custom function which handles serialization.
-
For more detailed information see Redux DevTools Serialize
-
-
actionsSafelist / actionsBlocklist
- array of strings as regex - actions types to be hidden / shown in the monitors, more information here.
-
predicate
- function - called for every action before sending, takes state and action object, and returns true in case it allows sending the current data to the monitor, more information here.
-
features
-
configuration object - containing properties for features than can be enabled or disabled in the browser extension Redux DevTools. These options are passed through to the browser extension verbatim. By default, all features are enabled. For more information visit the Redux DevTools Docs
features: { pause: true, // start/pause recording of dispatched actions lock: true, // lock/unlock dispatching actions and side effects persist: true, // persist states on page reloading export: true, // export history of actions in a file import: 'custom', // import history of actions from a file jump: true, // jump back and forth (time travelling) skip: true, // skip (cancel) actions reorder: true, // drag and drop actions in the history list dispatch: true, // dispatch custom actions or action creators test: true // generate tests for the selected actions },
-
- app.module.ts
@NgModule({ ... imports: [ ... StoreDevtoolsModule.instrument({ maxAge: 25, logOnly: false, autoPause: true, features: { pause: false, lock: true, persist: true } }) ], ... })
-
To prevent Store Devtools from being included in your bundle, you can exclude it from the build process.
-
Step 1: Create build specific files
-
Create a folder for your build specific files. In this case, it is
build-specifics. Now create a file for a common build. Within this file, export an array that defines theStoreDevtoolsModule.-
build-specifics/index.ts
import { StoreDevtoolsModule } from '@ngrx/store-devtools'; export const extModules = [ StoreDevtoolsModule.instrument({ maxAge: 25 }) ];
-
-
Now create a file for a production build (ng build --prod=true) that simply exports an empty array.
- build-specifics/index.prod.ts
export const extModules = [];
- build-specifics/index.prod.ts
-
-
Step 2: Import extModules
-
Modify
app.module.tsto includeextModulesin theimportsarray.-
app.module.ts
import { extModules } from './build-specifics'; @NgModule({ imports: [ StoreModule.forRoot(reducers), // Instrumentation must be imported after importing StoreModule extModules, ], })
-
-
-
Step 3: Modify angular.json
-
Add a new entry in the fileReplacements section in your angular.json. For more information on this topic, look at the build section of the angular documentation. Configure target-specific file replacements
- angular.json
"fileReplacements": [ { "replace": "src/app/build-specifics/index.ts", "with": "src/app/build-specifics/index.prod.ts" } ]
- angular.json
-
-
Scaffolding library for Angular applications using NgRx libraries.
-
Schematics provides Angular CLI commands for generating files when building new NgRx feature areas and expanding existing ones. Built on top of Schematics, this tool integrates with the Angular CLI.
-
Dependencies
-
After installing
@ngrx/schematics, install the NgRx dependencies.npm install @ngrx/{store,effects,entity,store-devtools} --saveyarn add @ngrx/{store,effects,entity,store-devtools}
-
-
Initial State Setup
-
Generate the initial state management and register it within the
app.module.tsng generate @ngrx/schematics:store State --root --module app.module.ts- The
@ngrx/schematicscommand prefix is only needed when the default collection isn't set.
- The
-
-
Initial Effects Setup
- Generate the root effects and register it within the app.module.ts
ng generate @ngrx/schematics:effect App --root --module app.module.ts
- Generate the root effects and register it within the app.module.ts
-
Default Schematics Collection
- To use
@ngrx/schematicsas the default collection in your Angular CLI project, add it to yourangular.json:ng config cli.defaultCollection @ngrx/schematics - The collection schema also has aliases to the most common schematics used to generate files.
- To use
-
Installing with ng add
-
You can make
@ngrx/schematicsthe default collection for your application with the followingng addcommand (details here):ng add @ngrx/schematics@latest -
This command will automate the following steps:
- Update
angular.json > cli > defaultCollectionwith@ngrx/schematics.
- Update
-
-
Installing with npm
npm install @ngrx/schematics --save-dev -
Installing with yarn
yarn add @ngrx/schematics --dev
-
Overview
- Generates the initial setup for state management and registering new feature states. It registers the @ngrx/store-devtools integration and generates a state management file containing the state interface, the object map of action reducers and any associated meta-reducers.
-
Command
ng generate store State [options]OR
ng generate st State [options] -
Options
-
Provide the project name where the state files will be created.
-
--project
- Alias: -p
- Type: string
-
-
Provide the path to a file containing an Angular Module and the feature state will be added to its imports array using StoreModule.forFeature or StoreModule.forRoot.
-
--module
- Alias: -m
- Type: string
-
-
When used with the --module option, it registers the state within the Angular Module using StoreModule.forRoot. The --root option should only be used to setup the global @ngrx/store providers.
-
--root
- Type: boolean
- Default: false
-
-
Only provide minimal setup for the root state management. Only registers StoreModule.forRoot() in the provided module with an empty object, and default runtime checks.
-
--minimal
- Type: boolean
- Default: false
-
-
Provide the folder where the state files will be created.
-
--state-path
- Type: string
- Default: reducers
-
-
Provide the name of the interface exported for your state. When defining with the --root option, the name of the store will be used to define the interface name.
-
--state-interface
- Type: string
- Default: State
-
-
-
Examples
-
Generate the initial state management files and register it within the app.module.ts.
ng generate store State --root --module app.module.ts -
Generate an Admin feature state within the admin folder and register it with the admin.module.ts in the same folder.
ng generate module admin --flat false ng generate store admin/Admin -m admin.module.ts -
Generate the initial state management files within a store folder and register it within the app.module.ts.
ng generate store State --root --state-path store --module app.module.ts
-
-
Overview
- Generates an action file that contains an enum of action types, an example action class and an exported type union of action classes.
-
Command
ng generate action ActionName [options]OR
ng generate a ActionName [options] -
Options
-
Provide the project name where the action files will be created.
-
--project
- Alias: -p
- Type: string
-
-
Nest the actions file within a folder based on the action name.
-
--flat
- Type: boolean
- Default: true
-
-
Group the action file within an actions folder.
-
--group
- Alias: -g
- Type: boolean
- Default: false
-
-
Specifies if api success and failure actions should be generated.
-
--api
- Alias: -a
- Type: boolean
- Default: false
-
-
Generate a spec file alongside the action file.
-
--skip-tests
- Type: boolean
- Default: false
-
-
Specify the prefix for the actions.
-
--prefix
- Type: string
- Default: load
-
-
-
Examples
-
Generate a User actions file with an associated spec file.
ng generate action User -
Generate a User actions file within a nested folder
ng generate action User --flat false -
Generate a User actions file within a nested actions folder
ng generate action User --group
-
-
Overview
- Generates a reducer file that contains a state interface, an initial state object for the reducer, and a reducer function.
-
Command
ng generate reducer ReducerName [options]OR
ng generate r ReducerName [options] -
Options
-
Provide the project name where the reducer files will be created.
-
--project
- Alias: -p
- Type: string
-
-
Nest the reducer file within a folder based on the reducer name.
-
--flat
- Type: boolean
- Default: true
-
-
Group the reducer file within a reducers folder.
-
--group
- Alias: -g
- Type: boolean
- Default: false
-
-
Provide the path to a file containing an Angular Module and the entity reducer will be added to its imports array using StoreModule.forFeature.
-
--module
- Alias: -m
- Type: string
-
-
Provide the path to a reducers file containing a state interface and an object map of action reducers. The generated reducer interface will be imported and added to the first defined interface within the file. The reducer will be imported and added to the first defined object with an ActionReducerMap type.
-
--reducers
- Alias: -r
- Type: string
-
-
Specifies if api success and failure actions should be added to the reducer.
-
--api
- Alias: -a
- Type: boolean
- Default: false
-
-
Generate a spec file alongside the reducer file.
-
--skip-tests
- Type: boolean
- Default: false
-
-
-
Examples
-
Generate a User reducer file add it to a defined map of reducers generated from a feature state.
ng generate reducer User --reducers reducers/index.ts -
Generate a User reducer file within a nested folder based on the reducer name.
ng generate reducer User --flat false -
Generate a User reducer and register it within the Angular Module in app.module.ts.
ng generate reducer User --module app.module.ts -
Generate a User reducer file within a nested reducers folder.
ng generate reducer User --group
-
-
Overview
- Generates a selector file for @ngrx/store.
-
Command
ng generate selector selectorName [options]OR
ng generate se selectorName [options] -
Options
-
Provide the project name where the selector files will be created.
-
--project
- Alias: -p
- Type: string
-
-
Nest the effects file within a folder based by the selector name.
-
--flat
- Type: boolean
- Default: true
-
-
Group the selector file within an selectors folder.
-
--group
- Alias: -g
- Type: boolean
- Default: false
-
-
Generate a spec file alongside the selector file.
-
--skip-tests
- Type: boolean
- Default: false
-
-
-
Examples
-
Generate a selector file.
ng generate selector User -
Generate a selector file within a nested
selectorsfolderng generate selector User --group
-
-
Overview
- Generates a component with Store injected into its constructor. You can optionally provide the path to your reducers and your state interface.
-
Command
ng generate container ComponentName [options]OR
ng generate co ComponentName [options] -
General Options
- Angular CLI component options.
-
Container Options
-
Provide the path to your file with an exported state interface
-
--state
- Type: string
-
-
Provide the name of the interface exported for your state interface
-
--state-interface
- Type: string
- Default: State
-
-
Specifies whether to create a unit test or an integration test
-
--test-depth
- Type: string
- Values: unit|integration
- Default: integration
-
-
-
Examples
-
Generate a
UsersPagecontainer component with your reducers imported and theStoretyped a custom interface namedMyState.ng generate container UsersPage --state reducers/index.ts --state-interface MyState -
If you want to generate a container with an scss file, add
@ngrx/schematics:containerto the schematics in yourangular.json."schematics": { "@ngrx/schematics:container": { "style": "scss" } }
-
-
Overview
- Generates an effect file for @ngrx/effects.
-
Command
ng generate effect EffectName [options]OR
ng generate ef EffectName [options] -
Options
-
Provide the project name where the effect files will be created.
-
--project
- Alias: -p
- Type: string
-
-
Nest the effects file within a folder based by the effect name.
-
--flat
- Type: boolean
- Default: true
-
-
Group the effect file within an effects folder.
-
--group
- Alias: -g
- Type: boolean
- Default: false
-
-
Provide the path to a file containing an Angular Module and the effect will be added to its imports array. If the --root option is not included, the effect will be registered using EffectsModule.forFeature.
-
--module
- Alias: -m
- Type: string
-
-
When used with the --module option, it registers an effect within the Angular Module using EffectsModule.forRoot.
-
--root
- Type: boolean
- Default: false
-
-
Only provide minimal setup for the root effects setup. Only registers EffectsModule.forRoot() in the provided module with an empty array.
-
--minimal
- Type: boolean
- Default: false
-
-
Specifies if effect has api success and failure actions wired up.
-
--api
- Alias: -a
- Type: boolean
- Default: false
-
-
Generate a spec file alongside the effect file.
-
--skip-tests
- Type: boolean
- Default: false
-
-
-
Examples
-
Generate a UserEffects file and register it within the root Angular module in the root-level effects.
ng generate effect User --root -m app.module.ts -
Generate a UserEffects file within a user folder and register it with the user.module.ts file in the same folder.
ng generate module User --flat false ng generate effect user/User -m user.module.ts -
Generate a UserEffects file within a nested effects folder
ng generate effect User --group
-
-
Overview
- Generates a set of entity files for managing a collection using @ngrx/entity including a set of predefined actions, a collection model and a reducer with state selectors.
-
Command
ng generate entity EntityName [options]OR
ng generate en EntityName [options] -
Options
-
Provide the project name where the entity files will be created.
-
--project
- Alias: -p
- Type: string
-
-
Nest the effects file within a folder based on the entity name.
-
--flat
- Type: boolean
- Default: true
-
-
Provide the path to a file containing an Angular Module and the entity reducer will be added to its imports array using StoreModule.forFeature.
-
--module
- Alias: -m
- Type: string
-
-
Provide the path to a reducers file containing a state interface and a object map of action reducers. The generated entity interface will be imported and added to the first defined interface within the file. The entity reducer will be imported and added to the first defined object with an ActionReducerMap type.
-
--reducers
- Alias: -r
- Type: string
-
-
Generate spec files associated with the entity files.
-
--skip-tests
- Type: boolean
- Default: false
-
-
-
Examples
-
Generate a set of User entity files and add it to a defined map of reducers generated from a feature state.
ng generate entity User --reducers reducers/index.ts -
Generate a set of User entity files within a nested folder.
ng generate entity User --flat false -
Generate a set of User entity files and register it within the Angular Module in app.module.ts as a feature state.
ng generate entity User -m app.module.ts
-
-
Overview
- Generates a feature set containing an actions, effects, reducer, and selectors file. You use this to build out a new feature area that provides a new piece of state.
-
Command
ng generate feature FeatureName [options]OR
ng generate f FeatureName [options] -
Options
-
Provide the project name where the feature files will be created.
-
--project
- Alias: -p
- Type: string
-
-
Nest the feature files within a folder based on the feature name.
-
--flat
- Type: boolean
- Default: true
-
-
Group the feature files within their respective folders.
-
--group
- Alias: -g
- Type: boolean
- Default: false
-
-
Provide the path to a file containing an Angular Module and the feature reducer will be added to its imports array using StoreModule.forFeature.
-
--module
- Alias: -m
- Type: string
-
-
Provide the path to a reducers file containing a state interface and a object map of action reducers. The generated feature interface will be imported added to the first defined interface within the file. The feature reducer will be imported and added to the first defined object with an ActionReducerMap type.
-
--reducers
- Alias: -r
- Type: string
-
-
Specifies if api success and failure actions, reducer, and effects should be generated as part of this feature.
-
--api
- Alias: -a
- Type: boolean
- Default: false
-
-
Generate spec files associated with the feature files.
-
--skip-tests
- Type: boolean
- Default: false
-
-
-
Examples
-
Generate a User feature set and register it within an Angular Module.
ng generate feature User -m app.module.ts -
Generate a User feature set and add it to a defined set of reducers.
ng generate feature User --group --reducers reducers/index.ts -
Generate a User feature set within a user folder and register it with the user.module.ts file in the same user folder.
ng generate module User --flat false ng generate feature user/User -m user.module.ts --group -
Generate a User feature set with actions, effects, reducer, and selectors file nested within their respective folders.
ng generate feature User --group
-
-
Overview
-
Use ESLint to follow the best practices and to avoid common pitfalls in your application.
-
The NgRx ESLint Plugin is no different and promotes the key concepts to create a maintainable project. It consists of @ngrx/store, @ngrx/effects, and @ngrx/component-store rules and a handful of preconfigured configurations.
-
The plugin comes with a number of rules that help address most popular NgRx malpractices. The rules are configurable so that you can choose the ones you want to follow, and which rules should give a linting error or warning.
-
Some rules also allow automatic fixes with
ng lint --fix. -
Rules
-
component-store
- @ngrx/updater-explicit-return-type
- Updater should have an explicit return type.
- @ngrx/updater-explicit-return-type
-
effects
-
@ngrx/avoid-cyclic-effects
- Avoid Effect that re-emit filtered actions.
-
@ngrx/no-dispatch-in-effects
- Effect should not call store.dispatch.
-
@ngrx/no-effect-decorator-and-creator
- Effect should use either the
createEffector the @Effect decorator, but not both.
- Effect should use either the
-
@ngrx/no-effect-decorator
- The
createEffectis preferred as the @Effect decorator is deprecated.
- The
-
@ngrx/no-effects-in-providers
- Effect should not be listed as a provider if it is added to the
EffectsModule.
- Effect should not be listed as a provider if it is added to the
-
@ngrx/no-multiple-actions-in-effects
- Effect should not return multiple actions.
-
@ngrx/prefer-action-creator-in-of-type
- Using action creator in
ofTypeis preferred over string.
- Using action creator in
-
@ngrx/prefer-concat-latest-from
- Use
concatLatestFrominstead ofwithLatestFromto prevent the selector from firing until the correct Action is dispatched.
- Use
-
@ngrx/prefer-effect-callback-in-block-statement
- A block statement is easier to troubleshoot.
-
@ngrx/use-effects-lifecycle-interface
- Ensures classes implement lifecycle interfaces corresponding to the declared lifecycle methods.
-
-
store
-
@ngrx/avoid-combining-selectors
- Prefer combining selectors at the selector level.
-
@ngrx/avoid-dispatching-multiple-actions-sequentially
- It is recommended to only dispatch one Action at a time.
-
@ngrx/avoid-duplicate-actions-in-reducer
- A Reducer should handle an Action once.
-
@ngrx/avoid-mapping-selectors
- Avoid mapping logic outside the selector level.
-
@ngrx/good-action-hygiene
- Ensures the use of good action hygiene.
-
@ngrx/no-multiple-global-stores
- There should only be one global store injected.
-
@ngrx/no-reducer-in-key-names
- Avoid the word "reducer" in the key names.
-
@ngrx/no-store-subscription
- Using the
asyncpipe is preferred over store subscription.
- Using the
-
@ngrx/no-typed-global-store
- The global store should not be typed.
-
@ngrx/on-function-explicit-return-type
- On function should have an explicit return type.
-
@ngrx/prefer-action-creator-in-dispatch
- Using action creator in dispatch is preferred over object or old Action.
-
@ngrx/prefer-action-creator
- Using action creator is preferred over Action class.
-
@ngrx/prefer-inline-action-props
- Prefer using inline types instead of interfaces, types or classes.
-
@ngrx/prefer-one-generic-in-create-for-feature-selector
- Prefer using a single generic to define the feature state.
-
@ngrx/prefer-selector-in-select
- Using a
selectorin theselectis preferred over string or props drilling.
- Using a
-
@ngrx/prefix-selectors-with-select
- The selector should start with "select", for example "selectThing".
-
@ngrx/select-style
- Selector can be used either with
selectas a pipeable operator or as a method.
- Selector can be used either with
-
@ngrx/use-consistent-global-store-name
- Use a consistent name for the global store.
-
-
-
Configuration NAME
- all-requiring-type-checking
- all
- component-store-strict
- component-store
- effects-requiring-type-checking
- effects-strict-requiring-type-checking
- effects-strict
- effects
- recommended-requiring-type-checking
- recommended
- store-strict
- store
- strict-requiring-type-checking
- strict
-
-
Installation
-
Installing with ng add
ng add @ngrx/eslint-plugin -
Installing with npm
npm install @ngrx/eslint-plugin --save-dev -
Installing with yarn
yarn add @ngrx/eslint-plugin -D
-