Adding Download Support
The database of the downloads are writing in JSON format. So if you don't have any experience with this kind of format, I would recommend you to use an editor like jsoneditoronline.
You have to make sure if your device has already download support by Kernel Adiutor. You can easily check this by opening the app and look for the Downloads Tab.
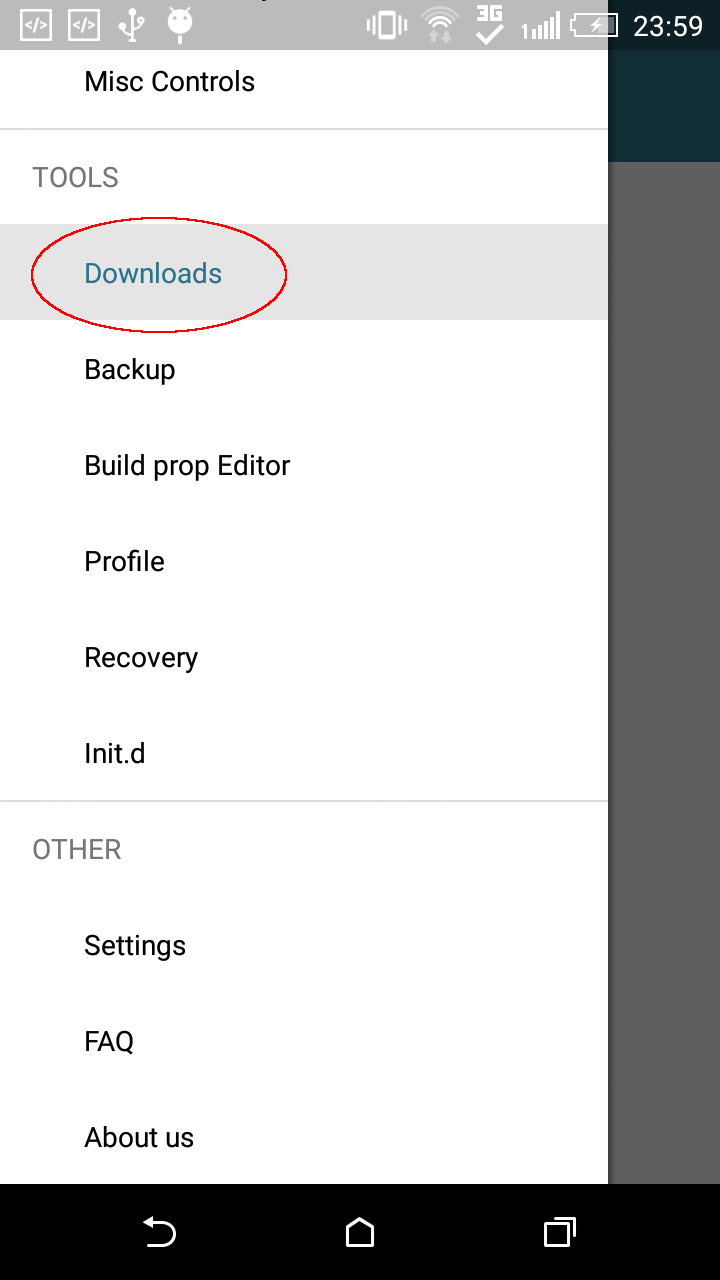
If it's there then continue with 2. Support for kernel
If not then open up downloads.json and add support for your device.
Example
{
  "vendor": [
    "HTC",
    "htc"
  ],
  "device": [
    "a5",
    "a5chl",
    "a5ul",
    "a5dwg",
    "a5dug",
    "htc_a5",
    "htc_a5chl",
    "htc_a5ul",
    "htc_a5dwg",
    "htc_a5dug"
  ],
  "link": "https://raw.githubusercontent.com/Grarak/KernelAdiutor/master/download/desire816.json"
}
Objects
-
required
vendor(Array): List of vendor names (ro.product.manufacturer in build.prop). -
required
device(Array): List of device names (ro.build.product and ro.product.device in build.prop). -
required
link(String): A link to the device database, you have to create a new file here in download folder (e.g. nexus5.json).
Open the download folder of Kernel Adiutor and edit the database which belongs to your device. If you are not sure which file you have to edit, then jump back to 1. Support for device and read all steps.
If you found the file belonging to your device, then it will look like this.
Example
[
  "https://raw.githubusercontent.com/Grarak/grarak.github.io/master/grakernel/desire816.json",
  "..",
  ".."
]
This is a collection of JSON files which contain kernel informations. When adding your kernel, your JSON link must be a blank site without any HTML elements. If you can't host a website, then simply use Github like me, but if you are going to use Github then you have to use the "raw" view of the file.
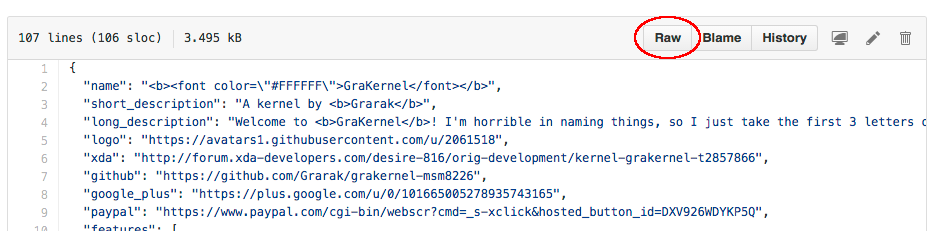
Just copy the link of the raw view and insert it in the device JSON file.
You have to create a JSON file which contains all informations about your kernel. The content of this file should be online on the link you given in 2. Support for kernel.
Example
{
  "name": "<b><font color=\"#FFFFFF\">GraKernel</font></b>",
  "short_description": "A kernel by <b>Grarak</b>",
  "long_description": "Welcome to <b>GraKernel</b>! I'm horrible at naming things, so I just take the first 3 letters of my name and combine it with kernel. In this Application you can find all advanced kernel features!<br><br>I'm a hobby Android Developer since 3 years.<br><a href=\"http://www.github.com/Grarak\">My Github Profile</a>",
  "logo": "https://avatars1.githubusercontent.com/u/2061518",
  "xda": "http://forum.xda-developers.com/desire-816/orig-development/kernel-grakernel-t2857866",
  "github": "https://github.com/Grarak/grakernel-msm8226",
  "google_plus": "https://plus.google.com/u/0/101665005278935743165",
  "paypal": "https://www.paypal.com/cgi-bin/webscr?cmd=_s-xclick&hosted_button_id=DXV926WDYKP5Q",
  "features": [
     "..",
     ".."
  ],
  "downloads": [
     "..",
     ".."
  ]
}
Objects
-
required
name(String) (you can use HTML elements): Name of your kernel. -
required
short_description(String) (you can use HTML elements): A short description of your kernel, I would recommend a maximum usage of 32 characters (HTML elements do not count). -
required
long_description(String) (you can use HTML elements): A long description of your kernel. -
required
logo(String): A picture which represents your kernel. The app will scale it down automatically if it's too big (width or height above 1920). -
xda(String): A link to XDA kernel thread or your XDA profile. -
github(String): A link to kernel sources or your Github profile. -
google_plus(String): A link to kernel G+ Community or your G+ profile. -
paypal(String): Donation link -
features(Array): See here -
required
downloads(Array): See here
This is an Array which contains a list of features your kernel has. This is not required, so if you don't want to add this, leave it.
Example
"features": [
  "Build with Google Toolchain 4.7",
  {
    "name": "CPU Governors",
    "items": [
      "interactive",
      "ondemand (default)",
      "userspace",
      "powersave",
      "performance"
    ]
  }
]
That list would look like this.
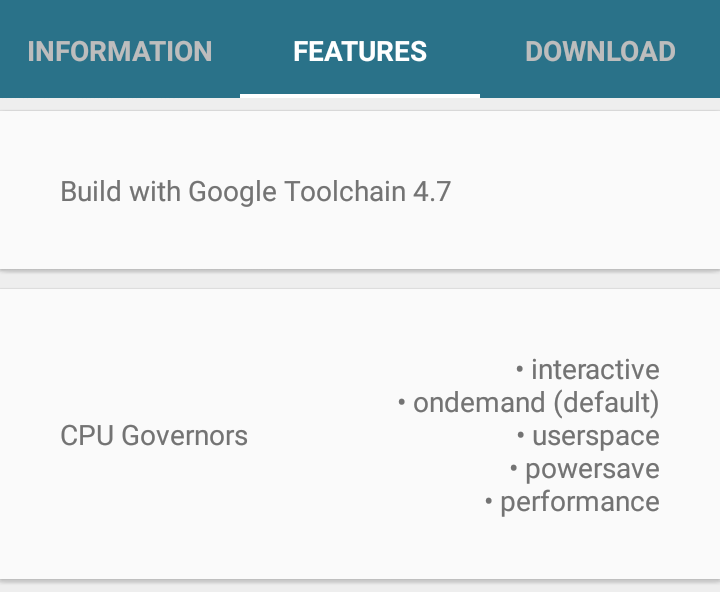
I hope "Build with Google Toolchain 4.7" is clear (you can use HTML elements here too).
If you want to use the second Object then let me explain it.
{
  "name": "CPU Governors",
  "items": [
    "interactive",
    "ondemand (default)",
    "userspace",
    "powersave",
    "performance"
  ]
}*Objects
-
required
name(String): The name of the category. -
required
items(Array): A list of features which belong to the category (you can use HTML elements in the Strings).
The order of Strings and Objects doesn't matter. You can do whatever you want.
For instance
"features": [
  "..",
  {
    "name": "..",
    "items": [
      ".."
    ]
  },
  "..",
  "..",
  "..",
  {
    "name": "..",
    "items": [
      ".."
    ]
  },
  {
    "name": "..",
    "items": [
      ".."
    ]
  }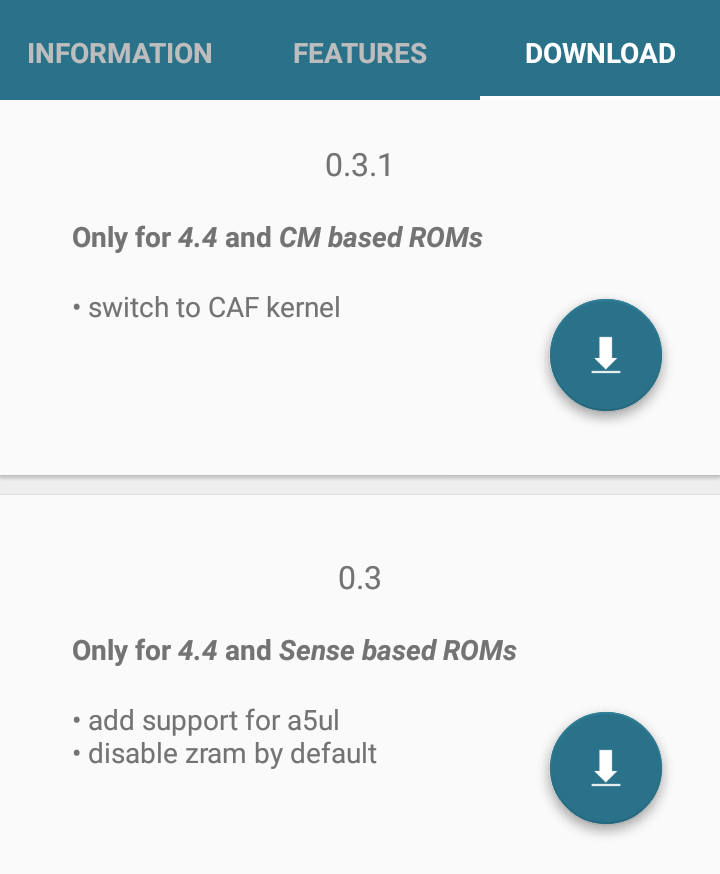
]This is an Array which contains all downloads of your kernel. It's required apparently, otherwise this whole thing wouldn't make sense.
Example
"downloads": [
  {
    "name": "0.3.1",
    "description": "<b>Only for <i>4.4</i> and <i>CM based ROMs</i></b>",
    "url": "https://github.com/Grarak/grarak.github.io/raw/master/a5/0.3.1.img",
    "md5sum": "02621769da1d5cc020c8ab503b20d797",
    "install_method": "dd if=$FILE of=/dev/block/platform/msm_sdcc.1/by-name/boot",
    "changelog": [
      "switch to CAF kernel"
    ]
  },
  {
    "name": "0.3",
    "description": "<b>Only for <i>4.4</i> and <i>Sense based ROMs</i></b>",
    "url": "https://github.com/Grarak/grarak.github.io/raw/master/a5/grakernel/gk_0.3.zip",
    "md5sum": "b6a2a025bd2251a399b831ff2244a7f3",
    "changelog": [
      "add support for a5ul",
      "disable zram by default"
    ]
  }
]
As you can see this Array contains various Objects. The example above will look like this
Example
{
  "name": "0.3.1",
  "description": "<b>Only for <i>4.4</i> and <i>CM based ROMs</i></b>",
  "url": "https://github.com/Grarak/grarak.github.io/raw/master/a5/0.3.1.img",
  "md5sum": "02621769da1d5cc020c8ab503b20d797",
  "install_method": "dd if=$FILE of=/dev/block/platform/msm_sdcc.1/by-name/boot",
  "changelog": [
    "switch to CAF kernel"
  ]
}
Objects
-
required
name(String) (you can use HTML elements): Name of the download. -
description(String) (you can use HTML elements): A description of the download. -
required
url(String): Download link (MUST BE A DIRECT DOWNLOAD). The file should be a zip, ifinstall_methodis not declared. -
required
md5sum(String): MD5 of the download. Just to make sure that the downloaded file afterwards is not corrupted. -
install_method(String): Here you can decide what should happen with the downloaded file. It's basically a shell command which will get executed (MUST BE A ONE LINER). As you can see in the example, you can use "$FILE" to refer to the file location. If you don't declareinstall_methodthen the app will automatically reboot into recovery and flash your file as a ZIP. Note: After executinginstall_methodit will reboot the phone. -
changelog(Array) (you can use HTML elements): A list of changes of this download.
You wrote the database for your kernel successfully and jsoneditoronline did not find any errors? Then congratulations! Now just send me a pull request and I will merge it as soon as possible.
But you want to test your database first? No problem! Just create "downloads.json" in /data/data/com.grarak.kerneladiutor/files/downloads.json and the app will read your created file instead of the builtin downloads file.
Note: if "downloads.json" is malformed then the app will not show the download tab!
With HTML elements you can decide how your text will look like (more informations).
Italic: <i></i>
Bold: <b></b>
Underlined: <u></u>
Colored text: <font color="#FF0000">Red text</font>
Clickable weblink: <a href="https://www.google.com/">Google</a>
New Line: <br>