#esp-iot-adapter-arduino A simple library to link Arduino and ESP8266 together to make cool IoT projects.
ESP8266 is a tiny and absolutely the most popular cheap WiFi chip in the world, it will be so great if we can use it as an IoT WiFi adapter to link our Arduino-like boards to the Internet of Things.

After searched on Google and Youtube, I found so many articles talking about how to link them together, but none of them satisfied me since they are far more complicated or even do not fit my need. For example, to run a HTTP service on ESP8266 , many posts suggest you to send AT Command from Arduino via SoftwareSerial, however it often fails because of the default baud rate on ESP8266 IS 115200 which is too fast for Arduino Uno's Software Serial(normally uses 9600).
My idea is to replace the AT Command with a simple protocol or computer language, and then I found NodeMCU - a lua based firmware. By leverage its powerful SDK, I build a suite of APIs which support very simple but useful features including WiFi configuring, data updating and basic RESTful service.
Another problem is baud rate, don't worry, in my Lua script, I already change it to 9600 by default, so now Arduino can catch up with ESP8266.
Now just wire the ESP8266 to Arduino like this below, it will allow you to start a software serial communication between the two devices. For example here, we use Arduino's Pin6 as RX, while Pin7 as TX, actually you don't even need a resistor.

Since NodeMCU provides a nice Lua REPL(Read-Eval-Print-Loop) over the serial port, Arduino can now talk to ESP8266 via our Lua API.
Using the Arduino IDE built-in example of SoftwareSerial, you can test the Lua REPL by yourself.

Of course you don't need to do it by yourself, all you need to do is to include this library into your project, and invoke API to link your Arduino and sensors to the internet world.
I was a Microsoft .NET Bluetooth AT command expert 12 years ago when I was in the college, but it's time to say good bye to the out-of-date AT Command (> . <).
-
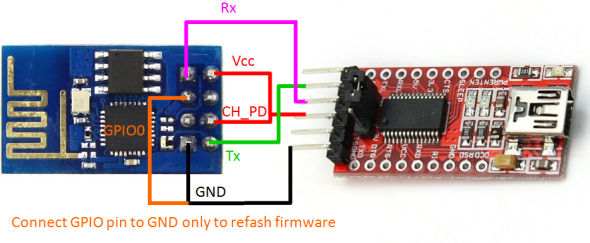
Flash the latest NodeMCU firmware on your ESP8266, it's a little difficult for beginner, and you need a USB->TTL adapter which costs $1-2 dollers.
-
Upload init.lua to ESP8266
-
Restart
- Download this ZIP file.
- In Arduino IDE, click
Sketch > Include Library > Add .ZIP Library. - Choose the ZIP file you just downloaded.
- Import this library to your project by clicking
Sketch > Include Library > ESP8266 IoT Adapter.

After install the library, you will see the example located in the menu Example > ESP8266 IoT Adapter > WiFi Thermometer.
/**
 * @example WiFiThermometer.ino
 * @brief A WiFi thermometer demo of library ESP8266IoTAdapter.
 * @author Henry Li <[email protected]>
 *
 * Setup
 * You need to wire ESP8266's TX to Arduino Pin2 and RX to Arduino Pin3
 * Please also wire the temperature sensor LM35 to analog input Pin1.
 *
 * For more details, please visit
 * https://github.com/MagicCube/esp-iot-adapter-arduino
 */

#include <SoftwareSerial.h>
#include <ESP8266IoTAdapter.h>

/*
 * Replace the SSID and password by yourself.
 */
const String WIFI_SSID = "Henry's Living Room 2.4GHz";
const String WIFI_PASSWORD = "PASSWORD";

/*
 * Wire the temperature sensor LM35 to analog input Pin1.
 */
const int LM35_PIN = 1;

bool wifiConnected = false;
String ip;
String url;

// Create ESP8266 adapter with a SoftwareSeiral
SoftwareSerial softSerial(2, 3);
ESP8266IoTAdapter esp(softSerial);

void setupWifiStationMode()
{
    Serial.print("Connecting to WiFi AP...");

    /*
     * You need to replace the SSID and password by yourself.
     */
    esp.connectToAP(WIFI_SSID, WIFI_PASSWORD);
    while (true)
    {
        int status = esp.getWifiStatus();
        if (status == 2)
        {
            Serial.println("ERROR:");
            Serial.println("Wrong password.");
            break;
        }
        else if (status == 3)
        {
            Serial.println("ERROR:");
            Serial.println("SSID \"" + WIFI_SSID + "\" has not been found.");
            break;
        }
        else if (status == 4)
        {
            Serial.println("ERROR:");
            Serial.println("Fail to connect with \"" + WIFI_SSID + "\".");
            break;
        }
        else if (status == 5)
        {
            wifiConnected = true;
            Serial.println();
            ip = esp.getIP();
            url = "http://" + ip + "/data";
            Serial.println("IP Address: " + ip);
            break;
        }
        else
        {
            delay(1000);
            Serial.print(".");
        }
    }

    if (wifiConnected)
    {
        Serial.print("Restarting server...");
        esp.restartServer();
        Serial.println("done");

        Serial.println();
        Serial.println("Please open your browser and visit");
        Serial.println(url);
        Serial.println();
    }
}

void setup()
{
    Serial.begin(9600);
    setupWifiStationMode();
}

void loop()
{
    if (wifiConnected)
    {
        // Read temperature value from Analog PIN 0
        double temperature = analogRead(LM35_PIN) * (5/10.24);
        // Update values on ESP8266 server every 60 seconds
        esp.setValue("temperature", temperature);
        Serial.print("Temperature: ");
        Serial.println(temperature);
        delay(10000);
    }
}
Upload and run the code above in your Arduino, then open your web browser and visit:
http://<your-esp8266-ip-address>/data.

Here's a simple example to demonstrate how to invoke the HTTP RESTful API in your website. The HTML file is also located in the examples directory.
<!DOCTYPE html>
<html lang="en">
<head>
    <meta charset="UTF-8">
    <title>Hello to ESP8266</title>
    <script src="http://cdn.bootcss.com/jquery/3.1.0/jquery.min.js"></script>
</head>
<body>
<section class="temperature">
    <div class="info">
		<span class="value">N/A</span>
		<span class="unit">degree</span>
    </div>
    <div class="last-updated-time"></div>
</section>
<script>
	(function updateTemperature()
	{
		$.ajax("http://your-esp8266-ip-address/data").then(data => {
			$(".temperature .value").text(data.temperature);
			$(".temperature .last-updated-time").text("Last updated at " + new Date());
			setTimeout(updateTemperature, 10 * 1000);
		}, function(err) {
			$(".temperature .value").text("ERR");
			console.error(err);
			setTimeout(updateTemperature, 10 * 1000);
			$(".temperature .last-updated-time").text("Error occured at " + new Date());
		});
	})();
</script>
</body>
</html>
https://github.com/MagicCube/smart-homekit-arduino


NOTE: By default, the service adds allow-cross-origin: * header so you won't have the cross origin access problems.
Returns a JSON object contains everything in the data you set via setValue(key, value).
If you decide to implement your own code to talk with my Lua API, here's the guide:
You can execute the Lua API on Arduino via a SoftwareSerial.
NOTE: Always remember to set the baud rate software serial to 9600.
Set ESP8266 to Station mode, and connect it to an existing WiFi AP with given ssid and password.
Get ESP8266's IP address if it get connected(in Station mode only).
Get ESP8266's WIFI Status(in Station mode only).
- 0: STA_IDLE,
- 1: STA_CONNECTING,
- 2: STA_WRONGPWD,
- 3: STA_APNOTFOUND,
- 4: STA_FAIL,
- 5: STA_GOTIP.
Set ESP8266 to Soft AP mode by using given ssid and password. Set password to nil if you want to use Open Auth.
Get a JSON string which contains all the key/values.
Set a specific value of given key.
Get a specific value of given key.
Start a local HTTP RESTful service at port 80. As described in NodeMCU document, only one HTTP server can be started in one time.
Stop the local HTTP service.
Stop and restart the local HTTP service. This could be very useful to make sure the HTTP service is running.