Today we're learning how to manage computational workspaces. I'll start with some broad principles around good data hygiene, which are broadly applicable to any computational analyses. We'll touch on ways to neatly organise code and data, how to version our workspaces with git, and how to take notes that remind ourselves of progress.
Then, we'll move to cover workflow management, which is a fancy way of saying "smart ways of working out which tasks are needed to complete an analysis". Specifically, we'll look at Snakemake, a python-based workflow manager with a billion fancy features that makes this task less daunting, especially for realistically-complex workflows.
As our case-study, we'll do a very simple variant calling workflow. This consists of sequence read QC, alignment to a reference, data reformatting, and finally variant calling and filtering. We'll gloss over a lot of the details of the workflow for time reasons, but it has been very nicely outlined in this data-carpentry tutotrial
A workspace is the directory within which some computational analyses happen. If you're used to working in R, an Rstudio project is a great example of a workspace, and of a set of tools and conventions that help us keep track of our code, data, metadata, and results.
Let's discuss key features of a well-organised workspace. Ideally, our workspaces should be:
- Self-contained: keep data, metadata, code, and outputs all under one project-specific directory. This also helps keep our workspaces Sharable.
- Sharable: one should be able to send (data volume notwithstanding) a workspace to a supervisor/collaborator/colleague with minimal fuss, and for them to be able to run this workflow and achieve the same results. Sharablity is a requirement for Reproducibility.
- Reproducible: Someone else (a reviewer, for example) should be able to convince themselves of your findings by running your code themselves, possibly with modifications. Full byte-for-byte reproducibility is less important than being able to quickly install all software, download all data, and then run the exact analysis steps that you ran.
Some recommendations:
- A directory should keep recreateable data separate from raw data. I suggest two direcrtories,
./rawdataand./outputs. - Step 0 of all analyses is to BACK UP
rawdataNOW!!! Be a data squirrel. ./outputsshould ONLY contain recreateable data, such that you can dorm -rf ./outputswith impunity../outputsshould have subdirectories for each "step"- Document why things are being done the way they are with comments in scripts/Snakefiles
- Use jupyter notebooks, markdown files, or labarchives as a lab notebook. Notebooks and scripts have different purposes -- notebooks are for you, scripts are for the computer.
- Use git to track code, metadata, and documentation, but not log files or data. We'll cover this later
- Use tmux to maintain persistent sessions on a remote server, one per project
For the rest of today, we'll focus on a variant calling workflow. This relatively simple workflow consists of several conceptual steps, each of which are made up of one or more commands. Step 2 depends on the output of step 1, and step 3 on step 2, etc. I have already implemented this workflow for you, which you can download and extract using the following commands:
wget -O bash_version.tar https://github.com/kdmurray91/2020_snakemake-workshop/raw/master/bash_version.tar
tar xvf bash_version.tar
cd bash/rawdata/ && bash getref.sh
cd ..
These large conceptual steps are:
- Raw sequence read data pre-processing per sample (
01_qc.sh) - Alignment of reads to a reference with a short read aligner per sample (
02_align.sh) - Variant calling and filtering on each sample in this set of samples (
03_varcall.sh)
The details within each step are largely out of scope, but generally cobble together a series of smaller computational tasks that together perform one of these larger conceptual steps.
We will now inspect each step, discuss what it does, and then run each step in turn.
For the remainder of today, we'll work on translating our variant-calling workflow above to a snakemake workflow. We'll follow the excellent online tutorial on snakemake, which you can find at https://snakemake.readthedocs.io/en/stable/tutorial/basics.html. I've copied the tutorial text with some changes of my own below. Here goes...
A Snakemake workflow is defined by specifying rules in a Snakefile. Rules decompose the workflow into small steps (e.g., the application of a single tool) by specifying how to create sets of output files from sets of input files. Snakemake automatically determines the dependencies between the rules by matching file names.
The Snakemake language extends the Python language, adding syntactic structures for rule definition and additional controls. All added syntactic structures begin with a keyword followed by a code block that is either in the same line or indented and consisting of multiple lines. The resulting syntax resembles that of original Python constructs.
In the following, we will introduce the Snakemake syntax by creating an example workflow. The workflow comes from the domain of genome analysis. It maps sequencing reads to a reference genome and call variants on the mapped reads. The tutorial does not require you to know what this is about. Nevertheless, we provide some background in the following paragraph.
So, let's prepare a second workspace within which we'll make a snakemake-based variant calling workflow.
wget -O snakemake_version.tar https://github.com/kdmurray91/2020_snakemake-workshop/raw/master/snakemake_version.tar
tar xvf snakemake_version.tar
cd snakemake/rawdata/ && bash getref.sh
cd ..Our first Snakemake rule maps reads of a given sample to a given reference genome. For this, we will use the tool bwa, specifically the subcommand bwa mem. In the working directory, create a new file called Snakefile (either through Jupyter's editor, or using nano/vim). In the Snakefile, define the following rule:
rule bwa_map:
    input:
        ref="rawdata/ecoli_rel606.fa",
        reads="rawdata/reads/SRR097977.fastq"
    output:
        "outputs/mapped_reads/SRR097977.bam"
    shell:
        "bwa mem {input.ref} {input.reads} | samtools view -Sb - > {output}"
NOTE: A common error is to forget the comma between the input or output items. Since Python concatenates subsequent strings, this can lead to unexpected behavior.
A Snakemake rule has a name (here bwa_map) and a number of directives, here input, output and shell. The input and output directives are followed by lists of files that are expected to be used or created by the rule. In the simplest case, these are just explicit Python strings. The shell directive is followed by a Python string containing the shell command to execute. In the shell command string, we can refer to elements of the rule via braces notation (similar to the Python format function). Here, we refer to the output file by specifying {output} and to the input files by specifying {input}. As we have multiple input files, we name each one, and then refer to the respective input file as e.g. {input.ref} for the reference. The shell command invokes bwa mem with reference genome and reads, and pipes the output into samtools which creates a compressed BAM file containing the alignments. The output of samtools is piped into the output file defined by the rule.
When a workflow is executed, Snakemake tries to generate given target files. Target files can be specified via the command line. By executing
$ snakemake -np outputs/mapped_reads/SRR097977.bamin the working directory containing the Snakefile, we tell Snakemake to generate the target file outputs/mapped_reads/SRR097977.bam. Since we used the -n (or --dry-run) flag, Snakemake will only show the execution plan instead of actually perform the steps. The -p flag instructs Snakemake to also print the resulting shell command for illustration. To generate the target files, Snakemake applies the rules given in the Snakefile in a top-down way. The application of a rule to generate a set of output files is called job. For each input file of a job, Snakemake again (i.e. recursively) determines rules that can be applied to generate it. This yields a directed acyclic graph (DAG) of jobs where the edges represent dependencies. So far, we only have a single rule, and the DAG of jobs consists of a single node. Nevertheless, we can execute our workflow with
$ snakemake outputs/mapped_reads/SRR097977.bamNote that, after completion of above command, Snakemake will not try to create outputs/mapped_reads/SRR097977.bam again, because it is already present in the file system. Snakemake only re-runs jobs if one of the input files is newer than one of the output files or one of the input files will be updated by another job.
Obviously, the rule will only work for a single sample with reads in the file data/samples/SRR097977.fastq. However, Snakemake allows to generalize rules by using named wildcards. Simply replace the SRR097977 in the second input file and in the output file with the wildcard {sample}, leading to
rule bwa_map:
    input:
        ref="rawdata/ecoli_rel606.fa",
        reads="rawdata/reads/{sample}.fastq"
    output:
        "outputs/mapped_reads/{sample}.bam"
    shell:
        "bwa mem {input.ref} {input.reads} | samtools view -Sb - > {output}"
Note that if a rule has multiple output files, Snakemake requires them to all have exactly the same wildcards. Otherwise, it could happen that two jobs from the same rule want to write the same file.
When Snakemake determines that this rule can be applied to generate a target file by replacing the wildcard {sample} in the output file with an appropriate value, it will propagate that value to all occurrences of {sample} in the input files and thereby determine the necessary input for the resulting job. Note that you can have multiple wildcards in your file paths, however, to avoid conflicts with other jobs of the same rule, all output files of a rule have to contain exactly the same wildcards.
When executing
$ snakemake -np outputs/mapped_reads/SRR098026.bam
Snakemake will determine that the rule bwa_map can be applied to generate the target file by replacing the wildcard {sample} with the value SRR098026. In the output of the dry-run, you will see how the wildcard value is propagated to the input files and all filenames in the shell command. You can also specify multiple targets, e.g.:
$ snakemake -np outputs/mapped_reads/SRR097977.bam outputs/mapped_reads/SRR098026.bam
You will see that Snakemake only proposes to create the output file outputs/mapped_reads/SRR098026.bam. This is because you already executed the workflow before (see the previous step) and no input file is newer than the output file mapped_reads/SRR097977.bam. You can update the file modification date of the input file rawdata/reads/SRR097977.fastq via
$ touch rawdata/reads/SRR097977.fastqand see how Snakemake wants to re-run the job to create the file outputs/mapped_reads/SRR097977.bam by executing
$ snakemake -np outputs/mapped_reads/SRR097977.bam outputs/mapped_reads/SRR098026.bamFor later steps, we need the read alignments in the BAM files to be
sorted. This can be achieved with the samtools
command. We add the following rule beneath the bwa_map rule:
rule samtools_sort:
    input:
        "outputs/mapped_reads/{sample}.bam"
    output:
        "outputs/sorted_reads/{sample}.bam"
    shell:
        "samtools sort -o {output}  {input}"
Note It is best practice to have subsequent steps of a workflow in separate, unique, output folders. This keeps the working directory structured. Further, such unique prefixes allow Snakemake to prune the search space for dependencies.
This rule will take the input file from the mapped_reads directory and
store a sorted version in the sorted_reads directory. Note that
Snakemake automatically creates missing directories before jobs are
executed.
When issuing
$ snakemake -np outputs/sorted_reads/SRR098026.bamyou will see how Snakemake wants to run first the rule bwa_map and then the rule samtools_sort to create the desired target file: as mentioned before, the dependencies are resolved automatically by matching file names.
Next, we need to use samtools again to index the sorted read alignments for random access. This can be done with the following rule:
rule samtools_index:
    input:
        "outputs/sorted_reads/{sample}.bam"
    output:
        "outputs/sorted_reads/{sample}.bam.bai"
    shell:
        "samtools index {input}"
Note Snakemake uses the Python format mini language to format shell commands. Sometimes you have to use braces for something else in a shell command. In that case, you have to escape them by doubling, e.g.,
echo {{A,B,C}}.
Having three steps already, it is a good time to take a closer look at the resulting DAG of jobs. By executing
$ snakemake --dag outputs/mapped_reads/SRR097977.bam outputs/mapped_reads/SRR098026.bam.bai | dot -Tsvg > dag.svgwe create a visualization of the DAG using the dot command provided by Graphviz. For the given target files, Snakemake specifies the DAG in the dot language and pipes it into the dot command, which renders the definition into SVG format. The rendered DAG is piped into the file dag.svg and will look similar to this:
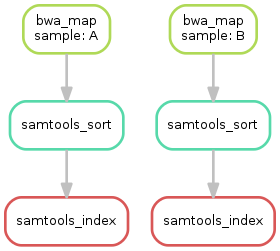
The DAG contains a node for each job and edges representing the dependencies. Jobs that don't need to be run because their output is up-to-date are dashed. For rules with wildcards, the value of the wildcard for the particular job is displayed in the job node.
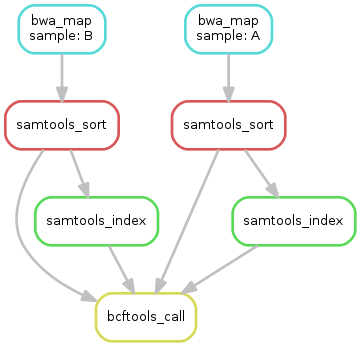
The next step in our workflow will aggregate the mapped reads from all samples and jointly call genomic variants on them. For the variant calling, we will combine the two utilities samtools and bcftools. Snakemake provides a helper function for collecting input files that helps us to describe the aggregation in this step. With
expand("outputs/sorted_reads/{sample}.bam", sample=SAMPLES)we obtain a list of files where the given pattern "outputs/sorted_reads/{sample}.bam" was formatted with the values in a given list of samples SAMPLES, i.e.
["outputs/sorted_reads/SRR097977.bam", "outputs/sorted_reads/SRR098026.bam"]
The function is particularly useful when the pattern contains multiple wildcards. For example,
expand("{sample}.{replicate}.bam", sample=SAMPLES, replicate=[0, 1])
would create the product of all elements of SAMPLES and the list
[0, 1], yielding
["SRR097977.0.bam", "SRR097977.1.bam", "SRR098026.0.bam", "SRR098026.1.bam"]
Here, we use only the simple case of expand. We first let Snakemake know which samples we want to consider. Remember that Snakemake works top-down, it does not automatically infer this from, e.g., the fastq files in the data folder. Also remember that Snakefiles are in principle Python code enhanced by some declarative statements to define workflows. Hence, we can define the list of samples ad-hoc in plain Python at the top of the Snakefile:
SAMPLES = ["SRR097977", "SRR098026"]
Later, we will learn about more sophisticated ways like config files. Now, we can add the following rule to our Snakefile:
rule bcftools_call:
    input:
        fa="rawdata/ecoli_rel606.fa",
        bam=expand("outputs/sorted_reads/{sample}.bam", sample=SAMPLES),
        bai=expand("outputs/sorted_reads/{sample}.bam.bai", sample=SAMPLES)
    output:
        "outputs/calls/all.vcf"
    shell:
        "samtools mpileup -g -f {input.fa} {input.bam} | "
        "bcftools call -mv - > {output}"
Note If you name input or output files like above, their order won't be preserved when referring them as
{input}. Further, note that named and not named (i.e., positional) input and output files can be combined, but the positional ones must come first, equivalent to Python functions with keyword arguments.
With multiple input or output files, it is sometimes handy to refer them separately in the shell command. This can be done by specifying names for input or output files (here, e.g., fa=...). The files can then be referred in the shell command via, e.g., {input.fa}. For long shell commands like this one, it is advisable to split the string over multiple indented lines. Python will automatically merge it into one. Further, you will notice that the input or output file lists can contain arbitrary Python statements, as long as it returns a string, or a list of strings. Here, we invoke our expand function to aggregate over the aligned reads of all samples.
- obtain the updated DAG of jobs for the target file
outputs/calls/all.vcf, it should look like this:
So far, we always executed the workflow by specifying a target file at the command line. Apart from filenames, Snakemake also accepts rule names as targets if the referred rule does not have wildcards. Hence, it is possible to write target rules collecting particular subsets of the desired results or all results. Moreover, if no target is given at the command line, Snakemake will define the first rule of the Snakefile as the target. Hence, it is best practice to have a rule all at the top of the workflow which has all typically desired target files as input files.
Here, this means that we add a rule
rule all:
    input:
        "outputs/calls/all.vcf"
to the top of our workflow. When executing Snakemake with
$ snakemake -nthe execution plan for creating the file output/calls/all.vcf which contains and summarizes all our results will be shown. Note that, apart from Snakemake considering the first rule of the workflow as default target, the appearance of rules in the Snakefile is arbitrary and does not influence the DAG of jobs.
Note In case you have multiple reasonable sets of target files, you can add multiple target rules at the top of the Snakefile. While Snakemake will execute the first per default, you can target any of them via the command line (e.g.,
snakemake -n mytarget).
- Create the DAG of jobs for the complete workflow.
- Execute the complete workflow and have a look at the resulting
all.vcf. - Snakemake provides handy flags for forcing re-execution of parts of the workflow. Have a look at the command line help with
snakemake --helpand search for the flag--forcerun. Then, use this flag to re-execute the rulesamtools_sortand see what happens. - With
--reasonit is possible to display the execution reason for each job. Try this flag together with a dry-run and the--forcerunflag to understand the decisions of Snakemake.
In total, the resulting workflow looks like this:
SAMPLES = ["SRR097977", "SRR098026"]


rule all:
    input:
        "outputs/calls/all.vcf"


rule bwa_map:
    input:
        ref="rawdata/ecoli_rel606.fa",
        reads="rawdata/reads/{sample}.fastq"
    output:
        "outputs/mapped_reads/{sample}.bam"
    shell:
        "bwa mem {input.ref} {input.reads} | samtools view -Sb - > {output}"


rule samtools_sort:
    input:
        "outputs/mapped_reads/{sample}.bam"
    output:
        "outputs/sorted_reads/{sample}.bam"
    shell:
        "samtools sort -o {output} {input}"


rule samtools_index:
    input:
        "outputs/sorted_reads/{sample}.bam"
    output:
        "outputs/sorted_reads/{sample}.bam.bai"
    shell:
        "samtools index {input}"


rule bcftools_call:
    input:
        fa="rawdata/ecoli_rel606.fa",
        bam=expand("outputs/sorted_reads/{sample}.bam", sample=SAMPLES),
        bai=expand("outputs/sorted_reads/{sample}.bam.bai", sample=SAMPLES)
    output:
        "outputs/calls/all.vcf"
    shell:
        "samtools mpileup -g -f {input.fa} {input.bam} | "
        "bcftools call -mv - > {output}"
In this second session of the Snakemake tutorial, we'll cover some more advanced features of Snakemake, and also some ancillary tools that make managing & sharing these workflows easier.
So far we've only shown a fairly minimal set of Snakemake features. Below, I'll briefly outline several useful features we can add to Snakefiles that assist us to write our workflows
Many tools in bioinformatics implement some form of internal parallelism. One example is our short read aligner, BWA MEM. If informed about these features, Snakemake can intelligently allocate a given number of CPUs to a single task, allowing more computationally efficient execution of workflows. This is particularly important when paired with Snakemake's ability to interact with clusters or cloud computing, as discussed below.
To inform Snakemake about the number of CPUs ("threads") each task should be allocated, one can use a threads: block within the rule text. Let's see what that looks like when applied to our BWA MEM rule from earlier.
rule bwa_map:
    input:
        ref="rawdata/ecoli_rel606.fa",
        reads="rawdata/reads/{sample}.fastq"
    output:
        "outputs/mapped_reads/{sample}.bam"
    threads:
        8
    shell:
	"bwa mem -t {threads} {input.ref} {input.reads} | samtools view -Sb - > {output}"
Importantly, one must inform Snakemake of the number of globally-available CPUs with the command line argument -j N (where N is the number of CPUs on your given machine). Say we have a 32 core machine, Snakemake would run up to 4 bwa_map jobs in parallel, each with 8 CPUs. For this reason, try to make the number you give threads: cleanly divisible into the number of CPUs on your server (threads: values of 2, 4, or 8 tend to work best on most systems).
So far, we specified the samples to consider in a Python list within the Snakefile. However, often you want your workflow to be customizable, so that it can be easily adapted to new data. For this purpose, Snakemake provides a config file mechanism. Config files can be written in JSON or YAML, and loaded with the configfile directive. In our example workflow, we add the following line at the top of our Snakefile (in place of SAMPLES = ...).
configfile: "config.yml"
SAMPLES = config["samples"]
Then, we need to create our configuration file. At a minimum, let's encode the sample names into our config file, by pasting the following into a new file called config.yml.
samples:
    - SRR097977
    - SRR098026
In reality, we'd also add many other details, perhaps including our adaptor sequences, or parameters to the variant calling algorithm. Config files are particularly important when working on large or multiple projects that may contain different sets of samples or have complex metadata that should not be hard-coded into our Snakefile.
At some point, you will likely encounter analyses so large that they would utilise a single server for weeks or even months on end, or perhaps not even be able to run at all on a single machine. In these cases, one needs to move analyses to some large, centralised shared computing platform. In academia, these are typically HPC clusters, a term for a large swarm of computers which cooperate to perform a series of tasks. At ANU we have access to the NCI's (brand spanking new shiny) cluster named Gadi.
The use of these systems is out of scope of this lesson, but I'll briefly describe how they work for those who haven't used them. One interacts with an HPC cluster via a head node, which is a relatively weak server shared across many hundred simultaneous users. This head node does little or no actual computation, instead computational "batch jobs" are submitted to a scheduler, which selects one or more (or fraction thereof) servers on which your tasks will run. The job then runs in the background on some other machine, and eventually your analysis completes. If this system sounds complex an painful, then good, I've accurately described it.
The good news is that Snakemake can be configured to submit jobs to a cluster with little extra effort on your behalf. I regularly use this feature to run very large variant calling runs on thousands of CPUs at once on NCI's Gadi cluster. The specifics of using this feature are quite system dependent, but I provide a minimal working configuration in this repository, and I briefly outline the logic below.
TARGET=${TARGET:-all}

QSUB="qsub -q {cluster.queue} -l ncpus={threads} -l jobfs={cluster.jobfs}"
QSUB="$QSUB -l walltime={cluster.time} -l mem={cluster.mem} -N {cluster.name} -l storage=scratch/xe2+gdata/xe2"
QSUB="$QSUB -l wd -j oe -o gadi/logs -P {cluster.project}"

snakemake                                                          \
    -j 1000                                                        \
    --max-jobs-per-second 2                                        \
    --cluster-config gadi/cluster.yaml                             \
    --local-cores ${PBS_NCPUS:-1}                                  \
    --js gadi/jobscript.sh                                         \
    --nolock                                                       \
    --rerun-incomplete                                             \
    --keep-going                                                   \
    --cluster "$QSUB"                                              \
    "$TARGET"
See gadi/submit.sh for a working submission script
To really reap the benefits of our recent work, we'd really like to version our workspace with git. This will allow us to easily save our changes, to push those changes to some public hosting site like GitHub (as a backup and to share with our collaborators), and to protect our workspace from accidental changes or deletions. A Snakemake workspace is not special as far as git is concerned, after all we've just made some text files. However, there are a few gotchas and recommendations I have for versioning Snakemake workspaces with git.
Specifically, the first thing we need to do is to tell git about the various places we don't want it to look for files to keep track of. We do this using a gitignore file. At a minimum, I recommend adding the following as a gitignore file (let's do this first before we set up git).
$ cd ~/snakemake/snakemake #  Path to the directory with the Snakefile in it on my system, might differ
$ ls Snakefile  # should work, let's confirm we're in the right place
$ cat <<EOF >.gitignore
.snakemake
rawdata
outputs
EOF
The above will ignore the Snakemake temporary state directory (where Snakemake stores it's internal state), and our two data directories. If you have additional data directories, add them to this file. (To those that wonder what that command is doing, it's a way to type out a file's contents on the command line, and is called a HEREDOC. See here for the docs (ha!)).
Now, let's initialise our workspace as a git repository, add our files, commit out first change set, and then set up a remote repository at GitHub and push our repository to GitHub.
$ git init # initialise a repo here
$ git add . # add everything
$ git status # check what we have added. As it says, use `git reset FILENAME` if you want to "un-add" any files
$ git commit # commit a set of changes
$ # now, go to github and make a new repo
$ git remote add origin .....  # copy this from the github new repo page
$ git push -u origin master # actually push your changesBetween a well organised workspace, a reproducible workflow managed with Snakemake, backed up and shareable raw data, and a versioned and shared git repository, we're 99% the way to frictionless collaboration. The last missing piece is the installation and management of the software we use in our workflow.
Conda is a piece of software that acts as a packager, installer, dependency manager, and provides isolated environments of software written in pretty much any language. Consider it like pip and virualenvs, but not just for python, or like CRAN and packrat but not just for R. In practice you'll want to install miniconda with python3.X from https://docs.conda.io/en/latest/miniconda.html.
There are two approaches to using conda with Snakemake. The simplest is to have a single large conda environment that contains all software needed to run our Snakemake workflow (including Snakemake itself). Alternatively or in addition, Snakemake supports providing a conda environment definition file (which we'll see in a minute) for each individual rule. This is more complex, but allows the different steps of our analysis to depend on mutually exclusive versions of e.g. Python or R. For now, we'll only cover the simple one-environment-to-run-them-all approach; the per-rule way is well documented at the snakemake tutorial site.
Conda environments are specified in a single YAML file which contains two main sections: a list of repositories that conda searches ("channels"), and a list of packages with optional versions that conda will find and install in an isolated environment. Here follows a conda environment for our Snakemake workflow; please save this as environment.yml next to our Snakefile.
name: snakevarcall
channels:
  - conda-forge
  - bioconda
dependencies:
  - python=3.*
  - snakemake
  - bwa
  - samtools
  - bcftools
I have already installed conda globally on our teaching virtual machine, so you should now have access to the conda command. Let's type conda to check that's the case.
$ condaAssuming that worked, we can now create our conda environment:
$ conda env create -f environment.ymlThis may take some time installing Snakemake, samtools, bwa, and bcftools in an isolated environment. When finished, we'll be able to load our new environment:
$ conda activate snakevarcalland then should be able to verify that we're referring to the correct samtools binary in an isolated environment:
$ which samtools
# should be something like /home/youruser/.conda/envs/...../bin/samtools
# NOT /usr/bin/samtoolsSo that's our snakemake workshop finished. I hope you all found that useful. Feel free to share this around as widely as it would be useful, and please also contact me if you have any questions. Below are some resources you may find useful:
- The snakemake documentation site: https://snakemake.readthedocs.io
- The exhaustive documentation on what a
rule:block can contain: https://snakemake.readthedocs.io/en/stable/snakefiles/rules.html - The documentation on installing and using conda: https://docs.conda.io/projects/conda/en/latest/user-guide/index.html
This workshop was delivered by Kevin Murray [email protected]. Large portions of this workshop are derived from the upstream documentation on snakemake, mostly written by Johannes Köster and Manuel Holtgrewe. Thanks to Tim Bonnet and the other helpers at RSB for making the workshop run so smoothly.