This repository contains the code and materials for the paper Learning Discrete World Models for Heuristic Search.


- About DeepCubeAI
- Quick Start
- Usage
- Environment Integration
- Citation
- Contact
DeepCubeAI is an algorithm that learns a discrete world model and employs Deep Reinforcement Learning methods to learn a heuristic function that generalizes over start and goal states. We then integrate the learned model and the learned heuristic function with heuristic search, such as Q* search, to solve sequential decision making problems. For more details, read the paper.
DeepCubeAI is comprised of three key components:
- Discrete World Model
- Learns a world model that represents states in a discrete latent space.
- This approach tackles two challenges: model degradation and state re-identification.
- Prediction errors less than 0.5 are corrected by rounding.
- Re-identifies states by comparing two binary vectors.

-
Generalizable Heuristic Function
- Utilizes Deep Q-Network (DQN) and hindsight experience replay (HER) to learn a heuristic function that generalizes over start and goal states.
-
Optimized Search
- Integrates the learned model and the learned heuristic function with heuristic search to solve problems. It uses Q* search, a variant of A* search optimized for DQNs, which enables faster and more memory-efficient planning.
- Accurate reconstruction of ground truth images after thousands of timesteps.
- Achieved 100% success on Rubik's Cube (canonical goal), Sokoban, IceSlider, and DigitJump.
- 99.9% success on Rubik's Cube with reversed start/goal states.
- Demonstrated significant improvement in solving complex planning problems and generalizing to unseen goals.
You can install the package using pip and run it from the command line, or you can run the code directly from the repository by cloning it, or you can import the package in your Python code and use the functions directly. Below are the instructions for each method.
You can install the package using pip. First create a virtual environment and activate it. You can use Conda or Python's built-in venv module (or any other virtual environment manager) to create a virtual environment. For Conda check the Conda documentation and for Python's venv module check the Python documentation.
After installing the virtual environment, you can create the environment and activate it using the following commands.
For Conda:
# Create an environment using Conda and install the `pip` package
conda create -n deepcubeai_env pip
# Activate the environment
conda activate deepcubeai_env
For Python's venv module:
# Create a virtual environment using Python's `venv` module
python -m `venv` deepcubeai_env
# Activate the environment
source deepcubeai_env/bin/activate
Once you have activated the virtual environment, you can install the package using pip.
pip install deepcubeaiAfter installing the package, you can run the code from the command line using the deepcubeai command. For detailed instructions on how to use the package, see the Running the pip Package section.
You can also run the code directly from the repository by cloning the repository and running the scripts from the command line. In this case, you can use the deepcubeai.sh script in the repository's root directory as the entry point. Below are the instructions for preparing the repository and the virtual environment for running the code directly from the repository.
- Clone the repository:
git clone https://github.com/misaghsoltani/DeepCubeAI.git- Change to the repository directory:
cd DeepCubeAI-
Create a Conda environment:
-
For macOS: Create an environment with dependencies specified in
environment_macos.yamlusing the following command:conda env create -f environment_macos.yaml
-
For Linux and Windows: Create an environment with dependencies specified in
environment.yamlusing the following command:conda env create -f environment.yaml
-
-
Activate the Conda environment:
conda activate deepcubeai_envNote
The only difference between the macOS environment and the Linux/Windows environments is that pytorch-cuda is not installed for macOS, as it is not supported.
Note
If CUDA is available on your system, by default, GPU will be used for training the models and the inference.
After activating the environment, you can run the code using the deepcubeai.sh script. For detailed instructions on how to use the script, see the Running the Code Directly from the Repository section.
You can also import the package in your Python code and use the functions directly. For this, first you need to intstall the deepcubeai package using pip. Then, you can import the functions and use them in your code. For examples of how to use the functions, see the Using the Package in Python Code section.
After installing the package using pip, you can run the code from the command line using the deepcubeai command. The general command structure is:
deepcubeai --stage <stage_name> --env <environment> [arguments]Replace <stage_name> with the specific stage you are running. The available stages are: gen_offline, gen_env_test, gen_search_test, train_model, test_model, train_model_cont, test_model_cont, encode_offline, train_heur, qstar, ucs, gbfs, visualize_data, gen_env_test_plot, disc_vs_cont.
Replace <environment> with one of the available environments. In the current version, the available environments are: cube3, sokoban, iceslider, and digitjump.
IceSlider and DigitJump are the environments from puzzlegen and are included in the current implementation for comparison purposes.
Note
There are additional arguments used for running the Python code of each stage, that are not used as an entry point argument. You can find out about these arguments in the Python files related to each stage in the deepcubeai.
Tip
For examples of running the code using the deepcubeai command, refer to the reproduce_results/run_package folder in the repository.
Tip
For examples of running the code on a SLURM cluster, refer to the job_submissions folder in the repository. See the section Running on a SLURM Cluster for more details.
Below are the detailed instructions for each stage:
Generate training and validation offline data for training the world model:
deepcubeai --stage gen_offline --env <environment> --data_dir <env_data_dir> --data_file_name <data_file_name> --num_offline_steps <steps> --num_train_eps <train_eps> --num_val_eps <val_eps> --num_cpus <num_cores> [--start_level <start> --num_levels <levels>]--data_dir: The folder where the data will be saved. The directory for training and validation data is deepcubeai/data/<env_data_dir>/offline. If not given, the environment name <environment> will be used.
--data_file_name: Specifies the name for the data file. The data will be saved in the following paths. Training data will be deepcubeai/data/<env_data_dir>/offline/<data_file_name>_train_data.pkl and validation data will be deepcubeai/data/<env_data_dir>/offline/<data_file_name>_val_data.pkl. If not specified, the default is train_data and val_data. If <data_file_name> does not contain train_data, _train_data will be appended. The same applies for validation data with val_data and _val_data.
The directory structure for the offline data is as follows:
deepcubeai
└── data
    └── <env_data_dir>
        └── offline
            ├── <data_file_name>_train_data.pkl
└── <data_file_name>_val_data.pkl--num_offline_steps: Specifies the number of steps for generating offline data.
--num_train_eps: Defines the number of training episodes.
- If both
--num_train_epsand--num_val_epsare not provided, defaults to9000. - If only
--num_train_epsis provided,--num_val_epswill be set to 10% of--num_train_eps. - If not provided and
--num_val_epsis set,--num_train_epswill be calculated as 90% of the total episodes.
--num_val_eps: Defines the number of validation episodes.
- If both
--num_val_epsand--num_train_epsare not provided, defaults to1000. - If only
--num_val_epsis provided,--num_train_epswill be set to 90% of the total episodes. - If not provided and
--num_train_epsis set,--num_val_epswill be calculated as 10% of--num_train_eps.
--start_level: Specifies the starting level for data generation.
- If provided along with
--num_levels, this value sets the starting seed for training, and the subsequent validation levels will be calculated asstart_level + num_levels. - If only
--start_levelis provided without--num_levels, the validation starting level is adjusted based on the number of training episodes. - If neither
--start_levelnor--num_levelsis provided, defaults to-1, indicating that no specific levels are set and the data is generated using random levels.
--num_levels: Specifies the number of levels to generate data for.
- If provided along with
--start_level, it defines the number of seeds for both training and validation levels. - If only
--num_levelsis provided without--start_level, a random starting seed will be generated for training, and the validation levels will be calculated based on this random start. - If neither
--start_levelnor--num_levelsis specified, defaults to-1, indicating that the number of levels used for training and validation is based on the number of episodes.
Note
If --num_levels is provided, and if it is less than the number of episodes, the same level may be used more than once.
Important
In the current version, the --start_level and --num_levels arguments are only used with the iceslider and digitjump environments. For the cube3 and sokoban environments, the levels are generated randomly, and the --start_level and --num_levels arguments are not used.
--num_cpus: Specifies the number of CPU cores to use for processing. Default is 1.
Generate test data for the Discrete and Continuous world models to evaluate the performance of the models after training:
deepcubeai --stage gen_env_test --env <environment> --data_dir <env_data_dir> --data_file_name <test_file_name> --num_offline_steps <steps> --num_test_eps <test_eps> --num_cpus <num_cores> [--start_level <start> --num_levels <levels>]--env: Specifies the environment name for which the test data will be generated.
--data_dir: The directory where the environment test data will be saved. The data is stored at deepcubeai/data/<env_data_dir>/model_test. If not specified, the default is the environment name <environment>.
--data_file_name: Specifies the name for the test data file. The test data will be saved in the path deepcubeai/data/<env_data_dir>/model_test/<test_file_name>_env_test_data.pkl. If not specified, the default is env_test_data. If <test_file_name> does not contain env_test_data, _env_test_data will be appended.
The directory structure for the environment test data is as follows:
deepcubeai
└── data
    └── <env_data_dir>
        └── model_test
└── <test_file_name>_env_test_data.pkl--num_offline_steps: Specifies the number of steps for generating the environment test data.
--num_test_eps: Defines the number of test episodes. Default is 1000.
--start_level: Specifies the starting level for generating test data.
- If provided along with
--num_levels, this value sets the starting seed for test data generation, and the subsequent test levels will be calculated asstart_level + num_levels. - If only
--start_levelis provided without--num_levels, the test data levels are adjusted based on the number of test episodes. - If neither
--start_levelnor--num_levelsis provided, defaults to-1, indicating that no specific levels are set, and the data is generated from random levels.
--num_levels: Specifies the number of levels to generate test data for.
- If provided along with
--start_level, it defines the number of seeds for the test levels. - If only
--num_levelsis provided without--start_level, a random starting seed will be generated for the test data, and subsequent levels will be calculated based on this random start. - If neither
--start_levelnor--num_levelsis specified, defaults to-1, indicating that the number of levels used for test data is based on the number of episodes.
Note
If --num_levels is provided, and if it is less than the number of episodes, the same level may be used more than once.
Important
In the current version, the --start_level and --num_levels arguments are only used with the iceslider and digitjump environments. For the cube3 and sokoban environments, the levels are generated randomly, and the --start_level and --num_levels arguments are not used.
--num_cpus: Specifies the number of CPU cores to use for processing. Default is 1.
Generate test data for the final search to solve the problem:
deepcubeai --stage gen_search_test --env <environment> --data_dir <env_data_dir> --data_file_name <search_test_file_name> --num_test_eps <test_eps> --num_cpus <num_cores> [--start_level <start> --num_levels <levels>]--env: Specifies the environment for which the search test data will be generated.
--data_dir: Specifies the directory where the search test data will be saved. The data will be stored in deepcubeai/data/<env_data_dir>/search_test. If not specified, it defaults to <environment>.
--data_file_name: Specifies the name for the search test data file. The data will be saved as deepcubeai/data/<env_data_dir>/search_test/<search_test_file_name>_search_test_data.pkl. If <search_test_file_name> does not contain search_test_data, _search_test_data will be appended. Default is search_test_data.
The directory structure for the search test data is as follows:
deepcubeai
└── data
    └── <env_data_dir>
        └── search_test
└── <search_test_file_name>_search_test_data.pkl--num_test_eps: Defines the number of search test episodes to generate.
--num_cpus: Specifies the number of CPU cores to use for processing. Default is 1.
--start_level: Specifies the starting level for search test data generation.
- If provided along with
--num_levels, it sets the starting seed for generating test data, and subsequent levels are calculated asstart_level + num_levels. - If only
--start_levelis provided without--num_levels, levels are adjusted based on the number of test episodes. - If neither
--start_levelnor--num_levelsis provided, defaults to-1, indicating that no specific levels are set and the data is generated randomly.
--num_levels: Specifies the number of levels for generating test data.
- If provided with
--start_level, it defines the number of seeds for the test levels. - If only
--num_levelsis provided without--start_level, a random starting seed will be generated, and subsequent levels will be calculated accordingly. - If neither
--start_levelnor--num_levelsis specified, defaults to-1, indicating that no specific levels are set and the data is generated randomly.
Important
In the current version, this stage only works for the iceslider and digitjump environments. For the cube3 and sokoban environments, the search test data is provided in the repository. You can find the search test data in the deepcubeai/data/cube3/search_test and deepcubeai/data/sokoban/search_test directories.
However, you can generate your own search test data using the functions provided in the deepcubeai.enviroments.cube3.Cube3 and deepcubeai.enviroments.sokoban.Sokoban classes.
Train the discrete environment model:
deepcubeai --stage train_model --env <environment> --data_dir <env_data_dir> --data_file_name <train_file_name> --env_batch_size <batch_size> --env_model_name <disc_env_model_folder_name>--data_dir: The directory where the training and validation data is located. This should match the folder where the offline data was saved, e.g., deepcubeai/data/<env_data_dir>/offline. If not given, the environment name <environment> will be used.
--data_file_name: The name of the training and validation data files. This should match the filename used during offline data generation. Training data used will be deepcubeai/data/<env_data_dir>/offline/<data_file_name>_train_data.pkl and validation data used will be deepcubeai/data/<env_data_dir>/offline/<data_file_name>_val_data.pkl. If not specified, the default is train_data and val_data. If <data_file_name> does not contain train_data, _train_data will be appended. The same applies for validation data with val_data and _val_data. This should follow the same structure mentioned in Generate Offline Data.
--env_batch_size: Specifies the batch size used during training of the environment model. Default is 100.
--env_model_name: Defines the name of the discrete environment model to be trained. The trained environment model will be saved in the directory deepcubeai/saved_env_models/<disc_env_model_folder_name>.
Below is the directory structure for the saved discrete world model:
deepcubeai
└── saved_env_models
    └── <disc_env_model_folder_name>
        ├── args.pkl
        ├── decoder_state_dict.pt
        ├── encoder_state_dict.pt
        ├── env_state_dict.pt
        ├── output.txt
        ├── train_itr.pkl
        └── pics    # sample pics of reconstructions of states during training
            ├── recon_itr0.jpg
            ├── recon_itr200.jpg
            └── ...
Below is examples of saved images of reconstructions of states during training for iterations 0, 300, 1000, and 179999:


Test the trained discrete environment model:
deepcubeai --stage test_model --env <environment> --data_dir <env_data_dir> --data_file_name <test_file_name> --env_model_name <disc_env_model_folder_name> --print_interval <interval>Or, if you want to use a different test data file, you can specify the test data file name:
deepcubeai --stage test_model --env <environment> --model_test_data_dir <env_model_test_data_dir> --env_model_name <disc_env_model_folder_name> --print_interval <interval>--data_dir: The directory where the test data is located. This should match the folder where the environment test data was saved, e.g., deepcubeai/data/<env_data_dir>/model_test. If not given, the environment name <environment> will be used.
--data_file_name: The name of the test data file. The test data used will be deepcubeai/data/<env_data_dir>/model_test/<data_file_name>_test_data.pkl. If not specified, the default is test_data. If <data_file_name> does not contain test_data, _test_data will be appended. This should follow the same structure mentioned in Generate World Model Test Data.
--model_test_data_dir: The directory where the test data is located. Use this argument if you want to use a different test data file than the one specified using --data_dir and --data_file_name.
--env_model_name: The name of the trained discrete environment model to be tested. This should match the model saved during the training stage, located in the directory deepcubeai/saved_env_models/<disc_env_model_folder_name>. This should follow the same structure mentioned in Train Discrete World Model.
--print_interval: Specifies the frequency at which the test results will be printed, and reconstruction images will be saved. The default value is 1.
The directory structure for the test results (the saved reconstructions of states) is as follows:
deepcubeai
└── saved_env_models
    └── <disc_env_model_folder_name>
        └── pics    # sample pics of reconstructions of states during training
            ├── model_test_disc_0.jpg
            ├── model_test_disc_1.jpg
└── ...Train the continuous environment model:
deepcubeai --stage train_model_cont --env <environment> --data_dir <env_data_dir> --data_file_name <train_file_name> --env_batch_size <batch_size> --env_model_name <env_model_folder_name>--data_dir: The directory where the training and validation data for the continuous model is located. This should match the folder where the offline data was saved, such as deepcubeai/data/<env_data_dir>/offline. If not specified, the environment name <environment> will be used.
--data_file_name: The name of the training and validation data files for the continuous model. The training data used will be deepcubeai/data/<env_data_dir>/offline/<data_file_name>_train_data.pkl and validation data will be deepcubeai/data/<env_data_dir>/offline/<data_file_name>_val_data.pkl. If not specified, the default names are train_data and val_data. If <data_file_name> does not contain train_data, _train_data will be appended. The same logic applies to validation data with val_data. This should follow the same structure mentioned in Generate Offline Data.
--env_batch_size: The batch size used during training of the continuous environment model. The default is set to 100.
--env_model_name: Specifies the name of the continuous environment model to be trained. The trained model will be saved in the directory deepcubeai/saved_env_models/<env_model_folder_name>.
The directory structure for the saved continuous world model is as follows:
deepcubeai
└── saved_env_models
    └── <cont_env_model_folder_name>
        ├── args.pkl
        ├── model_state_dict.pt
        ├── output.txt
└── train_itr.pklTest the trained continuous model:
deepcubeai --stage test_model_cont --env <environment> --data_dir <env_data_dir> --data_file_name <test_file_name> --env_model_name <cont_env_model_folder_name> --print_interval <interval>Or, if you want to use a different test data file, you can specify the test data file name:
deepcubeai --stage test_model_cont --env <environment> --model_test_data_dir <model_test_data_dir> --env_model_name <cont_env_model_folder_name> --print_interval <interval>--data_dir: The directory where the test data for the continuous model is located. This should match the folder where the evnironment test data was saved, such as deepcubeai/data/<env_data_dir>/model_test. If not specified, the environment name <environment> will be used.
--data_file_name: The name of the test data file for the continuous model. The test data used will be deepcubeai/data/<env_data_dir>/model_test/<data_file_name>_test_data.pkl. If not specified, the default is test_data. If <data_file_name> does not contain test_data, _test_data will be appended. This should follow the same structure mentioned in Generate World Model Test Data.
--model_test_data_dir: The directory where the test data is located. Use this argument if you want to use a different test data file than the one specified using --data_dir and --data_file_name, you can use this argument instead.
--env_model_name: The name of the trained continuous environment model to be tested. This should match the model saved during the training stage, located in deepcubeai/saved_env_models/<cont_env_model_folder_name>.
--print_interval: Specifies how frequently the test results will be printed. The default value is 1.
The directory structure for the saved continuous world model is as follows:
deepcubeai
└── saved_env_models
    └── <cont_env_model_folder_name>
        └── pics    # sample pics of reconstructions of states during training
            ├── model_test_cont_0.jpg
            ├── model_test_cont_1.jpg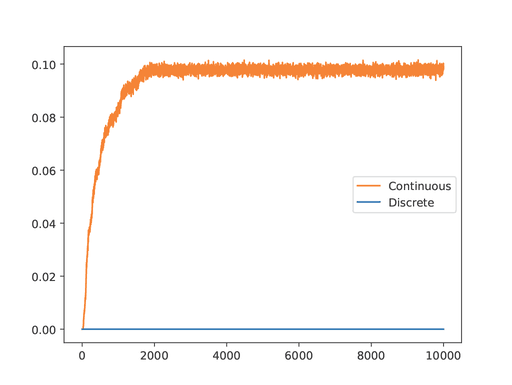
└── ...Compare the performance of discrete and continuous models. This will run the models and take the same actions in the environment and compare the predictions with the ground truth given in the test data. Finally, it will plot the MSE of the predictions for both models over time steps.
deepcubeai --stage disc_vs_cont --env <environment> --data_dir <env_data_dir> --data_file_name <plot_file_name> --env_model_dir_disc deepcubeai/saved_env_models/<disc_env_model_folder_name> --env_model_dir_cont deepcubeai/saved_env_models/<cont_env_model_folder_name> --save_dir deepcubeai/ --num_steps <steps> --num_episodes <num_episodes> --print_interval <interval>--env: Specifies the environment for which the comparison will be made.
--data_dir: The directory where the data for the comparison plot is located. This should match the folder where the data was saved, such as deepcubeai/data/<env_data_dir>/model_test. If not specified, the environment name <environment> will be used.
--data_file_name: The name of the data file for the comparison plot. The data used will be deepcubeai/data/<env_data_dir>/model_test/<plot_file_name>_env_test_data.pkl. If not specified, the default is env_test_data. If <plot_file_name> does not contain env_test_data, _env_test_data will be appended. This should follow the same structure mentioned in Generate World Model Test Data.
--env_model_dir_disc: The directory of the trained discrete environment model. This should follow the same files as mentioned in Train Discrete World Model.
--env_model_dir_cont: The directory of the trained continuous environment model. This should follow the same files as mentioned in Train Continuous World Model.
--save_dir: The directory where the comparison plot will be saved. If not given, the default path will be deepcubeai/.
The path structure for the comparison plot will be as follows: plots/sokoban_mse_100eps_10000steps_1.pdf
# If --save_dir is provided
<save_dir>
└── plots
    └── <environment>_mse_<num_episodes>eps_<num_steps>steps_<number>.pdf

# If --save_dir is not provided
deepcubeai
└── plots
└── <environment>_mse_<num_episodes>eps_<num_steps>steps_<number>.pdf--num_steps: The number of steps to use in the comparison. If this is less than the number of steps in the test data, the comparison will be made over the specified number of steps. Default is -1 (all steps in the test data).
--num_episodes: The number of episodes to use in the comparison. If this is less than the number of episodes in the test data, the comparison will be made over the specified number of randomly selected episodes. Default is -1 (all episodes in the test data).
--print_interval: Specifies the frequency at which the comparison results will be printed. The default value is 1.
Here is an example of the comparison plot for the Rubik's Cube environment:
Encode the offline data using the trained model:
deepcubeai --stage encode_offline --env <environment> --data_dir <env_data_dir> --data_file_name <train_file_name> --env_model_name <cont_env_model_folder_name>--data_dir: The directory where the offline data to be encoded is located. This should match the folder where the data was saved, such as deepcubeai/data/<env_data_dir>/offline. If not specified, the environment name <environment> will be used as the value for <env_data_dir>.
--data_file_name: The name of the offline data file that will be encoded. The training data used will be deepcubeai/data/<env_data_dir>/offline_enc/<data_file_name>_train_data_enc.pkl and validation data will be deepcubeai/data/<env_data_dir>/offline_enc/<data_file_name>_val_data_enc.pkl. If not specified, the default names are train_data_enc and val_data_enc. If <data_file_name> does not contain train_data_enc, _train_data_enc will be appended. The same logic applies to validation data with val_data.
The directory structure for the encoded offline data will be as follows:
deepcubeai
└── data
    └── <env_data_dir>
        └── offline_enc
            ├── <data_file_name>_train_data_enc.pkl
└── <data_file_name>_val_data_enc.pkl--env_model_name: The name of the trained discrete environment model used for encoding the data. This should match the model saved during the training stage, located in deepcubeai/saved_env_models/<disc_env_model_folder_name>.
Train the heuristic neural network. It uses Deep Q-Network (DQN) and hindsight experience replay (HER) to learn a heuristic function that generalizes over start and goal states.
deepcubeai --stage train_heur --env <environment> --data_dir <env_data_dir> --data_file_name <train_file_name> --env_model_name <env_model_folder_name> --heur_nnet_name <heur_nnet_folder_name> --per_eq_tol <percentage_to_be_equal> --heur_batch_size <batch_size_for_heur> --states_per_update <number_of_states_to_gen> --start_steps <start_steps> --goal_steps <goal_steps> --max_solve_steps <max_solve_steps> --num_test <num_test> [--use_dist]--env: The environment for which the heuristic network will be trained.
--data_dir: The directory where the offline data used for training the heuristic network is located. This should match the folder where the data was saved, such as deepcubeai/data/<env_data_dir>/offline_enc.
--data_file_name: The name of the training data file used for training the heuristic network. The data file used will be deepcubeai/data/<env_data_dir>/offline_enc/<data_file_name>_train_data_enc.pkl. If not specified, the default name is train_data_enc. If <data_file_name> does not contain train_data_enc, _train_data_enc will be appended.
--env_model_name: The name of the trained environment model used in heuristic training. This should match the model saved during the environment model training stage, located in deepcubeai/saved_env_models/<env_model_folder_name>. Also, the model files should be present in this directory as encoder_state_dict.pt, decoder_state_dict.pt, and env_state_dict.pt. This should follow the same structure mentioned in Train Discrete World Model.
--heur_nnet_name: Specifies the name of the heuristic neural network to be trained. The trained model will be saved in the directory deepcubeai/saved_heur_models/<heur_nnet_folder_name>. The structure of the heuristic model directory will be as follows:
deepcubeai
└── saved_heur_models
    └── <heur_nnet_folder_name>
        ├── args.pkl
        ├── current
        │   ├── model_state_dict.pt
        │   └── status.pkl
        ├── output.txt
        └── target
            ├── model_state_dict.pt
└── status.pkl--per_eq_tol: Percent of latent state elements that need to be equal to declare equal. Default is 100.
--heur_batch_size: The batch size used for training the heuristic neural network. Default is 10000.
--states_per_update: How many states to train on before checking if target network should be updated. Default is 50000000.
--start_steps: Maximum number of steps to take from offline states to generate start states.
--goal_steps: Maximum number of steps to take from the start states to generate goal states.
--max_solve_steps: Number of steps to take when trying to solve training states with greedy best-first search (GBFS). Each state encountered when solving is added to the training set. Number of steps starts at 1 and is increased every update until the maximum number is reached. Increasing this number can make the cost-to-go function more robust by exploring more of the state space.
--num_test: Number of test states. Default is 1000.
--use_dist: Use distributed training for the heuristic network. If this arg is given, it will use DDP for training. Note: Check out the Distributed Data Parallel (DDP) Training section before using this argument.
Perform a weighted and batched Q* search. This search uses the trained discrete world model and the trained Deep Q-Network to solve the problem.
deepcubeai --stage qstar --env <environment> --data_dir <env_data_dir> --data_file_name <search_file_name> --env_model_name <disc_env_model_folder_name> --heur_nnet_name <heur_nnet_folder_name> --qstar_batch_size <batch_size> --qstar_weight <weight> --per_eq_tol <percentage_to_be_equal> --qstar_results_dir <results_dir> --save_imgs <true/false> [--search_test_data <test_data_path>]--env: Specifies the environment for which the Q* search will be run.
--data_dir: The directory where the search test data is located. This should match the folder where the search test data was saved, such as deepcubeai/data/<env_data_dir>/search_test. If not specified, the environment name <environment> will be used as the value for <env_data_dir>.
--data_file_name: The name of the search test data file. The test data used will be deepcubeai/data/<env_data_dir>/search_test/<search_file_name>_search_test_data.pkl. If not specified, the default is search_test_data. If <search_file_name> does not contain search_test_data, _search_test_data will be appended. This should follow the same structure mentioned in Generate Search Test Data.
--env_model_name: The name of the trained discrete world model to be used in the Q* search. This should match the model saved during the training stage, located in deepcubeai/saved_env_models/<disc_env_model_folder_name>, and follow the same structure mentioned in Train Discrete World Model.
--heur_nnet_name: The name of the trained heuristic neural network to be used in the Q* search. This should match the model saved during the heuristic network training stage, located in deepcubeai/saved_heur_models/<heur_nnet_folder_name>, and follow the same structure mentioned in Train Heuristic Network, except for the target directory which is not used in the Q* search.
--qstar_batch_size: The batch size for the Q* search. This indicates the number of nodes to expand in each iteration of the search. Default is 1.
--qstar_weight: The weight for path costs used in the Q* algorithm. Default is 1.
--per_eq_tol: The percentage of latent state elements that need to be equal to declare two states as equal. Default is 100.
--qstar_results_dir: The directory where results will be stored. If given, the path will be deepcubeai/results/<environment>/<results_dir>. If not given, the default path will be deepcubeai/results/<environment>/model=<disc_env_model_folder_name>__heur=<heur_nnet_folder_name>_QStar_results/path_cost_weight=<weight>.
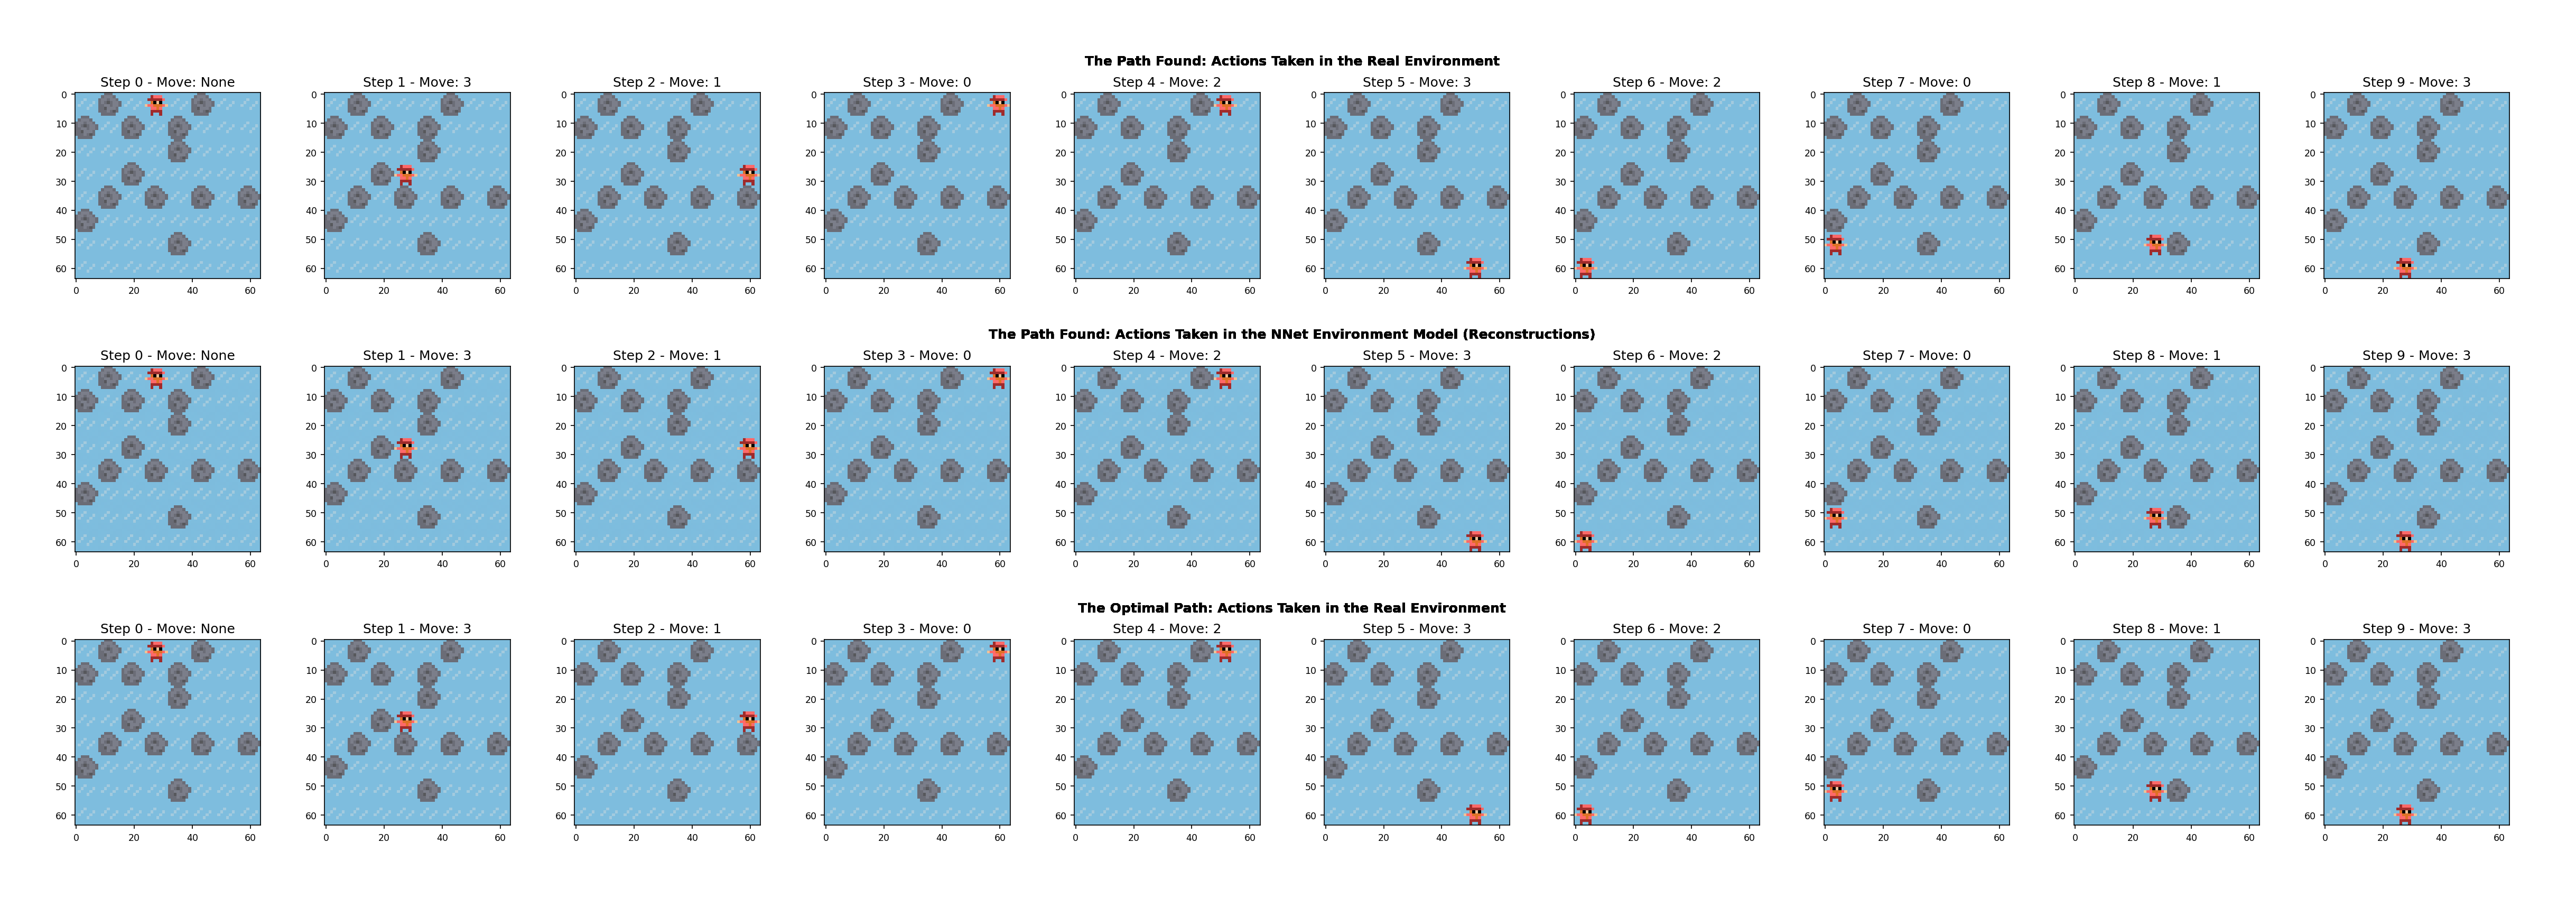
--save_imgs: A flag indicating whether to save a visualization of the states on the found solution path. The images will be saved to the qstar_soln_images directory in the results directory. Default is false.
The results directory will have a structure like:
# If --qstar_results_dir is provided
deepcubeai
└── results
    └── <environment>
        └── <results_dir>
            ├── output.txt
            ├── results.pkl
            └── qstar_soln_images
                ├── state_0.png
                ├── state_1.png
                └── ...

# If --qstar_results_dir is not provided
deepcubeai
└── results
    └── <environment>
        └── model=<disc_env_model_folder_name>__heur=<heur_nnet_folder_name>_QStar_results
            ├── output.txt
            ├── results.pkl
            └── qstar_soln_images
                ├── state_0.png
                ├── state_1.png
                └── ...
Below is an example of the images saved for the IceSlider environment:
--search_test_data: Allows specifying a custom path for the search test data file. If not provided, the default path constructed from other arguments will be used.
Run the Uniform Cost Search (UCS) algorithm. This implementation uses the trained discrete world model to perform the search. The search will be performed by greedily expanding the node with the lowest cost.
deepcubeai --stage ucs --env <environment> --data_dir <env_data_dir> --data_file_name <search_file_name> --env_model_name <disc_env_model_folder_name> --ucs_batch_size <batch_size> --per_eq_tol <percentage_to_be_equal> --ucs_results_dir "<results_dir>" --save_imgs <true/false> [--search_test_data <test_data_path>]--env: Specifies the environment for which the Uniform Cost Search will be run.
--data_dir: The directory where the search test data is located. This should match the folder where the search test data was saved, such as deepcubeai/data/<env_data_dir>/search_test. If not specified, the environment name <environment> will be used as the value for <env_data_dir>.
--data_file_name: The name of the search test data file. The test data used will be deepcubeai/data/<env_data_dir>/search_test/<search_file_name>_search_test_data.pkl. If not specified, the default is search_test_data. If <search_file_name> does not contain search_test_data, _search_test_data will be appended. This should follow the same structure mentioned in Generate Search Test Data.
--env_model_name: The name of the trained discrete world model to be used in the UCS. This should match the model saved during the training stage, located in deepcubeai/saved_env_models/<disc_env_model_folder_name>, and follow the same structure mentioned in Train Discrete World Model.
--ucs_batch_size: The batch size for the UCS. This indicates the number of nodes to expand in each iteration of the search. Default is 1.
--per_eq_tol: The percentage of latent state elements that need to be equal to declare two states as equal. Default is 100.
--ucs_results_dir: The directory where the UCS results will be saved. If given, the path will be deepcubeai/results/<environment>/<results_dir>. If not given, the default path will be deepcubeai/results/<environment>/model=<disc_env_model_folder_name>_UCS_results.
--save_imgs: A flag indicating whether to save a visualization of the states on the found solution path. The images will be saved to the ucs_soln_images directory in the results directory. Default is false.
The results directory will have a similar structure to the Q* Search results directory. Also, the saved images will be similar to the example image in the Run Q* Search section.
--search_test_data: Allows specifying a custom path for the search test data file. If not provided, the default path constructed from other arguments will be used.
Run the Greedy Best-First Search algorithm. This implementation uses the trained discrete world model and heuristic neural network. The search will be performed by following the greedy policy based on the heuristic values for the given number of iterations.
deepcubeai --stage gbfs --env <environment> --data_dir <env_data_dir> --data_file_name <search_file_name> --env_model_name <disc_env_model_folder_name> --heur_nnet_name <heur_nnet_folder_name> --per_eq_tol <percentage_to_be_equal> --gbfs_results_dir "<results_dir>" --search_itrs <search_iterations> [--search_test_data <test_data_path>]--env: Specifies the environment for which the GBFS will be run.
--data_dir: The directory where the search test data is located. This should match the folder where the search test data was saved, such as deepcubeai/data/<env_data_dir>/search_test. If not specified, the environment name <environment> will be used as the value for <env_data_dir>.
--data_file_name: The name of the search test data file. The test data used will be deepcubeai/data/<env_data_dir>/search_test/<search_file_name>_search_test_data.pkl. If not specified, the default is search_test_data. If <search_file_name> does not contain search_test_data, _search_test_data will be appended. This should follow the same structure mentioned in Generate Search Test Data.
--env_model_name: The name of the trained discrete world model to be used in the GBFS. This should match the model saved during the training stage, located in deepcubeai/saved_env_models/<disc_env_model_folder_name>, and follow the same structure mentioned in Train Discrete World Model.
--heur_nnet_name: The name of the trained heuristic neural network to be used in the GBFS. This should match the model saved during the heuristic network training stage, located in deepcubeai/saved_heur_models/<heur_nnet_folder_name>, and follow the same structure mentioned in Train Heuristic Network. except for the target directory which is not used in the GBFS.
--per_eq_tol: The percentage of latent state elements that need to be equal to declare two states as equal. Default is 100.
--gbfs_results_dir: The directory where the GBFS results will be saved. If given, the path will be deepcubeai/results/<environment>/<results_dir>. If not given, the default path will be deepcubeai/results/<environment>/model=<disc_env_model_folder_name>__heur=<heur_nnet_folder_name>_GBFS_results.
--search_itrs: The number of search iterations to perform. Default is 100.
--search_test_data: Allows specifying a custom path for the search test data file. If not provided, the default path constructed from other arguments will be used.
Saves samples of the training and validation data for visualization.
deepcubeai --stage visualize_data --env <environment> --data_dir <env_data_dir> --data_file_name <train_file_name> --num_train_trajs_viz <num_train_trajs> --num_train_steps_viz <num_train_steps> --num_val_trajs_viz <num_val_trajs> --num_val_steps_viz <num_val_steps>--env: Specifies the environment for which the data will be visualized.
--data_dir: The directory where the data for visualization is located. This should match the folder where the data was saved, such as deepcubeai/data/<env_data_dir>/offline. If not specified, the environment name <environment> will be used.
--data_file_name: The name of the data file to visualize. The data used will be deepcubeai/data/<env_data_dir>/offline/<data_file_name>_train_data.pkl and deepcubeai/data/<env_data_dir>/offline/<data_file_name>_val_data.pkl. If not specified, the default is train_data and val_data. If <data_file_name> does not contain train_data, _train_data will be appended. The same logic applies to validation data with val_data.
--num_train_trajs_viz: The number of training trajectories to visualize. Default is 8.
--num_train_steps_viz: The number of steps per training trajectory to visualize. Default is 2.
--num_val_trajs_viz: The number of validation trajectories to visualize. Default is 8.
--num_val_steps_viz: The number of steps per validation trajectory to visualize. Default is 2.
For running the code directly from the repository, first follow the steps 1 to 4 in the Using the Repository Directly section to set up the environment. Then, you can run the code using the following command structure:
- Run the code using the
deepcubeai.shscript:
sh deepcubeai.sh --stage <stage_name> --env <environment> [arguments]Replace <environment> with one of: cube3, sokoban, iceslider, or digitjump. Replace [arguments] with the specific arguments for the stage you are running. For example, to generate offline data for the Sokoban environment, you can run the following command:
sh deepcubeai.sh --stage gen_offline --env sokoban --data_dir sokoban --data_file_name 10k_stp30 --num_offline_steps 30 --num_train_eps 9000 --num_val_eps 1000 --num_cpus 4Other stages can be run in a similar manner by replacing the stage name and arguments accordingly. Refer to section Running the pip package for detailed instructions on each stage.
After installing the package using pip, you can use the package in your Python code. Below are two examples of how to use the package in your Python code.
Example 1: Using the functions of the package to generate offline data for the environment.
import argparse
from deepcubeai.scripts import generate_offline_data

def parse_arguments():
    parser = argparse.ArgumentParser(description="Generate offline data for DeepCubeAI")
    parser.add_argument("--env", type=str, required=True, help="Environment")
    parser.add_argument("--num_episodes", type=int, required=True, help="Number of episodes")
    parser.add_argument("--num_steps", type=int, required=True, help="Number of steps per episode")
    parser.add_argument("--data_file", type=str, required=True, help="Directory to save files")
    parser.add_argument("--num_procs", type=int, default=1, help="Number of processors")
    parser.add_argument("--start_level", type=int, default=-1, help="The seed for the starting level")
    parser.add_argument("--num_levels", type=int, default=-1, help="Number of levels to get the data from")
    return parser.parse_args()


def run_data_generation():
    args = parse_arguments()

    env = generate_offline_data.initialize_environment(args.env)

    state_trajs, action_trajs = generate_offline_data.generate_episodes(
        env, args.num_episodes, args.num_steps, args.start_level, args.num_levels)

    ctx = generate_offline_data.get_context("spawn")
    state_traj_queue = ctx.Queue()
    state_img_traj_queue = ctx.Queue()

    procs = generate_offline_data.start_image_processes(args.num_procs, args.env, state_traj_queue,
                                                        state_img_traj_queue)
    generate_offline_data.put_data_to_queues(state_trajs, action_trajs, state_traj_queue)
    state_img_trajs, action_trajs = generate_offline_data.get_images(args.num_episodes,
                                                                     state_img_traj_queue,
                                                                     state_trajs)
    generate_offline_data.stop_processes(args.num_procs, state_traj_queue, procs)

    generate_offline_data.save_data(args.data_file, state_img_trajs, action_trajs)

    print("Data generation complete!")


if __name__ == "__main__":
    run_data_generation()
Example 2: Using the default main function of the package to generate offline data for the environment.
import os
import sys

from deepcubeai.scripts import generate_offline_data

def generate_data(env_name: str, num_episodes: int, num_steps: int, data_file: str,
                  num_procs: int = 1, start_level: int = -1, num_levels: int = -1):
    # Set up the arguments for the generate_offline_data script
    args = [
        '--env', env_name,
        '--num_episodes', str(num_episodes),
        '--num_steps', str(num_steps),
        '--data_file', data_file,
        '--num_procs', str(num_procs),
        '--start_level', str(start_level),
        '--num_levels', str(num_levels)
    ]

    sys.argv = ['generate_offline_data.py'] + args
    generate_offline_data.main()


# Example usage
if __name__ == "__main__":
    env_name = "cube3"
    num_episodes = 1000
    num_steps = 30
    data_file = "output/data.pkl"
    num_procs = 4

    output_dir = os.path.dirname(data_file)
    os.makedirs(output_dir, exist_ok=True)

    generate_data(
      env_name=env_name,
      num_episodes=num_episodes,
      num_steps=num_steps,
      data_file=data_file,
      num_procs=num_procs
    )

print(f"Data generation completed. The output is saved to: {data_file}")The pip package can be used to reproduce the results from the paper. The reproduce_results/run_package folder contain example scripts to run the code for each environment. You can use these scripts to reproduce the results from the paper. The scripts are organized by environment and contain the necessary commands to run the code for each environment.
The reproduce_results/run_directly folder contains scripts to run the code. You can use these scripts to reproduce the results from the paper. The scripts are organized by environment and contain the necessary commands to run the code for each environment. You can run these scripts directly from the repository to reproduce the results. You can also modify the scripts to run the specific stages with your desired parameters.
Below are the instructions for running the scripts to reproduce the results.
Do the steps 1 to 4 from the section Using the Repository Directly. Then follow the steps below:
- Change to the
reproduce_resultsdirectory:
cd reproduce_results- Run the script for the environment you want to reproduce the results for.
sh reproduce_<environment>.shFor example, to reproduce the results for the Sokoban environment, you can run the following command:
sh reproduce_sokoban.shThe job_submissions folder contains example scripts to submit jobs to a SLURM cluster. You can use these scripts to submit jobs to a SLURM cluster to reproduce the results from the paper. The scripts are organized by environment and contain the necessary commands to submit jobs for each environment.
First, you need to modify the scripts to match your cluster configuration. You can change the number of nodes, CPUs, GPUs, memory, and other parameters according to your cluster setup. You can also modify the scripts to run the specific stages with your desired parameters.
First, do the steps 1 to 4 from the section Running the Code Directly from the Repository.
Once you have the Conda environment ready, and modified the scripts to match your cluster configuration, you can submit the jobs to the SLURM cluster using the following commands:
- Change to the
job_submissionsdirectory:
cd job_submissions- Submit the job for the environment you want to reproduce the results for:
sbatch submit_<environment>.shReplace <environment> with the environment you want to reproduce the results for. For example, to submit a job for the Sokoban environment, you can run the following command:
cd job_submissions
sbatch submit_sokoban.sh
Note
Make sure to modify the scripts to match your cluster configuration before submitting the jobs.
The scripts for running the heuristic training stage using Distributed Data Parallel (DDP) on a SLURM cluster are also provided in the job_submissions folder. The scripts submit_<environment>_ddp_heur.sh are for running the training in a multi-node multi-GPU setup. You can modify these scripts to match your cluster configuration and submit the jobs to the SLURM cluster.
Important
Since we use the learned world model with hindsight experience replay (HER) for generating the training data for the Deep Q-Network, the data generation process is parallelized across available GPUs. However, the DDP training paradigm used in this implementation has an overhead in broadcasting/scattering the data across nodes after the data is generated in each iteration, and we want to train the heuristic network on the data generated. Therefore, if you are using a single-node multi-GPU setup, we recommend using the scripts without the _ddp_heur suffix, where the data generation and training is done using DataParallel on a single node.
- Environment Variables: Ensure that necessary environment variables are correctly set. If not already set, the script will attempt to configure them based on SLURM job information or fall back to single GPU mode.
- SLURM Configuration: Confirm that SLURM variables (
SLURM_JOB_NODELIST,SLURM_JOB_NUM_NODES,SLURM_JOB_GPUS) are correctly configured if using a SLURM-managed cluster. The script will automatically set up MPI for distributed training if these variables are present (if the required variables have not been set manually). - Note that if the necessary configuration for distributed training is not met or is incorrect, the script will fall back to the DataParallel training mode and only use the available GPUs on a single.
-
MASTER_ADDR- Description: The IP address or hostname of the master node.
- Valid Formats: String name or IP address format
- Example:
192.168.1.1
-
MASTER_PORT- Description: The port number on the master node used for communication.
- Valid Formats: Numeric value
- Example:
29500
-
H_OPTION- Description: The
-Hoption string formpirun, defining nodes and workers. Format isnode1:num_workers,node2:num_workers,... - Valid Formats:
node1:4,node2:4 - Example:
node1:4,node2:4
- Description: The
-
NP_OPTION- Description: The
-npoption formpirundefining the total number of workers. - Valid Formats: Numeric value
- Example:
8
- Description: The
If the above environment variables are not set, the script will attempt to configure them based on SLURM job information, if available. The following SLURM variables are used for setting up the MPI environment:
-
SLURM_JOB_NODELIST- Description: The list of nodes allocated for the job.
- Valid Formats: Comma-separated node names.
- Example:
node1,node2
-
SLURM_JOB_NUM_NODES- Description: The total number of nodes allocated for the job.
- Valid Formats: Numeric value
- Example:
2
-
SLURM_JOB_GPUS- Description: The GPUs allocated per node, typically a comma-separated list of GPU indices.
- Valid Formats: Comma-separated GPU indices.
- Example:
0,1,2,3
As an example, if you are running a job on a SLURM cluster with 2 nodes, each with 4 GPUs, the environment variables should be set as follows:
export MASTER_ADDR=node1
export MASTER_PORT=29500
export H_OPTION=node1:4,node2:4
export NP_OPTION=8This implementation dynamically detects and loads environment classes from the deepcubeai/environments/ directory when needed. This allows easy integration of new environments. The code searches for environment classes in Python files in the mentioned directory and identifies them by their get_env_name method.
To add a new environment, follow these steps:
-
Create Environment Class: Create a new environment class in the file
deepcubeai/environments/<environment_name>.py. This class should inherit fromdeepcubeai.environments.environment_abstract.Environmentand implement all of its abstract methods, includingget_env_namethat returns the environment name as a string. -
Create State Class: Implement a state class inside the same file. This class should inherit from
deepcubeai.environments.environment_abstract.State, and implement all of its abstract methods with the same signature as the parent class. -
Automatic Detection: Once you have followed the above steps, the new environment will be automatically detected and available for use in the code. The return value of the
get_env_namemethod will be the value given to the--envargument when running the code.
For reference, check existing environments in the repository.
@article{agostinelli2024learning,
    title={Learning Discrete World Models for Heuristic Search},
    author={Agostinelli, Forest and Soltani, Misagh},
    journal={Reinforcement Learning Journal},
    volume={1},
    issue={1},
    year={2024}
}For any questions, suggestions, or feedback, please feel free to reach out to [email protected].