First Z Wave Flow Setup
This example will walk you through an initial set of flows, it is designed to show how the interface works and provide examples of each node type. The starting point is to have Node-RED and node-red-contrib-zwave-js installed on your system. Please see our Getting Started for help with the install process.
This page has a walk-through for:
-
zwave-jscontroller node setup - Using the UI to include a device
- Adding a
zwave-devicenode - Creating a "Binary Switch"
event-filternode - Creating a "Binary Switch"
cmd-factorynode - Copyable flow
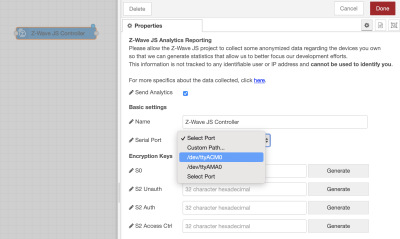
The first thing which must be added is a Controller Node - this is where the USB port is selected pointing to your Z-Wave radio. Selecting a controller is the only required field, for a Raspberry Pi the serial port is usually /dev/ttyACM0 - simply select this, deploy, and you'll be ready for the next steps!
Hint: you will know the controller properly connected when the node's status turns to green and says "All nodes ready."
Once your Z-Wave JS Controller node is set up and deployed, the next place you'll want to go is to the User Interface (UI) panel. The UI is where all of the Z-Wave specific things are handled including, including/excluding devices, network healing, firmware updates, and device setup. The UI is meant to aid in the Z-Wave setup process; it is not meant to be a normal place to go for simply controlling devices.
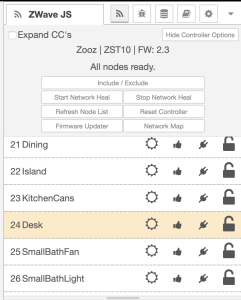
The top half of the UI is all about your controller. Since this is about basics, simply click "Show Controller Options" then "Include/Exclude" to begin the process of adding your first device. Follow the on-screen instructions to add your device, use your preferred security settings or simply "no security" to get going quickly.
The bottom half of the UI is all about the device currently selected in the top half. This is where you should give your device a name (and optional location). Additionally the device-specific config is available along with the ability to control your device manually.
The purpose of the UI is for testing and configuration. You can read more about it here.
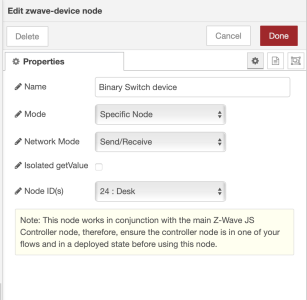
The zwave-device node is a way to choose a set of one or more devices where you will send or receive messages. For this example we will point it a single device with a "Binary Switch" feature (an on/off device).
For now, simply drag in the node and set it up with these settings:
Mode:         Specific Node
Network Mode: Send/Receive
Node ID(s):   <choose your device from the drop-down>
More details about device node and what it can do can be found here.
The event-filter node is used to filter and sort the various messages which may be set by a Z-Wave device. The zwave-device node will send all messages from the device, but if you are setting up an on/off switch you probably do not care what the devices LED indicator light settings are... This example is for a "Binary Switch" device.
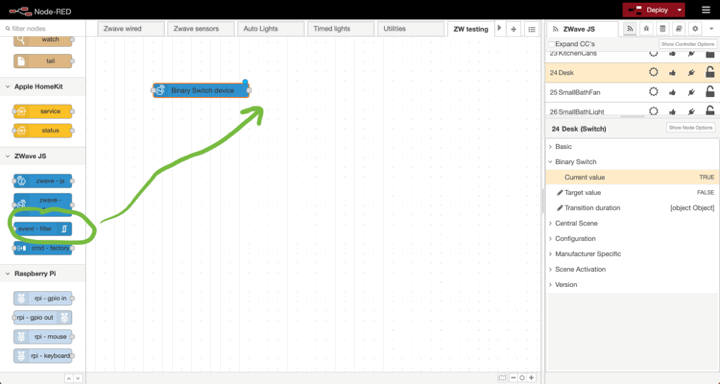
- Add the
event-filterto your flow and double click to edit it - Click "Add Filter Set" to insert your first filter
- Select the newly added filter set and give it a name
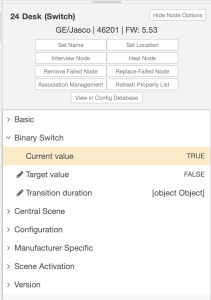
- In the UI panel, find "Current value" under "Binary Switch" - and double click on that item
- There will be a pop-up showing the Value ID for "Current Value"
- Click the "Add To Filter Set" button
The Value ID should now show in your filter set! Your filter is set now to pass through only "VALUE_UPDATED" messages when the current value of the binary switch is updated. This process can be repeated for more Value IDs from the UI, or additional filter sets can be created. It is a very powerful node - try a couple of examples by following the gif above. Once you are ready for the next level, please click here for more details about these filters.
The final step is to create a command which is sent to your Z-Wave device. The commands going into the Z-Wave nodes must be very specific JSON commands but never fear, the command factory is here! The command factory is designed to create these messages for you with using JSONata expressions. The command factory is very powerful so we are doing only a basic example on this page, please click here for the more advanced instructions about command factories.
For this example, we will simply be sending a msg.payload containing either true or false into the cmd-factory node. The JSONata expression for the "Params" field will insert the true or false into the proper array format for the Binary Switch command class. Set up your node as shown here and you should be ready to test!

Everything (except the controller) we discussed above is available here as a quick copy-paste flow for you to test. The controller is not included because it should only be added one time. After importing this flow you will need to point the node titled "Binary Switch device" to the device you'd like to test, it probably won't match Node=24 like I'm using.
[{"id":"2661a846e7176226","type":"zwave-device","z":"4c708fa6.65fbd","name":"Binary Switch device","filteredNodeId":"24","multicast":false,"datamode":"Send/Receive","messagesPerMS":1,"messageInterval":250,"isolated":false,"outputs":1,"inputs":1,"x":400,"y":1480,"wires":[["e8af12028d20af28"]]},{"id":"e8af12028d20af28","type":"event-filter","z":"4c708fa6.65fbd","name":"Binary Switch","filters":[{"index":0,"name":"Binary Switch","valueIds":[{"commandClassName":"Binary Switch","commandClass":37,"endpoint":0,"property":"currentValue","propertyName":"currentValue"}],"events":["VALUE_UPDATED"],"strict":false,"id":"19584"}],"outputs":1,"changeDate":"2021-10-09T17:37:06.286Z","x":460,"y":1540,"wires":[["455c1001496420c1"]]},{"id":"455c1001496420c1","type":"debug","z":"4c708fa6.65fbd","name":"","active":true,"tosidebar":true,"console":false,"tostatus":false,"complete":"false","statusVal":"","statusType":"auto","x":670,"y":1540,"wires":[]},{"id":"63f2b07f0fab34c1","type":"cmd-factory","z":"4c708fa6.65fbd","name":"ZWave CMD Factory","node":"","endpoint":"0","cc":"Binary Switch","method":"set","params":"[payload]","noEvent":false,"forceUpdate":"","api":"CCAPI","vapiMode":"setValue","vapiValue":"payload","vapiValueId":"valueId","vapiOptions":"options","x":360,"y":1420,"wires":[["2661a846e7176226"]]},{"id":"73582fc733c3efe7","type":"inject","z":"4c708fa6.65fbd","name":"","props":[{"p":"payload"}],"repeat":"","crontab":"","once":false,"onceDelay":0.1,"topic":"","payload":"true","payloadType":"bool","x":150,"y":1400,"wires":[["63f2b07f0fab34c1"]]},{"id":"776da38994171399","type":"inject","z":"4c708fa6.65fbd","name":"","props":[{"p":"payload"}],"repeat":"","crontab":"","once":false,"onceDelay":0.1,"topic":"","payload":"false","payloadType":"bool","x":150,"y":1440,"wires":[["63f2b07f0fab34c1"]]}]