Quick Start
Welcome to the Cloudberry tutorial!
In this tutorial, you'll do the following steps:
- Setup your machine
- Start AsterixDB, Cloudberry and Twittermap
- Test Twittermap Application and visualize Tweets
- Send example queries to Cloudberry RESTFul API
The following diagram illustrates the Twittermap architecture
- Linux or Mac
- At least 4GB memory
- (if using Virtual Machine) At least 2 CPUs
Follow these instructions to install Java 8 and sbt-0.13.
-
Please make sure
Java version is 8andsbt version is 0.13- Example way to install
sbt-0.13throughHomebrew:brew install [email protected]
- Example way to install
mkdir ~/quick-start
cd ~/quick-startwget --no-check-certificate http://cloudberry.ics.uci.edu/img/asterix-server-0.9.5-SNAPSHOT-binary-assembly.zipunzip asterix-server-0.9.5-SNAPSHOT-binary-assembly.zipcd apache-asterixdb-0.9.5-SNAPSHOT/opt/local/bin/./start-sample-cluster.sh Wait until you see the following messages:
CLUSTERDIR=/home/x/apache-asterixdb-0.9.5-SNAPSHOT/opt/local
INSTALLDIR=/home/x/apache-asterixdb-0.9.5-SNAPSHOT/
LOGSDIR=/home/x/apache-asterixdb-0.9.5-SNAPSHOT/opt/local/logs

Using Java version: 1.8.0_XX
INFO: Starting sample cluster...
Using Java version: 1.8.0_XX
INFO: Waiting up to 30 seconds for cluster 127.0.0.1:19002 to be available.
INFO: Cluster started and is ACTIVE.
Step 1.6: Open the AsterixDB Web interface at http://localhost:19001 and issue the following query to see the AsterixDB instance is running.
select * from Metadata.`Dataverse`;{ "Dataverse": { "DataverseName": "Default", "DataFormat": "org.apache.asterix.runtime.formats.NonTaggedDataFormat", "Timestamp": "Wed Mar 07 16:13:37 PST 2018", "PendingOp":0}}
{ "Dataverse": { "DataverseName": "Metadata", "DataFormat": "org.apache.asterix.runtime.formats.NonTaggedDataFormat", "Timestamp": "Wed Mar 07 16:13:37 PST 2018", "PendingOp":0}}cd ~/quick-start
git clone https://github.com/ISG-ICS/cloudberry.gitcd ~/quick-start/cloudberry/cloudberry
sbt compile
sbt "project neo" "run"Note: if you see errors like the following:
[ERROR] Failed to construct terminal; falling back to unsupported
java.lang.NumberFormatException: For input string: "0x100"
	at java.lang.NumberFormatException.forInputString(NumberFormatException.java:65)
	at java.lang.Integer.parseInt(Integer.java:580)
	at java.lang.Integer.valueOf(Integer.java:766)
	... ...
it’s due to the compatibility of some versions of
sbt, do the following:Add
export TERM=xterm-colorto the top of/usr/share/sbt/bin/sbt.Now the errors above should be gone. And you can continue this guide. If this doesn’t solve the above errors, please refer to this discussion to try other solutions
Wait until the shell prints the messages shown as following:
[info] Loading global plugins from /Users/white/.sbt/0.13/plugins
[info] Loading project definition from /Users/white/cloudberry/cloudberry/project
[info] Set current project to cloudberry (in build file:/Users/white/cloudberry/cloudberry/)
[info] Set current project to neo (in build file:/Users/white/cloudberry/cloudberry/)

--- (Running the application, auto-reloading is enabled) ---

[info] p.c.s.NettyServer - Listening for HTTP on /0:0:0:0:0:0:0:0:9000

(Server started, use Ctrl+D to stop and go back to the console...)(1) Download the synthetic sample tweets (about 100K) data:
cd ~/quick-start/cloudberry/examples/twittermap/script/
wget --no-check-certificate http://cloudberry.ics.uci.edu/img/sample.adm.gz
(2) Ingest the data into AsterixDB.
cd ~/quick-start/cloudberry/examples/twittermap/
./script/ingestAllTwitterToLocalCluster.sh
When it finishes you should see the messages shown as following:
Socket 127.0.0.1:10005 - # of ingested records: 260000
Socket 127.0.0.1:10005 - # of total ingested records: 268497
>>> # of ingested records: 268497 Elapsed (s) : 2 (m) : 0 record/sec : 134248.5
>>> An ingestion process is done.
[success] Total time: 3 s, completed Nov 19, 2018 8:44:51 PM
Ingested city population dataset.sbt "project web" "run 9001"Wait until the shell prints the messages shown as following:
[info] Loading global plugins from /Users/white/.sbt/0.13/plugins
...
--- (Running the application, auto-reloading is enabled) ---
[info] p.c.s.NettyServer - Listening for HTTP on /0:0:0:0:0:0:0:0:9001
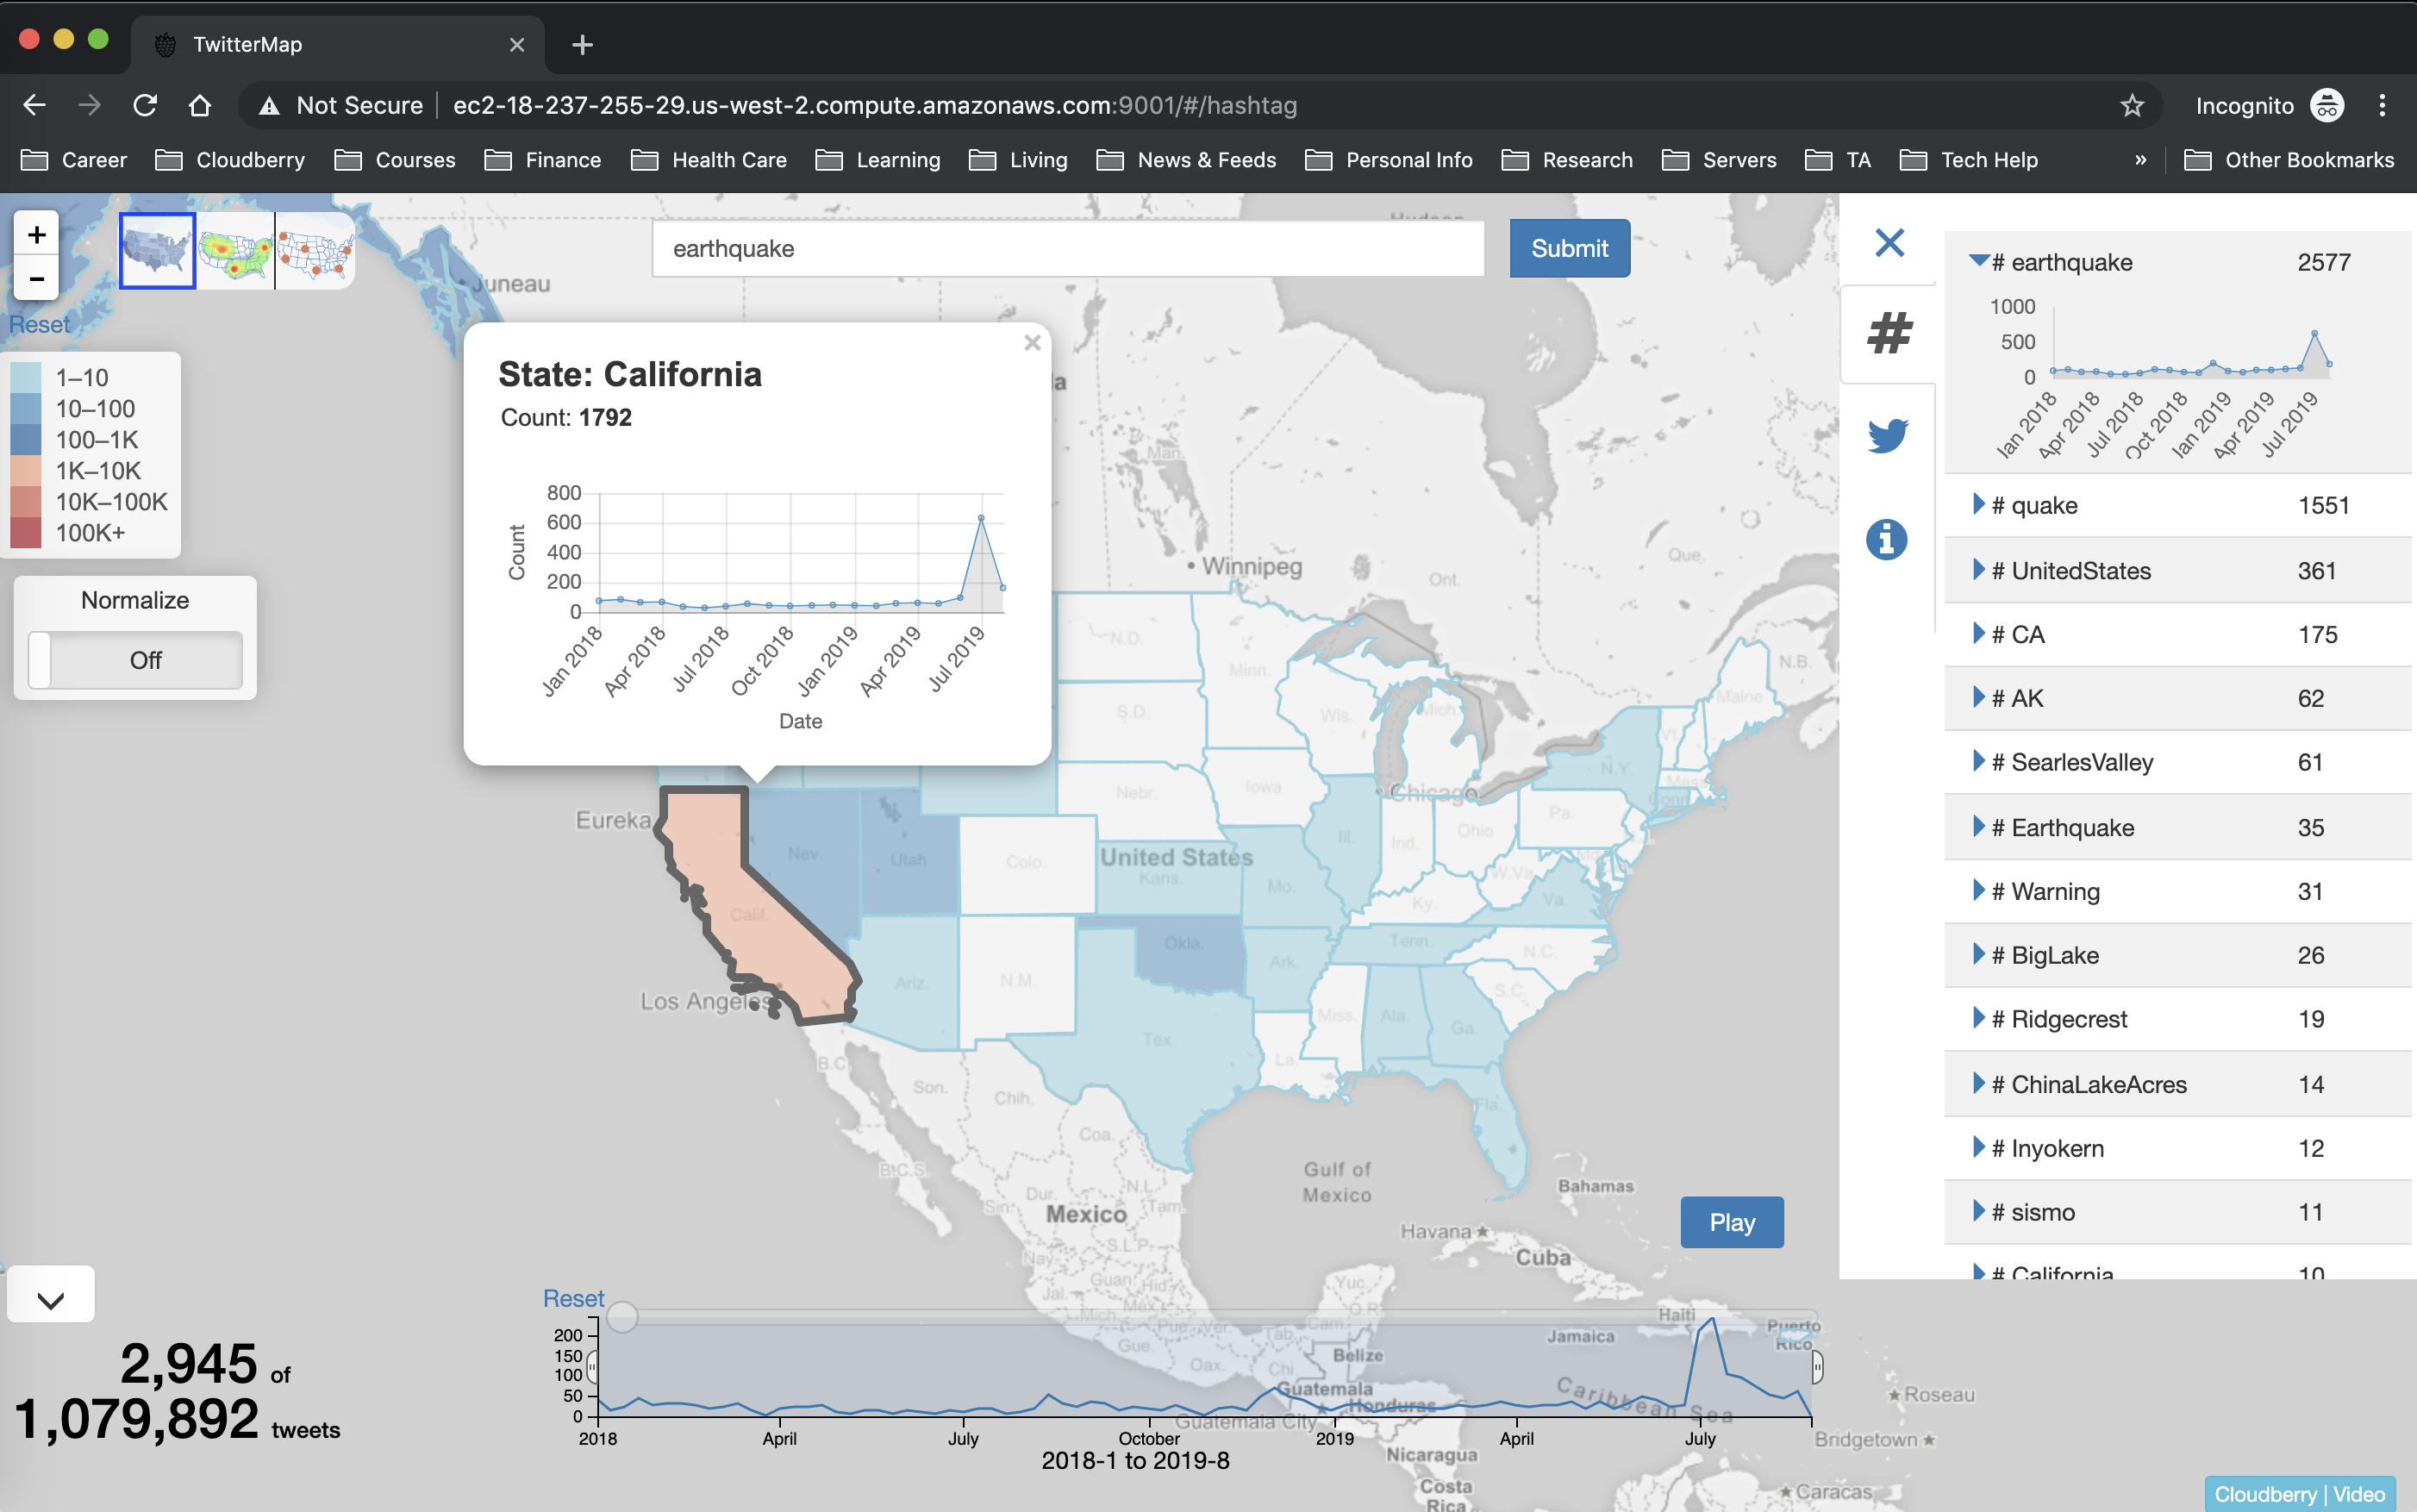
(Server started, use Ctrl+D to stop and go back to the console...)Step 2.5: Open a browser to access http://localhost:9001 to see the TwitterMap frontend. The first time you open the page, it could take up to several minutes (depending on your machine’s speed) to show the following Web page:
(Note: Firefox users have to go to about:config and change privacy.trackingprotection.enabled to false)

Congratulations! You have successfully set up TwitterMap using Cloudberry and AsterixDB!
~/quick-start/apache-asterixdb-0.9.5-SNAPSHOT/opt/local/bin/start-sample-cluster.sh
~/quick-start/apache-asterixdb-0.9.5-SNAPSHOT/opt/local/bin/stop-sample-cluster.shthen follow the steps to launch an instance from the image.
! Note: please use ec2-user as the username to connect to the instance.
- 8GB memory
- 2 vCPUs
- OS: Amazon Linux
- Installed Software:
- Java 8 SDK
- sbt 0.13 (Scala building tool)
- AsterixDB
cd apache-asterixdb-0.9.5-SNAPSHOT/opt/local/bin/
./start-sample-cluster.shcd ~/cloudberry/cloudberrysbt "project neo" "run"Wait until you see the following messages:
[info] Loading project definition from /home/cloudberry/cloudberry/cloudberry/project
[info] Set current project to cloudberry (in build file:/home/cloudberry/cloudberry/cloudberry/)
[info] Set current project to neo (in build file:/home/cloudberry/cloudberry/cloudberry/)

--- (Running the application, auto-reloading is enabled) ---

[info] p.c.s.NettyServer - Listening for HTTP on /0:0:0:0:0:0:0:0:9000

(Server started, use Ctrl+D to stop and go back to the console...)cd ~/cloudberry/examples/twittermapsbt "project web" "run 9001"Wait until the shell prints the following messages:
--- (Running the application, auto-reloading is enabled) ---

[info] p.c.s.NettyServer - Listening for HTTP on /0:0:0:0:0:0:0:0:9001
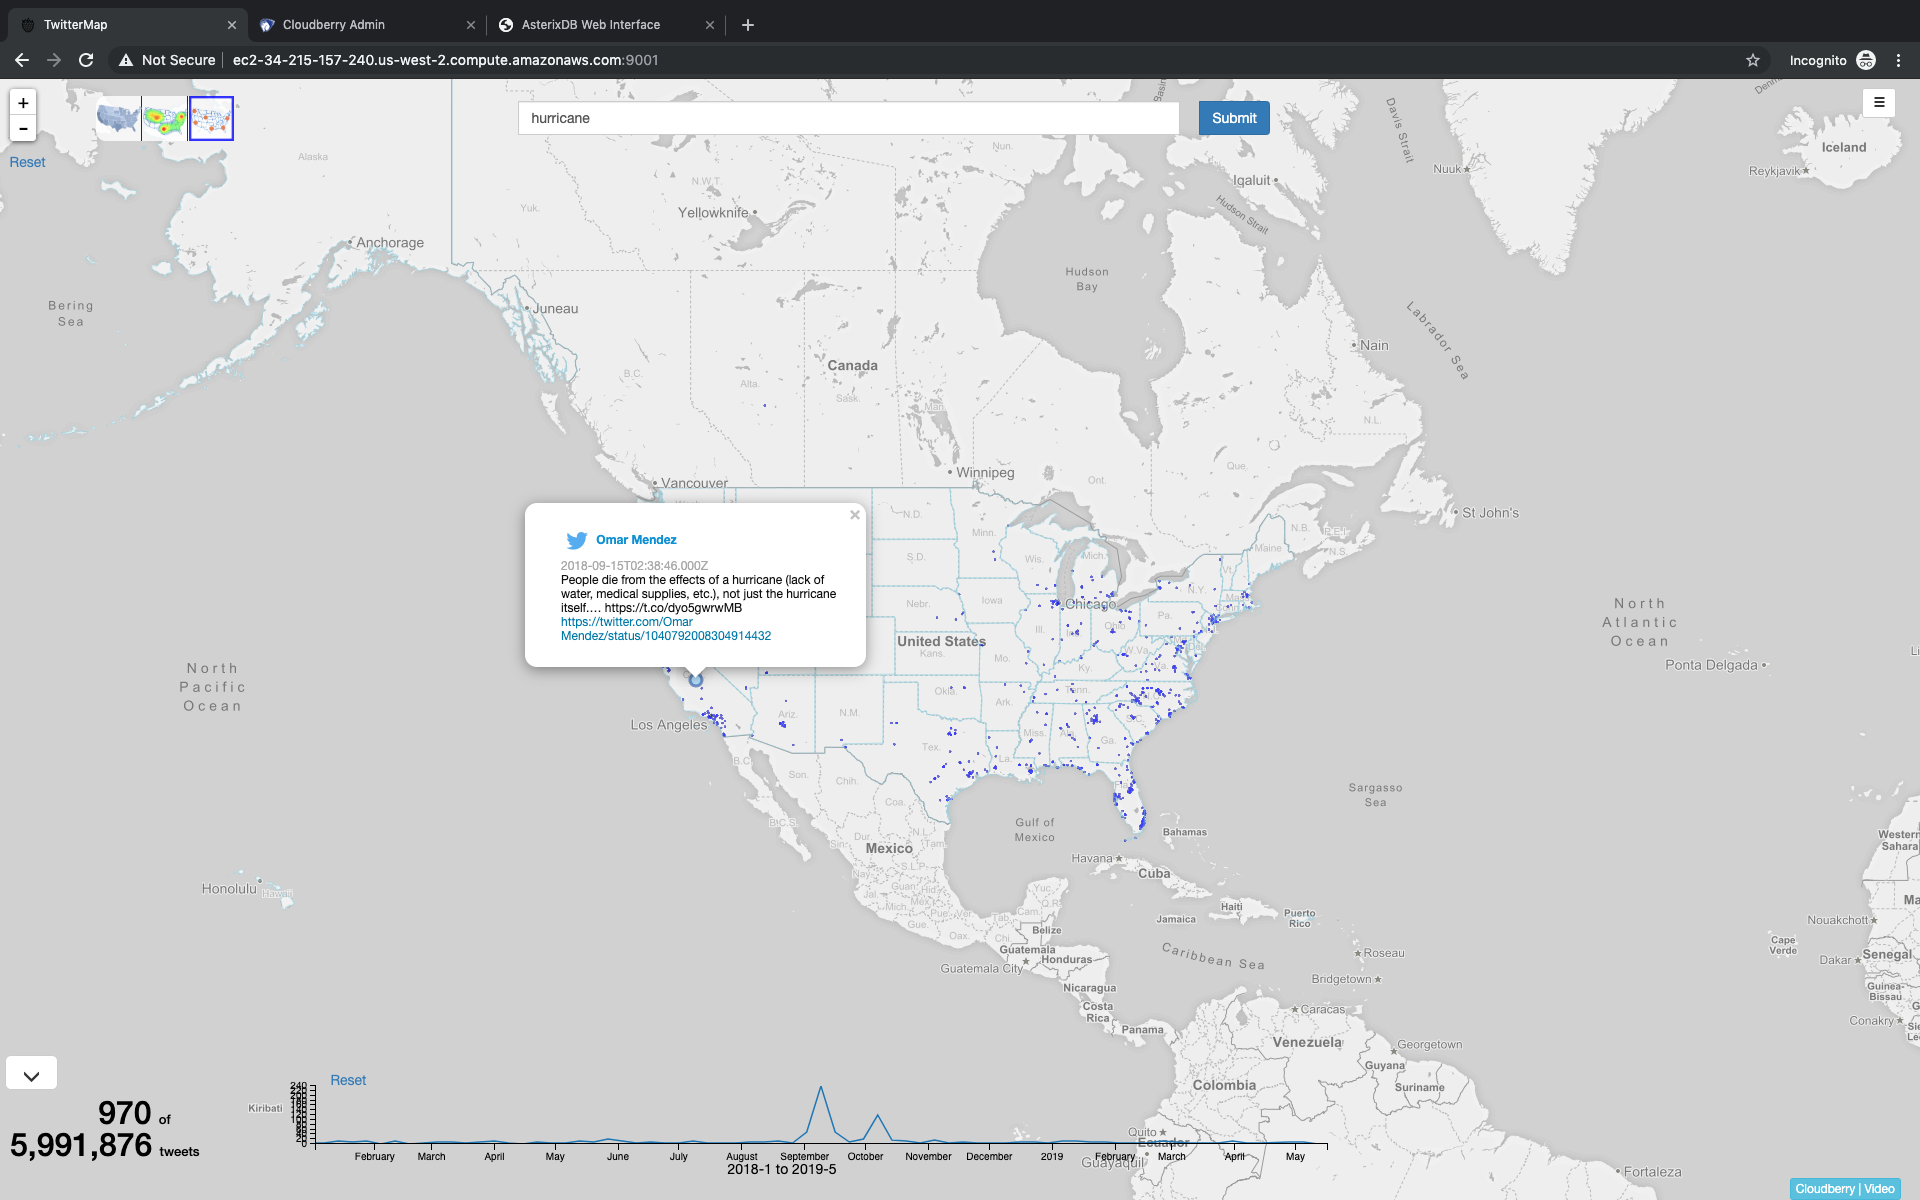
(Server started, use Ctrl+D to stop and go back to the console...)Use your Web browser to open the link http://[your aws ip]:9001. The first time you open the page, it could take up to several minutes to show the following Web page.
(Note: Firefox users need to go to about:config and change privacy.trackingprotection.enabled to false and restart Firefox.)
Congratulations! You have successfully set up TwitterMap using Cloudberry and AsterixDB!
ATTENTION! To see the power of Cloudberry, don't issue new queries or different keywords during the workshop to later see how DRUM works
Type the keyword hurricane in the input box and press enter.
Explore all the three maps from the upper left corner.
Access http://[your aws ip]:9000 to check the schema of the datasets in Cloudberry.
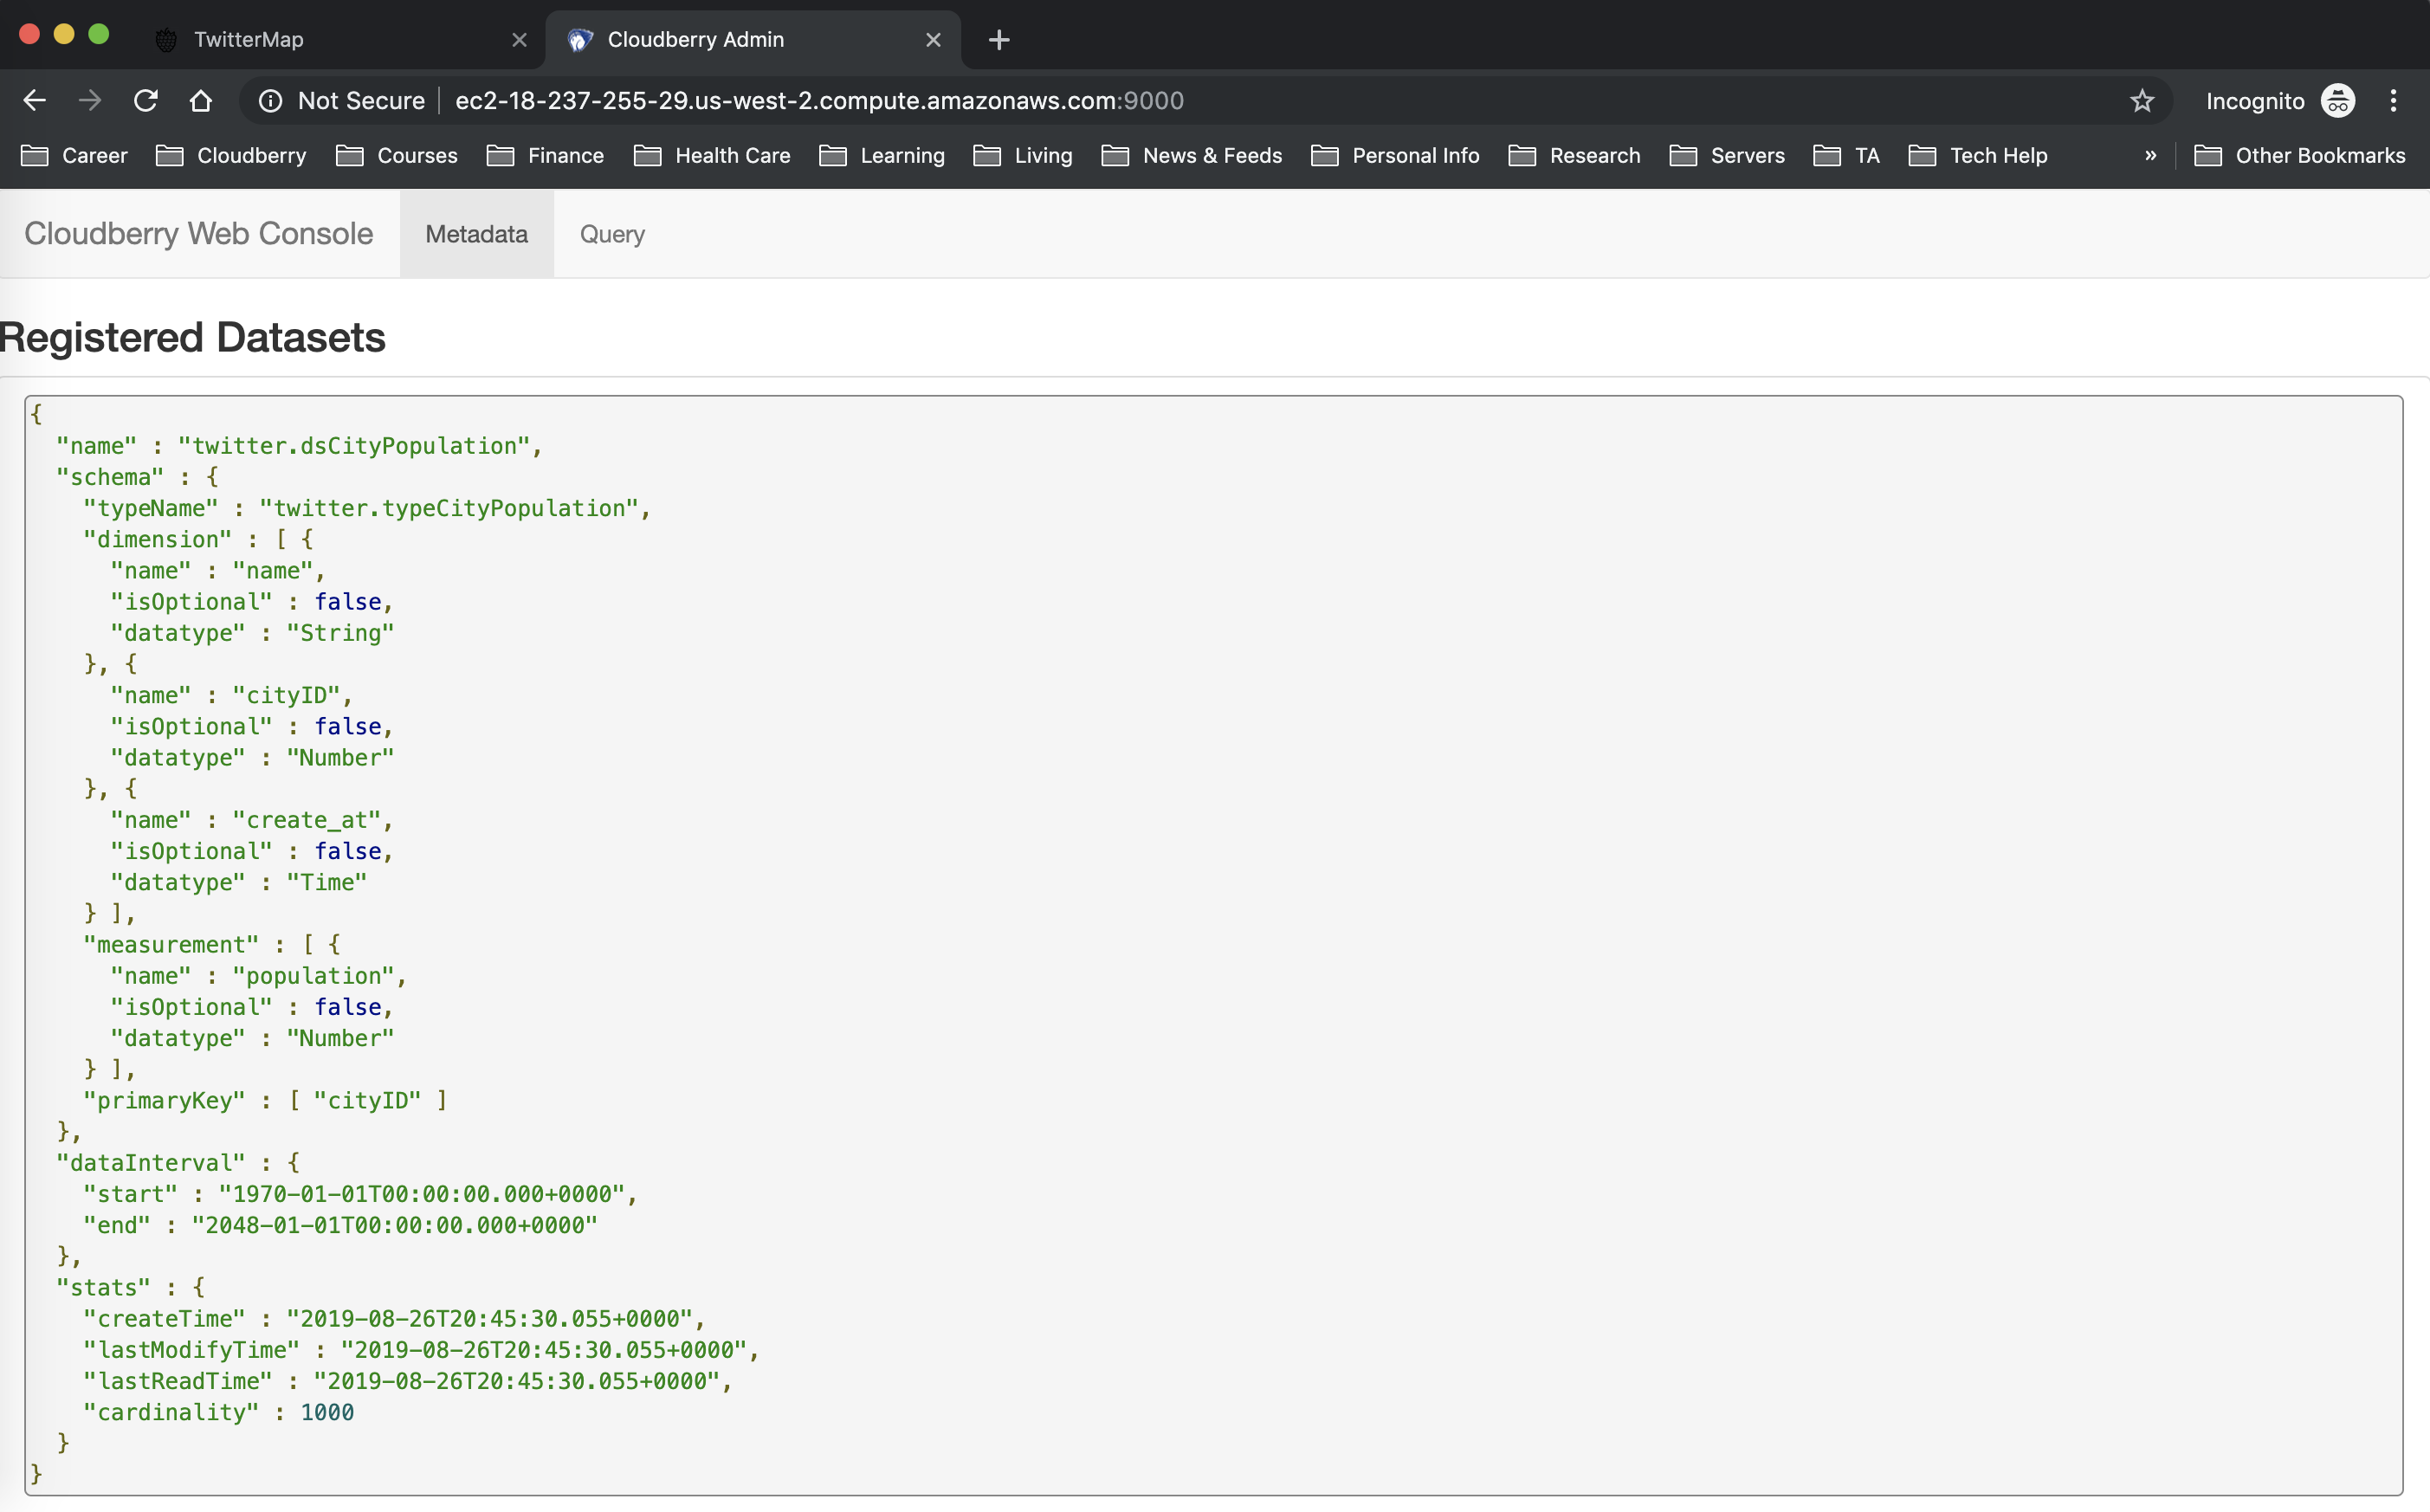
The below json object describes the schema used in the TwitterMap application, which is already registered in Cloudberry:
{
  "name":"twitter.ds_tweet",
  "schema":{
    ...
    "dimension":[
      {"name":"create_at","isOptional":false,"datatype":"Time"},
      {"name":"id","isOptional":false,"datatype":"Number"},
      {"name":"coordinate","isOptional":false,"datatype":"Point"},
      {"name":"hashtags","isOptional":true,"datatype":"Bag","innerType":"String"},
      {"name":"geo_tag.stateID","isOptional":false,"datatype":"Number"},
      {"name":"geo_tag.countyID","isOptional":false,"datatype":"Number"},
      {"name":"geo_tag.cityID","isOptional":false,"datatype":"Number"},
      ...
    ],
    "measurement":[
      {"name":"text","isOptional":false,"datatype":"Text"},
      ...
    ],
    ...
  }
}Access http://[your aws ip]:19001 to check the metadata table used by Cloudberry inside AsterixDB. Copy the following query to the Query box, and click the Run button.
select name as `viewName`, createQuery.`filter`[0] as `filter` from berry.meta where createQuery is not unknown;The result should include all the materialized views and their filtering conditions as follows.
{ "viewName": "twitter.ds_tweet_c5285abd05d46a954151ddf9b8128114", "filter": { "field": "text", "relation": "contains", "values": [ "hurricane" ] } }
...
Note: as we send more queries, more datasets (ds_tweet_[hash value]) are created as materialized views.
A request to the Cloudberry RESTful API is represented as a json object.
You can use the Web console by accessing http://[your aws ip]:9000 -> query tab, copy a json request to the Query box, and click the Submit button.
Return per-state count of tweets containing the keyword happy
Use Case in Twittermap: choropleth map
{
  "dataset": "twitter.ds_tweet",
  "filter": [
    {
      "field": "text",
      "relation": "contains",
      "values": ["happy"]
    }
  ],
  "group": {
    "by": [
        {
          "field": "geo_tag.stateID",
          "as": "state"
        }
      ],
    "aggregate": [
      {
        "field": "*",
        "apply": {
          "name": "count"
        },
        "as": "count"
      }
      ]
  }
}
Pay attention to the query time when there is no view on happy keyword.
Repeat step 2 and see the newly added view on happy
Query the same keyword and add one more condition
{
  "dataset": "twitter.ds_tweet",
  "filter": [
      {
      "field": "create_at",
      "relation": "inRange",
      "values": ["2018-01-01T00:00:00.000Z", "2019-06-30T00:00:00.000Z"]
      },
      {
      "field": "text",
      "relation": "contains",
      "values": ["happy"]
    }
  ],
  "group": {
    "by": [
        {
          "field": "geo_tag.stateID",
          "as": "state"
        }
      ],
    "aggregate": [
      {
        "field": "*",
        "apply": {
          "name": "count"
        },
        "as": "count"
      }
      ]
  }
}
Notice how the second query is much faster due to using the view.
- Return per-state count of tweets containing the keyword
love.
{
  "dataset": "twitter.ds_tweet",
  "filter": [
    {
      "field": "text",
      "relation": "contains",
      "values": ["love"]
    }
  ],
  "group": {
    "by": [
        {
          "field": "geo_tag.stateID",
          "as": "state"
        }
      ],
    "aggregate": [
      {
        "field": "*",
        "apply": {
          "name": "count"
        },
        "as": "count"
      }
    ]
  }
}
If no materialized view is available for a popular keyword, the query could take a long time. We will next show how to address this long-latency issue.
Drum is a technique to support progressive results in batches. The following is an example query:
- Return per-state count of tweets containing the keyword
job. - Optionally return the results progressively with an interval of 2s.
{
  "dataset": "twitter.ds_tweet",
  "filter": [
    {
      "field": "text",
      "relation": "contains",
      "values": ["job"]
    }
  ],
  "group": {
    "by": [
        {
          "field": "geo_tag.stateID",
          "as": "state"
        }
      ],
    "aggregate": [
      {
        "field": "*",
        "apply": {
          "name": "count"
        },
        "as": "count"
      }
    ]
  },
  "select" : {
    "order" : ["-count"],
    "limit": 100,
    "offset" : 0
  },
  "option":{
   "sliceMillis": 2000
  }
}
Notice how the results are returned in batches. Also notice the results of the last batch include the keyword "DONE" to indicate the full result returned. The response-time interval (called "rhythm") can be tuned in the SliceMillis option)
-
By default, Cloudberry returns the accumulated results progressively, i.e., the results returned in each batch are the entire aggregation numbers computed so far.
-
If you want the progressive results to only include those for each new batch, you can just add another entry into the
optionselement:returnDelta: true. -
Return per-state count of tweets containing the keyword
job -
Optionally return the results progressively with a time interval of 2 seconds in the
deltamode.
{
  "dataset": "twitter.ds_tweet",
  "filter": [
    {
      "field": "text",
      "relation": "contains",
      "values": ["job"]
    }
  ],
  "group": {
    "by": [
        {
          "field": "geo_tag.stateID",
          "as": "state"
        }
      ],
    "aggregate": [
      {
        "field": "*",
        "apply": {
          "name": "count"
        },
        "as": "count"
      }
    ]
  },
  "select" : {
    "order" : ["-count"],
    "limit": 100,
    "offset" : 0
  },
  "option":{
   "sliceMillis": 2000,
   "returnDelta": true
  }
}- Send the query again to see how the results are returned.
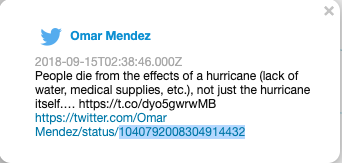
Return a tweet where the tweet's ID is equal to a specific value
- Use case in Twittermap
Hover over a tweet point on the scatterplot map:
- Copy the
idvalue from the hyperlink and paste to thevaluesentry in the following query
{
  "dataset": "twitter.ds_tweet",
  "filter": [{
    "field": "id",
    "relation": "=",
    "values": "1043629999599771648"
  }],
  "select" : {
    "order" : [],
    "limit": 1,
    "offset" : 0,
    "field": ["*"]
  }
}Return per-day count of tweets containing the keyword happy
**Use case in Twittermap: Timebar **

{
  "dataset": "twitter.ds_tweet",
  "filter": [
    {
      "field": "text",
      "relation": "contains",
      "values": ["happy"]
    }
  ],
  "group": {
    "by": [
        {
          "field": "create_at",
          "apply": {
            "name": "interval",
            "args": {
              "unit": "day"
            }
          },
          "as": "day"
        }
      ],
    "aggregate": [
      {
        "field": "*",
        "apply": {
          "name": "count"
        },
        "as": "count"
      }
      ]
  }
}For further information about how to use Cloudberry, please refer to the wiki pages.
cd /apache-asterixdb-0.9.5-SNAPSHOT/opt/local/bin
./stop-sample-cluster.sh
Wait until the cluster is stopped then start it again
./start-stample-cluster.sh